Scrapyard 80 Gallon RF build

  • Some of the links on this forum allow SMF, at no cost to you, to earn a small commission when you click through and make a purchase. Let me know if you have any questions about this.
SMF is reader-supported. When you buy through links on our site, we may earn an affiliate commission.

RastaPasta

Newbie
Original poster
Apr 4, 2022
15
20
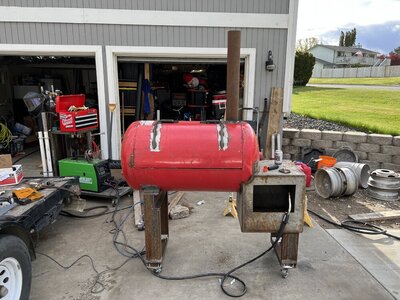
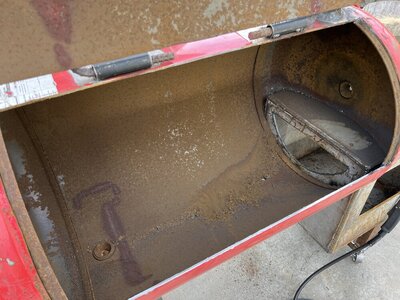
This is my first build…in fact, it’s my first time ever using a welder or cutting torch. It’s also built almost entirely from metal out of scrapyards…so you could say it has character hah. Been working on it for a couple weeks when I have time here or there, and finally got her looking more or less like an actual smoker, so I figure it’s time to share a bit. It was a great feeling cutting the final corner on the door and actually being able to see inside the CC proper for the first time.

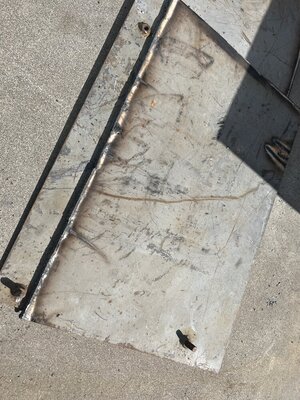
Lots of work to do still, biggest hurdle will be measuring, cutting, and installing the baffle plate with any sort of accuracy. Yikes!
 

Attachments

  • 97D4EAC2-3BE5-4CC3-8C55-6E522097A341.jpeg
    97D4EAC2-3BE5-4CC3-8C55-6E522097A341.jpeg
    191.1 KB · Views: 166
  • 8F918906-623D-46E0-BCA9-349217081C20.jpeg
    8F918906-623D-46E0-BCA9-349217081C20.jpeg
    173.5 KB · Views: 159
  • 47E26168-35AC-400B-9042-CB739C35A75C.jpeg
    47E26168-35AC-400B-9042-CB739C35A75C.jpeg
    243.8 KB · Views: 146
  • CFC766C2-3EBF-4FC6-8677-46A4193755BB.jpeg
    CFC766C2-3EBF-4FC6-8677-46A4193755BB.jpeg
    132.3 KB · Views: 154
Decided I didn’t like the rebar hinges, way too much slop and I couldn’t get any flange over the top side of the door, and I don’t want any smoke coming out anywhere but the chimney! So I tore them off and build some new hinges out of the same scrap channel iron I used on for the legs…I cut the web from the flange sections, and used piece of the flange for the supports and cut the hinge arms out of the web.
1AE6161F-07D5-4EBF-B47E-2A9BD2CEE994.jpeg


Then I installed this self latching latch idea I had…and it doesn’t work like I wanted. But I already know why, and will attack with plan B the next day I work on it. Then it started raining, so I had to pack up for the day. Dinner time anyway!
B7723A70-9EEF-4B2B-AAC8-A0CECCB58049.jpeg
20F43279-ABF0-40DD-9493-E03E73C0DFFA.jpeg
 
  • Like
Reactions: kawboy
Had a pretty productive couple days! Cut the firebox door bigger and welded the old door into the new door to make it one solid piece
CC179488-9A4F-46E1-814C-F9416EE72146.jpeg


Built and installed some hinges for the firebox door
F490CFDA-F087-42C8-B4BE-16B9F1228E62.jpeg

Got the baffle plate, grease dam, and bottom rack shelf all welded in
47483459-FF20-4D7D-BBB5-19E8D5019B3C.jpeg

Got my handle attachments fabbed and tacked to the door (using a sledge hammer handle for the handle itself). Not sure if I will keep these or modify to reduce the drop down to make a front shelf easier to install and use
86B5A84E-ED19-4369-A9BF-64C08FF0143F.jpeg

And, most excitingly, got my self catching hold open latch mocked up and working. Still need to refine it, but I’m stoked it works like I wanted!
F71CC4DA-32BC-4932-B4E6-2E402B5EDBCE.jpeg
 
Last edited:
  • Like
Reactions: 48°North
Here’s the hinges before cutting and grinding the top ridges off. Made from more flange sections off the scrap channel, 3/8” rod, and 1/2” tube (3/8” ID, perfect tight fit).
F0FA9FE8-F19E-4D52-AED4-181936CADCE6.jpeg

Despite the awesome death metal look, It was decided to chop the ridges off when my brother pointed out that if you got your fingers in between them when it opened, you were gunna lose the finger.

Also, these took forever to make because I grossly underestimated the precision required to get them to actually swing correctly without interfering with each other, so I spent lots and lots of time at the bench grinder making everything as square as physically possible.
 
Exciting day! Got my automatic hold-open latch locked on and polished up, works perfectly.
289F1D66-6679-427C-9165-A6E75A64755B.jpeg
7D777E19-5E50-43C9-BB19-12BDA1427D80.jpeg

Got my firebox air vents all cut and covered
BFE411F4-A281-4A57-A108-D893AA6C8FDF.jpeg

Firebox door latch finished
70D5C6E5-C8C8-40C8-A31B-082BF47F104A.jpeg
CFE6F70F-9006-4C56-94A6-E5510DA2B1DC.jpeg

And most exciting, did my burn off burn. She drafts real well! Tomorrow I’m installing the front shelf I built today, stripping all the paint, then hitting it with some high temp black spray paint. Then she’s making some ribs for some friends this weekend! Woo!
E7E0CA52-5645-43CF-828D-118A7297028E.jpeg
 
While doing my seasoning run, I had one probe on the bottom rack near the firebox and one on the top rack near the open end. I had expected temps to be fairly similar with such a heavy thick baffle plate (1/3” steel plate), but when I saw this it blew my mind! Bear in mind, temps weren’t always identical, but once everything was up and running and warmed up it was usually within 5 degrees
1C8E158A-3310-4858-AA2D-2EFC3DCD6EF5.jpeg


Seasoning went great, the entire inside of the smoker and the cooking grates are covered in a smooth, shiney, slippery black coating. Unfortunately the paint on top of the firebox didn’t live to see it all come to fruition. I did spill some oil on the spot where the bubbling and flaking first started, but it kept spreading throughout the 6-7 hours I ran it (I decided to make some smoked queso after the seasoning run…why burn all that wood and not cook something?). So I’m not sure if the oil had anything to do with the paint failing or not? Either way, I just knocked off whatever was loose and will run her as she is. I can always slap another coat on top of I feel like it later, or might just sand it all off the top and use some oil to season it and prevent any possibility of rust forming.
39D98DB3-8FAE-43F2-9470-3DB61DCE7890.jpeg


Today I’m doing up a rack of ribs and some beans!
 
Just a quick modification, was tired of messing with foil balls to try and keep my temp probes in place, so I drilled small holes in the vertical supports for the cook rack rails to hold the temp probes an inch or so above the racks. Drilled holes in the same spot on both racks, both left and right side, so it’ll be ways to track temps in all 4 corners of the smoker and I won’t have to worry about knocking probe over when sliding racks, having meat on top of the wires, any of that stuff!
DE96E61F-88B0-45B3-B12D-A09563648FE4.jpeg
 
SmokingMeatForums.com is reader supported and as an Amazon Associate, we may earn commissions from qualifying purchases.

Latest posts

Hot Threads

Clicky