MES Rewire Simple Guide - No Back Removal Needed!!!

  • Some of the links on this forum allow SMF, at no cost to you, to earn a small commission when you click through and make a purchase. Let me know if you have any questions about this.
SMF is reader-supported. When you buy through links on our site, we may earn an affiliate commission.
Ok, its my turn. I read thru this whole thread. I had read about these controllers before but was proactive. My last few smokes had horrible temp controls. Over shoot temps, undershoot temps, just temps all over the map and takes long time to correct. I was having temps swings of 30 degrees, at least according to the readout, who knows how accurate that is, but still all over the place. I bit the bullet and ordered an Auber Dual-Probe PID Controller for Bradley Smoker WSD 1220GPH. To be honest, I was just cruising the Auber site, saw this dual probe unit, saw that it was "preprogrammed" for a Bradley Smoker (how different can it be from a MES30). The two smokers appear to be equal in size so I figured why not. Did not now at the time that the Bradley has a smoke generator and this unit will control that as well. Anyway, the Auber arrived this week, I read thru the manual and ohhh boy does this take some head scratching. haha. Anyway, yesterday I tackled the rewiring and today Im smoking some venison roasts that have been brining for some pastrami.

My smoker was slightly different than the original poster in that my power wires from plug wired exactly opposite and my braided wires were different colors. But I used the same philosophy as the original poster. Meaning that his #1 smooth black wire was the "inlet power" to the circuit board. Whereas my inlet power to circuit board was smooth white wire. Original pic #2 smooth white wire was the "inlet power to relay". Mine inlet relay power was smooth black wire. The #3 "outlet power" from relay and #4 "outlet power from circuit board " are braided wires but different colors. Although my colors dont match the original pic, my "ins" and "outs" match up the same. Connected 1 to 3 and 2 to 4. But as mentioned in the thread already at this point it is a "dumb circuit" and shouldnt matter , just smooth wire to braided wire and you will be fine. Example....It was mentioned somewhere in the middle of this thread around page 6 or 7 that someone had a identical setup to mine. That user matched colors even though it was opposite the ins and outs...yet we were both successful in performing the rewire.

As luck would have it I did not have any wire nuts on hand but did have some spade connectors. I did not cut any wires, instead use a jumper wire with 2 males spade connections. Put some heat shrink on the connections I made. Then took some needle nose pliers and crimped the female connections a bit to give a tighter fit. These were actually kind of loose as it was and I was surprised it hadnt failed yet. Made the connections, wrapped with electrical tape, and tucked everything back in the box and replaced cover. Back in business. Smoking some deer roasts for pastrami as I type this and the temps are holding rock steady with little to no temp swings. The pic below is in "warmup phase" and held at 125 for an hour in order to get some "cold/warm" smoke before raising temps. I may go back and try to tune it better to this unit versus the Bradley as I think it starts "throttling" the output too far away from set temp (too soon) and then creeps up to the set point. I think it can be better, will adjust the P value to something that works better for me. Maybe even do the autotune feature. I also read and reread and watched some videos on the unit to make sense of the technical speak in the manual, and then I created myself a "cheat sheet" in laymans terms that I will print out to have on hand for when i want to make changes and program the unit. Currently just using it without the programming. Just one temp mode. And so far I am pleased with it. Well worth the money and effort to have better control of the smoker compared to the OEM controller. Dont wait, just do it. You wont regret it.
Hi there and welcome!

Congrats on coming over to the PID side of things! :D

I just got back from my hunting trip and bagged 3 meat deer (2 does, 1 runt of a male that didnt even have knobs or bumps much less horns of any kind) and 1 feral hog.
My brother brought back 2 giant feral hogs and 1 doe.

I think you are going to be more and more impressed with your PID setup and we can help you tinker with a lower P value to help heat up faster if needed.
I look forward to seeing how the venison pastrami comes out. Congrats! :)
 
  • Like
Reactions: ol tex
I'm sure this is a dumb question, but I'm really ignorant on electronics (I'm a software engineer and programmer, if that helps, LOL!). I've had my 20070311 for several years, and I've tried repeatedly to fix the two wires that connect to the heating element. Each "fix" would last several months, but then burn up again (I'm attaching some photos). Last year, I bought the MB20071619 when it was on sale, but it's not as nice a model and doesn't seem as insulated - but it works.
So ... if you were in my boat, would you try to remove the panel on the 20070311 and replace the wires, or just chunk it? and what do you think about the 20071619? Would it be worthwhile doing this PID fix on that smoker?
I loved a lot about my 20070311, and I honestly don't know what I'd replace it with - a pellet grill (but they have their own temperature issues, from what I've read), or use my Weber grill and Slow & Sear for smoking (I've done that, it's not bad, but not as nice as the MES), or some other route. Maybe the 20071619 will be good enough?
I don't know if these photos help at all, it was hard to get good pics. Basically, both wires and tabs have corroded or burned through multiple times, and I've actually spliced them.
I have a friend who says he knows electronics pretty well, but he hasn't seen these photos yet. :-)

Thanks!
 

Attachments

  • IMG_4510.jpg
    IMG_4510.jpg
    225.6 KB · Views: 53
  • IMG_4511.jpg
    IMG_4511.jpg
    224.6 KB · Views: 42
  • IMG_4512.jpg
    IMG_4512.jpg
    232.7 KB · Views: 39
I'm sure this is a dumb question, but I'm really ignorant on electronics (I'm a software engineer and programmer, if that helps, LOL!). I've had my 20070311 for several years, and I've tried repeatedly to fix the two wires that connect to the heating element. Each "fix" would last several months, but then burn up again (I'm attaching some photos). Last year, I bought the MB20071619 when it was on sale, but it's not as nice a model and doesn't seem as insulated - but it works.
So ... if you were in my boat, would you try to remove the panel on the 20070311 and replace the wires, or just chunk it? and what do you think about the 20071619? Would it be worthwhile doing this PID fix on that smoker?
I loved a lot about my 20070311, and I honestly don't know what I'd replace it with - a pellet grill (but they have their own temperature issues, from what I've read), or use my Weber grill and Slow & Sear for smoking (I've done that, it's not bad, but not as nice as the MES), or some other route. Maybe the 20071619 will be good enough?
I don't know if these photos help at all, it was hard to get good pics. Basically, both wires and tabs have corroded or burned through multiple times, and I've actually spliced them.
I have a friend who says he knows electronics pretty well, but he hasn't seen these photos yet. :-)

Thanks!

Well If i were in your boat I would likely get a PID controller and use the 20070311 to experiment on.
I'd pull the back off and run new wires from the heating element for the rewire. Those old wires look like toast.
I noticed that the connectors seemed to be holding up but the wires were not. With the connectors I would also make sure I had them covered with some heat shrink insulation wrap or some good high temp electrical tape at the least. I would ensure the crimps are all good and tight too. Anything lose = resistance which = heating and burning up. You have lots of burning up in there.
I'd get all three wires run and fastened well and connectors insulatied (neutral, hot, and ground wires).

This would get the old smoker running and working with a PID and get you some practice and familiarity with it so you can decide if you want to do the same with your newer model.

At that point you have two functioning smokers and could gift one or keep one for backup. You would also be armed with all the knowledge to work these things and keep them going unless they get hit by a tornado haha :D

That's just me :)
 
I'm sure this is a dumb question, but I'm really ignorant on electronics (I'm a software engineer and programmer, if that helps, LOL!). I've had my 20070311 for several years, and I've tried repeatedly to fix the two wires that connect to the heating element. Each "fix" would last several months, but then burn up again (I'm attaching some photos). Last year, I bought the MB20071619 when it was on sale, but it's not as nice a model and doesn't seem as insulated - but it works.
So ... if you were in my boat, would you try to remove the panel on the 20070311 and replace the wires, or just chunk it? and what do you think about the 20071619? Would it be worthwhile doing this PID fix on that smoker?
I loved a lot about my 20070311, and I honestly don't know what I'd replace it with - a pellet grill (but they have their own temperature issues, from what I've read), or use my Weber grill and Slow & Sear for smoking (I've done that, it's not bad, but not as nice as the MES), or some other route. Maybe the 20071619 will be good enough?
I don't know if these photos help at all, it was hard to get good pics. Basically, both wires and tabs have corroded or burned through multiple times, and I've actually spliced them.
I have a friend who says he knows electronics pretty well, but he hasn't seen these photos yet. :-)

Thanks!

I have two Gen 1 Mes 40 20070311 from 2015 or earlier and Stainless steel inside and out with the window. I would keep that if it's all SS. MB may have kept the part number during all their changes the last five+ years and may be using black paint on the outside cabinet on one's marked as 20070311. I don't like paint. If you're using OEM light aluminum female disconnects vs nickle plated steel then the Aluminum and steel and copper wire metals will create aluminum oxide that's corrosive so the lugs get loose, then hot from higher resistance, then burn up. I use supco T1113 high heat steel appliance lugs on amazon and they aren't crimp-able. I solder them to keep air out of the joint. Strip 14 gauge AWG wire one inch and heat with a torch or pencil torch and tin the wire in a couple seconds and let cool. Slide tinned wire through the barrel of the steel lug with helping hands and hold lug above the tinned wire as you reheat the wire sticking out the other end and add more solder to fill the joint and hold lug above the wire till the solder solidifies and cut off excess tinned wire. No shrink wrap on lugs and inspect them every six months. The junction box is lined with rubber and I peeled the rubber off the access plate so that is my cover over the six rubber holes. I peel off over the screw heads and inspect with plywood as my cover leaned against the smoker. I made and gave away these high heat lugs with a 3" lead of wire stripped (Pigtails) so folks could just wire nut these on to not waste the the wire in the smoker like the MB fix. I have the original power cord from another MB smoker with soldered on lugs on the white and black and the green ground wraps around one of the six access screws to test/isolate elements and a back up power cord to the PID or as a main cord to the element. With PID up grade I have a back up power cord and an element. I use aluminum Jacketing tape after I made an access to the safety limit switch in the back with a dremel cut of wheel that fails a lot. I bypass my smokers with a wire nut to that POS switch since I always use a pit therm set to a range of 145-290. My lugs to my element failed after 11 months in 2016. No issues since. Don't throw away the smokers just get elements and a PID controller.
 
  • Like
Reactions: MJB05615 and tallbm
Howdy Smoking Mod experts! I have and MES 30 (MB26071317) that I'd like to rewire for a PID controller. My smoker only has two removeable panels

This one on the back for the heating element wires:
Smoker1.jpg


And, this one underneath for the circuit board:
Smoker3a.jpg


I'm assuming that all I have to do is combine the red and black wire going to the relay on the bottom panel that I have circled? Then, I can plug the smoker into the temp controller?

Thanks for the help.
 
Howdy Smoking Mod experts! I have and MES 30 (MB26071317) that I'd like to rewire for a PID controller. My smoker only has two removeable panels

This one on the back for the heating element wires:
View attachment 649839

And, this one underneath for the circuit board:
View attachment 649840

I'm assuming that all I have to do is combine the red and black wire going to the relay on the bottom panel that I have circled? Then, I can plug the smoker into the temp controller?

Thanks for the help.
Yes. The white power cord neutral and blue braided are terminated together on the PC board but I don't like the light weight aluminum lugs so I cut stripped the four wires and wire nutted the black to red and blue to white. Mine maybe backwards black to blue and red to white. As long as a smooth power cord wire is terminated to a braided wire.
 
  • Like
Reactions: tallbm
Howdy Smoking Mod experts! I have and MES 30 (MB26071317) that I'd like to rewire for a PID controller. My smoker only has two removeable panels

This one on the back for the heating element wires:
View attachment 649839

And, this one underneath for the circuit board:
View attachment 649840

I'm assuming that all I have to do is combine the red and black wire going to the relay on the bottom panel that I have circled? Then, I can plug the smoker into the temp controller?

Thanks for the help.
Yeah dr k dr k has you covered. You have the colored wires which helps identify things much more easily.

Let us know how it all turns out and if you have any issues :)
 
I recently purchased an Auber AW-1520H because I'm tired of the wild temperature swings in my MES MB20073519. I unscrewed the bottom plate, and the wiring doesn't match Auber's rewiring instructions or any of the posts I've seen here. It looks like there are two relays? I assume that it's because the smoker has a broiler that I never use. I've numbered the wires and was hoping that someone could tell me which wires to splice in order to safely use my new PID controller.

Thanks!

wiring.jpg
 
I recently purchased an Auber AW-1520H because I'm tired of the wild temperature swings in my MES MB20073519. I unscrewed the bottom plate, and the wiring doesn't match Auber's rewiring instructions or any of the posts I've seen here. It looks like there are two relays? I assume that it's because the smoker has a broiler that I never use. I've numbered the wires and was hoping that someone could tell me which wires to splice in order to safely use my new PID controller.

Thanks!

View attachment 651668
Hi there and welcome!

First time I'm seeing a post about a unit with the broiler, so this is exciting :D

A little investigation will need to be done. Do you have an access panel to the broiler element?
Also having a Multimeter with a continuity function (most have it) will help.

I have a strong strong suspicion as to what your wiring is but with wiring and electricity it is best to be correct and to not speculate :)

Please send some pics of the wiring at both your main heating element AND your broiler heating element.

[struck out that statement because that wont work, you will pull too many Amps with both burners running]
I'm thinking we can easily wire this so both elements run at the same time giving u both top and bottom heat... but
We can get you rewired for sure with just using the bottom element, you will lose your broil function and top element though. Good thing you never use it. I think it's a gimmic anyways since the insulation in these units isn't made to handle temps above 325F for a long period of time so I question being able to broil at needed temps that are like 500F+ :D

If you can get back with those pics we'll get you sorted out with running the bottom element only :)
 
Last edited:
Here's the broiler:
broiler.jpg


And here's the main element:
main.jpg


I have no intention of ever using the broiler. I guess having heat from the top would be ok, as long as it doesn't cause problems with meat at the top of the smoker. I mostly smoke sausage and bacon on the upper racks.
 
Here's the broiler:
View attachment 651708

And here's the main element:
View attachment 651709

I have no intention of ever using the broiler. I guess having heat from the top would be ok, as long as it doesn't cause problems with meat at the top of the smoker. I mostly smoke sausage and bacon on the upper racks.

Thanks for the pics!

I'm pretty sure that you connect:
  • 1&6, Red braided to White smooth
  • 3&4, Black smooth to Blue braided
When you do that and plug in your MES into the wall BUT DON'T LEAVE IT!!!! lol The bottom element SHOULD heat and the top element will never heat.
Once you confirm this, unplug it from the wall. After the rewire you have bypassed its internal control and will only heat until it the safety switch cuts power OR it burns down. The Auber PID will now be the controller :)

That top element is a 1400watt element and your bottom element is a 1200watt element. If you ran both at the same time that would be too much.

Let me know if this works for you then we can talk about possibilities with that top burner. I'm thinking you can run a separate cord to it and and switch cords to your Auber depending on if you want to use the top broiler element or regular bottom element :D
I'll try it out tomorrow. I've had too many pints of homebrew to start tinkering tonight. :)

I think I'll just pretend that the top element doesn't exist. I'd forgotten all about it until I decided to give the smoker a bit of a cleaning earlier today. I won't miss it at all.

Thanks for your help! I'll let you know how it went sometime tomorrow.

EDIT: I do have a multimeter, so if there are any continuity checks that you'd like me to do, just let me know.
 
Last edited:
I'll try it out tomorrow. I've had too many pints of homebrew to start tinkering tonight. :)

I think I'll just pretend that the top element doesn't exist. I'd forgotten all about it until I decided to give the smoker a bit of a cleaning earlier today. I won't miss it at all.

Thanks for your help! I'll let you know how it went sometime tomorrow.

EDIT: I do have a multimeter, so if there are any continuity checks that you'd like me to do, just let me know.

The if you unhook the Black BRAIDED at the lower heating element AND unhook the Blue braided at the circuit board I am pretty sure a continuity check on the black braided and blue braided ends should pan out when you touch both ends. It will show they are connected with no breaks (hence continuity).
Why do they switch colors here?
Usually the blue braided runs to the safety roll out limit switch (overheat protection switch) which is Normally Closed (NC). Then from the other end of the switch they run a Black braided wire to the heating element.
That seems to be their method of operation when they use red and blue braided color wires.

Unhook the Red Braided end at the circuit board and the Red Braided end at the heating element and do a continuity check with both those ends and it should confirm they are 1 wire.

The connectors MUST be disconnected when you do this or you can get false positives.

This should give you 100% certainty that my wiring suggestions are good to go in the previous post :)
 
I have a similar (20072612) smoker to tallbm tallbm that I'm planning to bypass and wire up to run with PID. I wanted to verify my plan to connect (Hot) #4 with #2 and (Neutral) #3 with #1. Does that look correct?
 

Attachments

  • 11.png
    11.png
    1.1 MB · Views: 38
  • 22.png
    22.png
    1.3 MB · Views: 38
I have a similar (20072612) smoker to tallbm tallbm that I'm planning to bypass and wire up to run with PID. I wanted to verify my plan to connect (Hot) #4 with #2 and (Neutral) #3 with #1. Does that look correct?
Hi there and welcome!

Yep you are correct in your planning. You should be good to go! :D
 
  • Like
Reactions: smokermd33
Per the fantastic input and suggestion of another forum member (they can feel free to identify themselves if they like), I have am posting an additional set of images for a simpler rewire IF YOU have this kind of setup with your MES.

These images were taken from the following thread where the original poster was fortunate enough to have such a setup and posted great questions and info regarding it.
https://www.smokingmeatforums.com/threads/mes-pid-mod.272044/#post-1791328

Ok to the point.

Some MES units have a set of white clips on the wiring (I think similar version with black clips exists and the process is the same regardless of the color of the clips).
If you have these clips, the simple rewire is even simpler hahaha.

In short, you:
1. Unhook the white clips
2. Then you take the clip that comes from the ME power cord and connect it to the clip that goes to the MES heating element

That's it.
Here are some pictures to show what you would see and how the clips would match up.

(cord to clip)
BgsMEDu.png


(red heating element wires running to it's clip [heating element wires may end up being a different color in your case])
9mPunqK.png


(clips that need to be connected for final rewire; notice long/female clip would hook to short/male clip so it's not hard to see if they match)
cFpIGZs.png

I hope this info helps some people and if it's too confusing the same simple rewire posted at the start of this thread still works if someone doesn't notice the clips or doesn't want to mess with them.
It's all the same wires running to the same points whether there are clips or not :)
 
  • Like
Reactions: mosparky
Lately I've seen a number of posts about guys wanting to rewire their MES. I had wanted to post a quick and simple guide for those out there that are curious or those that simply need to rewire but need a little assistance. Well here goes.

Disclaimer: When messing with electrical equipment it is best to consult a local electrical professional to ensure things are done correctly. Be safe and use caution. I am not an electrician and with many things you hear or read, it is your responsibility to verify the information's validity and ensure you and others are safe.

Ok now on to rewiring info :)

Smoker Referenced Below:
  • MES 40 Gen1
Tools and Equipment (at a Minimum):
  • A strong back or a 2nd body to help pick up the smoker and set on a table to be worked on
  • Waist High Table - to put the smoker onto
  • Needle Nose Plyers
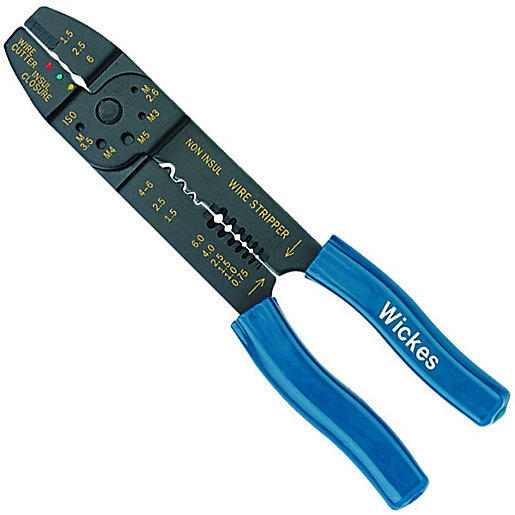
  • Wire Crimping Tool - one that crimps, strips, and cuts wires
  • 14-16 AWG Butt Connectors, or Wire Nuts
  • Drill
  • 1/8" Drill Bit that can drill metal - to drill out circuit board rivets
  • #12 - 1" self tapping Sheet Metal Screws/Fastener to refasten circuit board panel back on after rivets are removed. 3/4" long may also be good for this one panel but MAY be a little short. I used 3/4" because that is what I used when pulled the back off my MES
  • Drill Bit to drive the sheet metal screws (I used hex head fasteners but you may find hex + phillips head)
  • Masking Tape/Electrical Tape - some kind of tape that can be used to mark a wire. U need no more than 1 inch worth

Quick Explanation of the Process:

The rewire is actually very simple and does NOT require removing the back of the MES. What is being done is the following:
  • Take existing MES wiring and disconnecting it from the MES circuit board the controller is connected to
  • Connect Hot wire that comes from MES plug, to Hot wire that leads to the safety Roll out Limit Switch & Heating Element
  • Connect the Neutral wire that comes from the MES plug, to the Neutral wire that leads to the Heating element
  • Done!
When done, the MES controller will be bypassed and will receive no electricity. Also the safety mechanism (safety roll out limit switch) will still do it's job and cut off power to the heating element should the heat limit be exceeded. The switch will auto reset after a while and when it does electricity will again be able to flow to the heating element.

IMPORTANT: If you plug the rewired MES into the wall there is NOTHING to control the electricity to the element. If plugged in, the MES will simply just suck electricity and heat up as a dumb circuit. This is why a 3rd party controller like a PID controller is needed.

The PID controller will control the on/off flow of electricity to the heating element according to the set temperature and the temp the PID controller is reading with a probe from within the smoker.

Simple Rewire Steps:

The process should really take between 30 minutes and 2 hours based on how you work, preperation, and confidence/comfort level with the tools and the process.
  1. UNPLUG the MES!!!!
  2. Get the MES up on a table laying flat on it's back or on the front. If you lay it on the front (what I did) be sure not to break the glass window in the door... just use caution
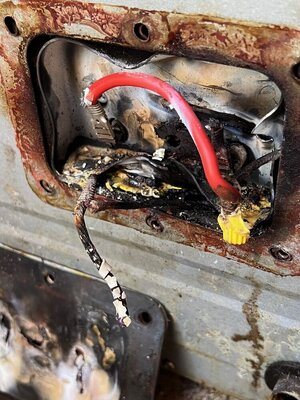
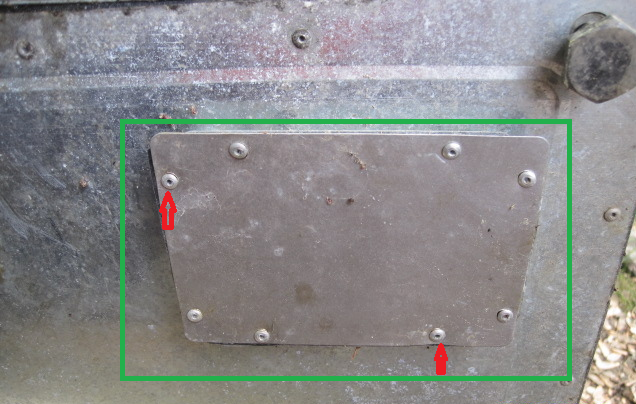
  3. Using the 1/8" drill bit and a drill, drill out the rivets on the bottom panel of the MES.

    The bottom panel is identified by the green square, everything outside of the green square is irrelevant for this step.
    The red arrows identify some rivets on the PANEL. ONLY drill out the panel rivets inside the green square, NOT the rivets outside the green square.

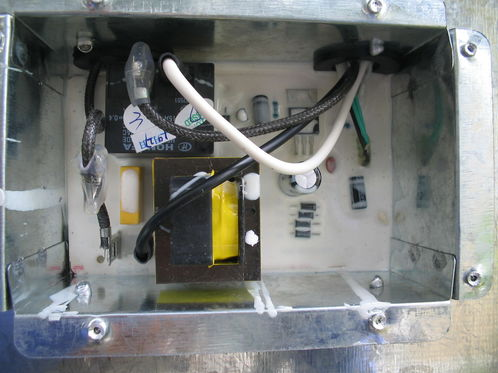
  4. You should see an image similar to the one below but it may be slightly different. Don't worry if it is slightly different because we will be able to easily identify the wires.

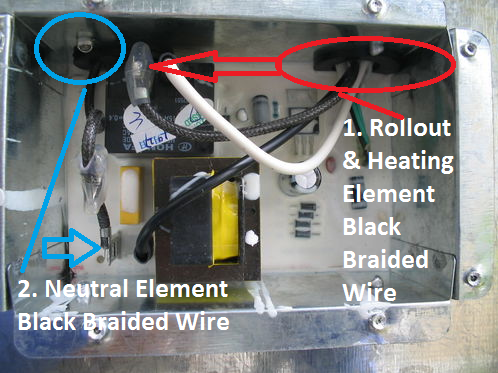
  5. Use your hand or the Needle Nose Plyers to disconnect the wires listed below:
    1. Plug Hot Wire - Smooth Black color wire
    2. Plug Neutral Wire - Smooth White color wire
    3. Rollout Limit Switch & Heating Element Hot Wire - Black Braided wire
    4. Heating Element Neutral Wire - Black Braided wire - yes looks just like wire #3

  6. IMPORTANT: Ignore any other tiny wires that may come out of the upper right hole of the compartment. These can be any color (black, green, white, white braided wire, etc.). They will be noticeably thinner than the real wires!

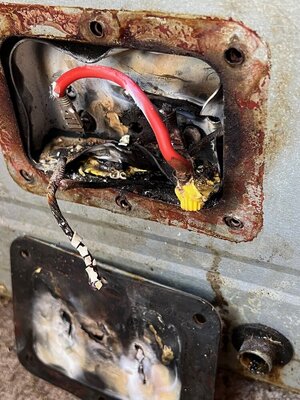
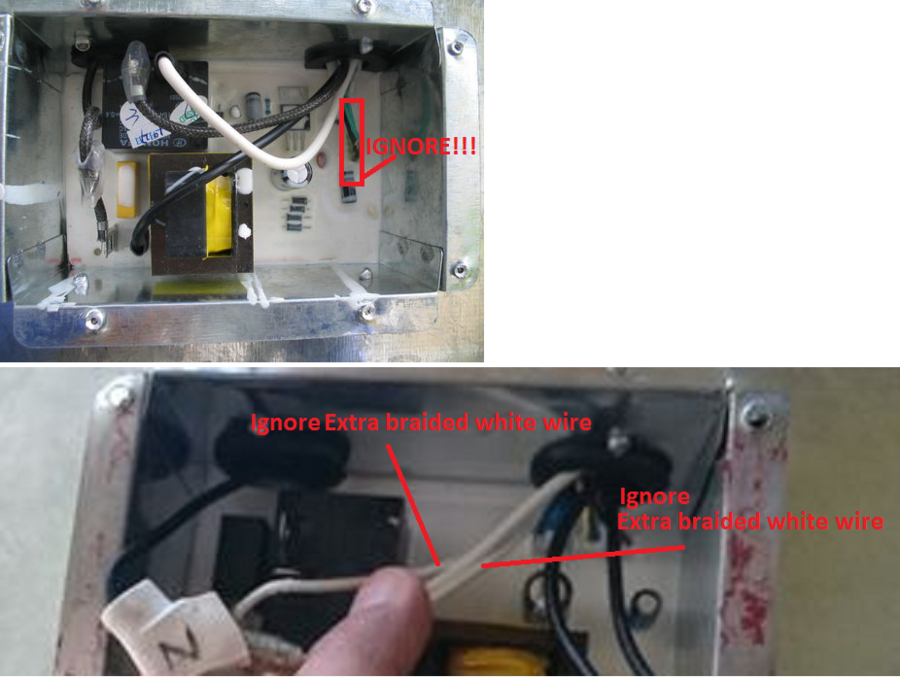
  7. Identify and use a piece of tape Label the black braided wires:
    1. Heating Element NEUTRAL Black Braided wire - Comes out of upper LEFT hole
    2. Rollout Limit Switch & Heating Element HOT Black Braided wire comes out of the upper RIGHT hole

      The key here is to identify the hole that the wire comes out of. Use a piece of tape to flag the wires for quick identification. If you accidentally splice the wires it should be OK and all should still work safely and fine. The thing is the wiring is not TECHNICALLY accurate which may lead to some confusion about which wire goes where.


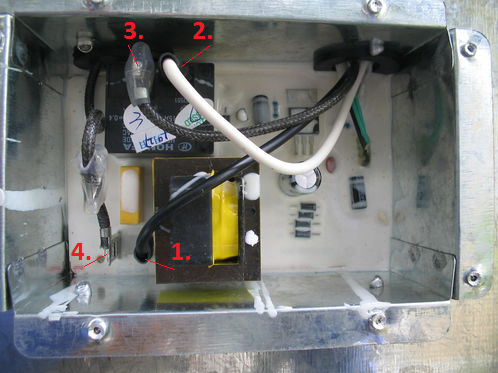
  8. Cut and splice wires together. Use butt connectors, wire nuts, or any electrical connectors to splice the wires. JUST BE SURE that the connections are tight!!! You want no wiggle between the connection because that causes resistance and resistance causes heat and that will burn up the wire, wiring, etc. which is bad!
    1. Connect wires #1 and #3. Notice they should both come out of the upper right hole/port.

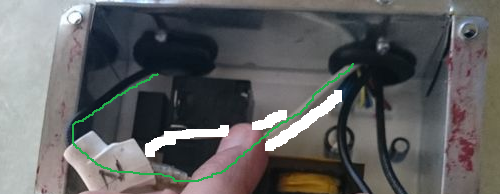
    2. Connect wires #2 and #4. Notice the white wire comes out of the upper right hole/port and the black braided wire comes out of the upper left hole/port. The pic is bad so I tried to erase extra wires and used a Green line to trace the wire and connections. I hope it gives the proper visual.


  9. When all wired up it should look like the image below:

  10. Use the sheet metal screws to fasten the panel back on through the rivet holes.
  11. Safely put the smoker back on the ground
  12. Open the smoker door and plug in the MES to the wall outlet. You should feel that it is heating and if you leave it on long enough you will see the element start turning color showing heat.
Well that is it. This approach is about as simple as it gets to rewire a Gen1 MES. Now every MES generation and model may be a little different but the idea for rewiring is still the same.

Additional Rewire Considerations:

This post is simply showing how to rewire for a 3d party controller to be used, BUT it does not address some week points of the MES wiring. I will note some improvements that should be considered because they are common issues with the MES that you will likely run into an need to fix at some point.
  1. Replace the Heating Element connectors with Hi Temp Stainless Steel female spade connectors - the MES uses poor electrical connectors on the wires that connect to the heating element. They don't seem to be able to stand up to the heat of the element very well and corrode easily. Mine showed signs of corrosion after 3 months of use!!! Google the following connectors as good replacement options:
    Supco T1111c (typical female spade), or Supco T1113c (flag style female spade)

    Again, be sure the connectors are on completely and are crimped complete! You want NO wiggle. Keep working until you get the proper connection.
  2. Replace the Safety Rollout Limit Switch connectors with Hi Temp Stainless Steel female spade connectors - as stated above the connectors that MES uses are poor and corrode easily. The connectors here suffere the same issue.
    The big issue is that most MES smokers do not have a panel to access the rollout limit switch. In this case, you must remove the back of the MES to get to the rollout limit switch
    1. Consider cutting and creating a panel to access this switch in the future
    2. The rollout limit switch is a little delicate so if you happen to damage it go to Amazon and search for: KSD301 for replacement switches should you knock a tab loose or bend it or damage it in any way.


      Again, be sure the connectors are on completely and are crimped complete! You want NO wiggle. Keep working until you get the proper connection.
Best of luck guys and remember to be safe and enjoy smoking! :)
I'm glad you found it helpful :)

What you mention is the most accurate and least intrusive way to go about things. You disconnect the wires from the heating element and from the board. Then put a multi meter on the ends of each wire from the circuit board to the rollout limit switch to the wires in the heating element panel and find all the matching ends and label the wires.

That is basically what I did on my 2nd rewire job. On my 1st MES rewire I took the back off and pulled up every single wire because I wanted to be 100% sure. With that under my belt, I just multimeter'ed the wires/ends for the 2nd MES and confirmed where the wires led to and from in comparison to my 1st MES rewire My 1st MES rewire was a Gen2 and the 2nd MES rewire was a Gen1 and everything I posted above holds true across the two models I have worked with :)

If the pics above do not look anything like what an MES is showing then I would definitely go back to the multimeter checks... BUT that is not what this post is about. This post is the simple way for probably 90% of the cases people with an MES will run into :)
 
SmokingMeatForums.com is reader supported and as an Amazon Associate, we may earn commissions from qualifying purchases.

Hot Threads

Clicky