OK, so this is my first post on this forum. Looks like there is a lot of good information here.
So I got a used 30" Masterbuilt smoker from a brother-in-law about a year ago. It was only used a few times to roast a couple turkeys. For whatever reason, he no longer wanted it.
I bought it from him and cleaned it up a bit and tried cooking a small 4 lb. pork butt in it. I put it in at 0900, and cooked it slow at 205 degrees all day long with smoke. When I pulled it out at 7:00 at night it was still for the most part raw. So into the slow cooker it went for several more hours to finish cooking. The controller on the smoker is so far off it is unusable. I checked into ordering parts and the price was almost 200.00 for parts. Absolutely ridiculous. Further, everyone seems to have the same problem with these smokers.
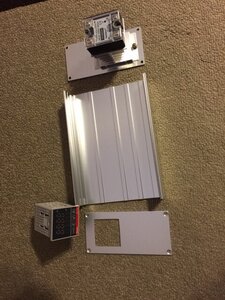
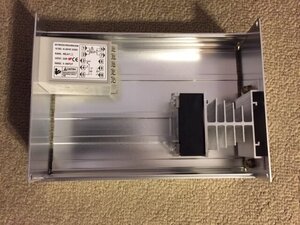
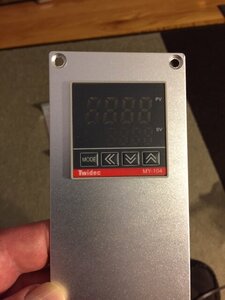
I searched the web and found a video on smoker repair. They wire in a PID Temp controller that comes in a kit with probe and solid-state relay with heat sink. I'm still waiting for it to arrive in the mail, but in the meantime have continued on with the modification. My controller will be mounted in a nice aluminum electrical panel, and I am attaching it a few inches below the rear handle so that I can still cover the smoker with its cover. I also ordered a nice meat thermometer with probes and a wireless unit for monitoring. My smoker is like the one in this video, but in much better shape. I will let you know how this all works out for me! I currently have the aluminum box mounted with rivets on the smoker, waiting for the electronics to arrive. I am also adding a lighted red LED push button switch for on/off power control, and wiring in a 25' orange extension cord for the power cord (cutting off the female receptacle and hard wiring to the controller).
www.youtube.com/watch?v=2qsO83_x_7U
www.amazon.com/Twidec-MV100-B10-Temperature-Controllers-Thermostat/dp/B07LCYWCB1?ref_=ast_sto_dp&th=1&psc=1
www.amazon.com/Eightwood-Extruded-Aluminum-Electronic-Enclosure/dp/B0107WTZHE/ref=sr_1_16?crid=4EMPOYIKOVIP&keywords=Silver+Aluminum+Project+Box+Enclosure+Case+8"+x+5.7"+x+2.7"+203x144x68mm&qid=1642449916&s=industrial&sprefix=silver+aluminum+project+box+enclosure+case+8+x+5.7+x+2.7+203x144x68mm%2Cindustrial%2C31&sr=1-16
www.amazon.com/Wireless-Thermometer-Grilling-Accurate-Digital/dp/B08M6CB1KD/ref=sr_1_2?crid=2L3R36XO590KS&keywords=luyata+meat+thermometer&qid=1642449192&sprefix=luyata+meat+%2Caps%2C39&sr=8-2
So I got a used 30" Masterbuilt smoker from a brother-in-law about a year ago. It was only used a few times to roast a couple turkeys. For whatever reason, he no longer wanted it.
I bought it from him and cleaned it up a bit and tried cooking a small 4 lb. pork butt in it. I put it in at 0900, and cooked it slow at 205 degrees all day long with smoke. When I pulled it out at 7:00 at night it was still for the most part raw. So into the slow cooker it went for several more hours to finish cooking. The controller on the smoker is so far off it is unusable. I checked into ordering parts and the price was almost 200.00 for parts. Absolutely ridiculous. Further, everyone seems to have the same problem with these smokers.
I searched the web and found a video on smoker repair. They wire in a PID Temp controller that comes in a kit with probe and solid-state relay with heat sink. I'm still waiting for it to arrive in the mail, but in the meantime have continued on with the modification. My controller will be mounted in a nice aluminum electrical panel, and I am attaching it a few inches below the rear handle so that I can still cover the smoker with its cover. I also ordered a nice meat thermometer with probes and a wireless unit for monitoring. My smoker is like the one in this video, but in much better shape. I will let you know how this all works out for me! I currently have the aluminum box mounted with rivets on the smoker, waiting for the electronics to arrive. I am also adding a lighted red LED push button switch for on/off power control, and wiring in a 25' orange extension cord for the power cord (cutting off the female receptacle and hard wiring to the controller).
www.youtube.com/watch?v=2qsO83_x_7U
www.amazon.com/Twidec-MV100-B10-Temperature-Controllers-Thermostat/dp/B07LCYWCB1?ref_=ast_sto_dp&th=1&psc=1
www.amazon.com/Eightwood-Extruded-Aluminum-Electronic-Enclosure/dp/B0107WTZHE/ref=sr_1_16?crid=4EMPOYIKOVIP&keywords=Silver+Aluminum+Project+Box+Enclosure+Case+8"+x+5.7"+x+2.7"+203x144x68mm&qid=1642449916&s=industrial&sprefix=silver+aluminum+project+box+enclosure+case+8+x+5.7+x+2.7+203x144x68mm%2Cindustrial%2C31&sr=1-16
www.amazon.com/Wireless-Thermometer-Grilling-Accurate-Digital/dp/B08M6CB1KD/ref=sr_1_2?crid=2L3R36XO590KS&keywords=luyata+meat+thermometer&qid=1642449192&sprefix=luyata+meat+%2Caps%2C39&sr=8-2
Last edited: