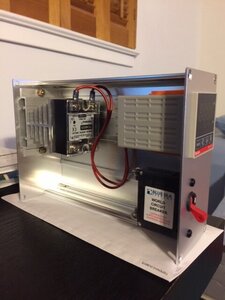
Man u are almost there!!! :DThank you and to everyone else out there and their contributions to this thread. Your input is helping me with this project! I just keep at it as time permits. I did get my relay control wires built, crimped, and soldered. Waiting on the circuit breaker! Thanks again!
Navigation
Install the app
How to install the app on iOS
Follow along with the video below to see how to install our site as a web app on your home screen.
Note: This feature may not be available in some browsers.
More options
Style variation
-
Some of the links on this forum allow SMF, at no cost to you, to earn a small commission when you click through and make a purchase. Let me know if you have any questions about this.
You are using an out of date browser. It may not display this or other websites correctly.
You should upgrade or use an alternative browser.
You should upgrade or use an alternative browser.
MES Rewire Simple Guide - No Back Removal Needed!!!
- Thread starter tallbm
- Start date
SmokingMeatForums.com is reader supported and as an Amazon Associate, we may earn commissions from qualifying purchases.
Does anyone know the operating voltage of the LED light that is mounted on the upper door of the MasterBuilt Smokers? Is that a 110v AC LED bulb? Just wondering if I can add switch provisions for this light assembly on my electrical panel for the PID Controller.....
I still need to get this done. Keep trying to talk myself into the Wifi model. Need to just pull the trigger and go on.
I feel like it is but if you pull the bulb out it should tell you.Does anyone know the operating voltage of the LED light that is mounted on the upper door of the MasterBuilt Smokers? Is that a 110v AC LED bulb? Just wondering if I can add switch provisions for this light assembly on my electrical panel for the PID Controller.....
You could simply wire that into your setup with a switch for sure. There is one guy who just drilled into the side of the MES and put a new wire there so this is what I'm going off of.
I didn't bother with it because I don't clean my MES40 window, it gets so crudded up it made the light pointless since I got tired of cleaning it and just leave it covered black lol. Plus once full of smoke the light is useless as well. I just opted to leave it dead :)
I still need to get this done. Keep trying to talk myself into the Wifi model. Need to just pull the trigger and go on.
All up to you my friend. The HeaterMeter PID I built had the wifi part wear out so I roll without it. It was nice for recording the info and monitoring from my phone with the app BUT I use remote thermometers that I had to monitor as well so it was a moot point to lose the wifi capability.
Just providing that info in case it helps you make a decision one way or the other. In any case the PID behavior will be a whole new and whole better world for ya :D
BTW, Select briskets $1.97/lb limit 2 with digital app coupon/rewards at Market Street starting tomorrow. I've picked some that were easily choice grade in the past. Also they make great grind if you need any :)
I still have one last brisket that been in the freezer a while now but thanks for the head up. I am starting to learn that there is another sale just down the road.BTW, Select briskets $1.97/lb limit 2 with digital app coupon/rewards at Market Street starting tomorrow. I've picked some that were easily choice grade in the past. Also they make great grind if you need any :)
I just ordered the multipurpose one. Thanks for the push. I seen the wiring part but where do you run the probe?All up to you my friend. The HeaterMeter PID I built had the wifi part wear out so I roll without it. It was nice for recording the info and monitoring from my phone with the app BUT I use remote thermometers that I had to monitor as well so it was a moot point to lose the wifi capability.
Just providing that info in case it helps you make a decision one way or the other. In any case the PID behavior will be a whole new and whole better world for ya :D
BTW, Select briskets $1.97/lb limit 2 with digital app coupon/rewards at Market Street starting tomorrow. I've picked some that were easily choice grade in the past. Also they make great grind if you need any :)
Congrats!!!I just ordered the multipurpose one. Thanks for the push. I seen the wiring part but where do you run the probe?
I drop my probe down the vent. My probe has a probe aligator clip on the end so I can easily clip it to the underside of the rack and move it around.
Something like these, I just open the round part and then squeeze it on to my probe using needle nose plyers without damaging anything:
These clips will work too:
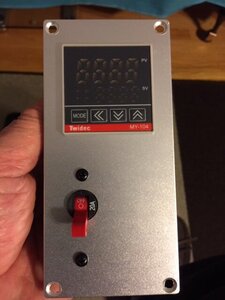
Gettin closer man! :DSome progress tonight while watching the Olympics!
Also, I'm so glad you bought a real switch and not one of those cheap plastic ones from China where they sell you 5-10 in a pack because they all melt down hahaha.
The Black wire is #1 and the White wire is #2. Not sure about 3 & 4. Instead of cutting the wires would to find some kind of union to just plug them into. Could make some jumpers with male ends?

Something like this, maybe?Instead of cutting the wires would to find some kind of union to just plug them into

.250 Tab Doubel Male Nylon Connector - WiringProducts, Ltd.
.250 Tab Double Male Nylon Connector - 2 male push on tabs (one on each side) inside a Nylon enclosure. Each end is open for the connectors. Quantities of 5, 25 and 100 for your convenience.
wiringproducts.com
The Black wire is #1 and the White wire is #2. Not sure about 3 & 4. Instead of cutting the wires would to find some kind of union to just plug them into. Could make some jumpers with male ends?
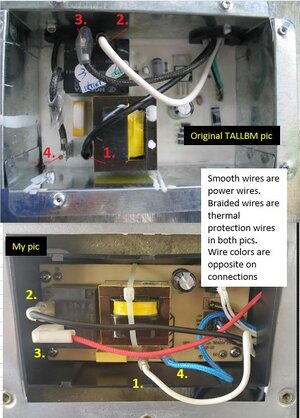
View attachment 525781
Thanks for the picture! Your #3, and #4 are the braided Red and braided Blue.
It won't matter which you connect AS LONG AS it is #1 to a braided, and #2 to the other braided. So the rule = Smooth wire to a braided wire.
Yeah you can use some kind of double mail connector like @DougE posted and just electrical tape it good so no metal is exposed and it doesn't somehow pull lose.
You are almost there man! :D
That's about what I figured but needed to make sure. Thanks for the reply.Thanks for the picture! Your #3, and #4 are the braided Red and braided Blue.
It won't matter which you connect AS LONG AS it is #1 to a braided, and #2 to the other braided. So the rule = Smooth wire to a braided wire.
Yeah you can use some kind of double mail connector like @DougE posted and just electrical tape it good so no metal is exposed and it doesn't somehow pull lose.
You are almost there man! :D
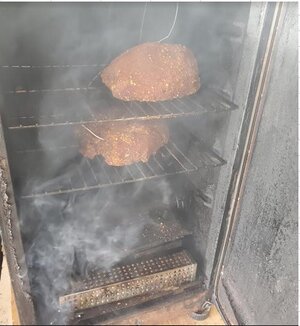
Up and running. The smoker always held temp good with nothing in it. Soon as added anything would see big difference from top to bottom. Will see how this does. At least can put the probe where I want it now. Could of used a longer cord. That thing pretty short. Will order a short 16 gauge. Used this connector and cut the female off.


What a thing of beauty!!! Inkbird reading 250 and 247 and Auber is right there at 248 inbetween haha. Yeah being able to move your temp probe will make a difference in getting temps nailed. Can't argue with a probe reading at rack level.Up and running. The smoker always held temp good with nothing in it. Soon as added anything would see big difference from top to bottom. Will see how this does. At least can put the probe where I want it now. Could of used a longer cord. That thing pretty short. Will order a short 16 gauge. Used this connector and cut the female off.
View attachment 525976
View attachment 525975
How much cord do you need? I ask because if you get 12guage or 14 guage you can ensure that you get full power pull across the length of the cord as long as you are 25ft or under in length.
Also if you need to tweak settings or anything on the Auber be sure to reach out. The instructions are a little hard to read but the actual steps aren't hard to perform. It's just hard to understand what the instructions are trying to say hahaha.
I meant 14 gauge. Just need couple feet.How much cord do you need? I ask because if you get 12guage or 14 guage you can ensure that you get full power pull across the length of the cord as long as you are 25ft or under in length.
KJNDIVER
Newbie
Ok, its my turn. I read thru this whole thread. I had read about these controllers before but wasnt proactive. My last few smokes had horrible temp controls. Over shoot temps, undershoot temps, just temps all over the map and takes long time to correct. I was having temps swings of 30 degrees, at least according to the readout, who knows how accurate that is, but still all over the place. I bit the bullet and ordered an Auber Dual-Probe PID Controller for Bradley Smoker WSD 1220GPH. To be honest, I was just cruising the Auber site, saw this dual probe unit, saw that it was "preprogrammed" for a Bradley Smoker (how different can it be from a MES30). The two smokers appear to be equal in size so I figured why not. Did not now at the time that the Bradley has a smoke generator and this unit will control that as well. Anyway, the Auber arrived this week, I read thru the manual and ohhh boy does this take some head scratching. haha. Anyway, yesterday I tackled the rewiring and today Im smoking some venison roasts that have been brining for some pastrami.
My smoker was slightly different than the original poster in that my power wires from plug wired exactly opposite and my braided wires were different colors. But I used the same philosophy as the original poster. Meaning that his #1 smooth black wire was the "inlet power" to the circuit board. Whereas my inlet power to circuit board was smooth white wire. Original pic #2 smooth white wire was the "inlet power to relay". Mine inlet relay power was smooth black wire. The #3 "outlet power" from relay and #4 "outlet power from circuit board " are braided wires but different colors. Although my colors dont match the original pic, my "ins" and "outs" match up the same. Connected 1 to 3 and 2 to 4. But as mentioned in the thread already at this point it is a "dumb circuit" and shouldnt matter , just smooth wire to braided wire and you will be fine. Example....It was mentioned somewhere in the middle of this thread around page 6 or 7 that someone had a identical setup to mine. That user matched colors even though it was opposite the ins and outs...yet we were both successful in performing the rewire.
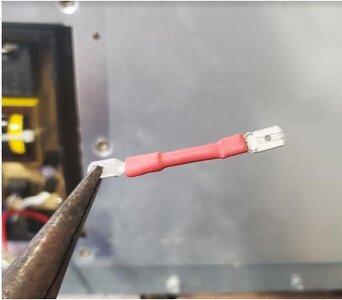
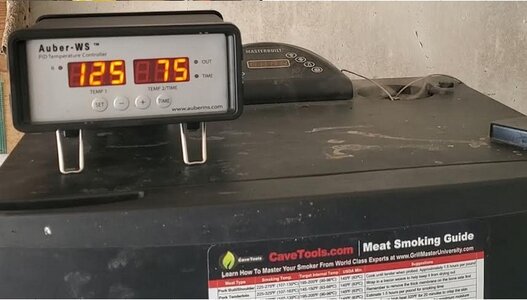
As luck would have it I did not have any wire nuts on hand but did have some spade connectors. I did not cut any wires, instead use a jumper wire with 2 males spade connections. Put some heat shrink on the connections I made. Then took some needle nose pliers and crimped the female connections a bit to give a tighter fit. These were actually kind of loose as it was and I was surprised it hadnt failed yet. Made the connections, wrapped with electrical tape, and tucked everything back in the box and replaced cover. Back in business. Smoking some deer roasts for pastrami as I type this and the temps are holding rock steady with little to no temp swings. The pic below is in "warmup phase" and held at 125 for an hour in order to get some "cold/warm" smoke before raising temps. I may go back and try to tune it better to this unit versus the Bradley as I think it starts "throttling" the output too far away from set temp (too soon) and then creeps up to the set point. I think it can be better, will adjust the P value to something that works better for me. Maybe even do the autotune feature. I also read and reread and watched some videos on the unit to make sense of the technical speak in the manual, and then I created myself a "cheat sheet" in laymans terms that I will print out to have on hand for when i want to make changes and program the unit. Currently just using it without the programming. Just one temp mode. And so far I am pleased with it. Well worth the money and effort to have better control of the smoker compared to the OEM controller. Dont wait, just do it. You wont regret it.
My smoker was slightly different than the original poster in that my power wires from plug wired exactly opposite and my braided wires were different colors. But I used the same philosophy as the original poster. Meaning that his #1 smooth black wire was the "inlet power" to the circuit board. Whereas my inlet power to circuit board was smooth white wire. Original pic #2 smooth white wire was the "inlet power to relay". Mine inlet relay power was smooth black wire. The #3 "outlet power" from relay and #4 "outlet power from circuit board " are braided wires but different colors. Although my colors dont match the original pic, my "ins" and "outs" match up the same. Connected 1 to 3 and 2 to 4. But as mentioned in the thread already at this point it is a "dumb circuit" and shouldnt matter , just smooth wire to braided wire and you will be fine. Example....It was mentioned somewhere in the middle of this thread around page 6 or 7 that someone had a identical setup to mine. That user matched colors even though it was opposite the ins and outs...yet we were both successful in performing the rewire.
As luck would have it I did not have any wire nuts on hand but did have some spade connectors. I did not cut any wires, instead use a jumper wire with 2 males spade connections. Put some heat shrink on the connections I made. Then took some needle nose pliers and crimped the female connections a bit to give a tighter fit. These were actually kind of loose as it was and I was surprised it hadnt failed yet. Made the connections, wrapped with electrical tape, and tucked everything back in the box and replaced cover. Back in business. Smoking some deer roasts for pastrami as I type this and the temps are holding rock steady with little to no temp swings. The pic below is in "warmup phase" and held at 125 for an hour in order to get some "cold/warm" smoke before raising temps. I may go back and try to tune it better to this unit versus the Bradley as I think it starts "throttling" the output too far away from set temp (too soon) and then creeps up to the set point. I think it can be better, will adjust the P value to something that works better for me. Maybe even do the autotune feature. I also read and reread and watched some videos on the unit to make sense of the technical speak in the manual, and then I created myself a "cheat sheet" in laymans terms that I will print out to have on hand for when i want to make changes and program the unit. Currently just using it without the programming. Just one temp mode. And so far I am pleased with it. Well worth the money and effort to have better control of the smoker compared to the OEM controller. Dont wait, just do it. You wont regret it.
Attachments

Last edited:
Hi there and welcome!Ok, its my turn. I read thru this whole thread. I had read about these controllers before but was proactive. My last few smokes had horrible temp controls. Over shoot temps, undershoot temps, just temps all over the map and takes long time to correct. I was having temps swings of 30 degrees, at least according to the readout, who knows how accurate that is, but still all over the place. I bit the bullet and ordered an Auber Dual-Probe PID Controller for Bradley Smoker WSD 1220GPH. To be honest, I was just cruising the Auber site, saw this dual probe unit, saw that it was "preprogrammed" for a Bradley Smoker (how different can it be from a MES30). The two smokers appear to be equal in size so I figured why not. Did not now at the time that the Bradley has a smoke generator and this unit will control that as well. Anyway, the Auber arrived this week, I read thru the manual and ohhh boy does this take some head scratching. haha. Anyway, yesterday I tackled the rewiring and today Im smoking some venison roasts that have been brining for some pastrami.
My smoker was slightly different than the original poster in that my power wires from plug wired exactly opposite and my braided wires were different colors. But I used the same philosophy as the original poster. Meaning that his #1 smooth black wire was the "inlet power" to the circuit board. Whereas my inlet power to circuit board was smooth white wire. Original pic #2 smooth white wire was the "inlet power to relay". Mine inlet relay power was smooth black wire. The #3 "outlet power" from relay and #4 "outlet power from circuit board " are braided wires but different colors. Although my colors dont match the original pic, my "ins" and "outs" match up the same. Connected 1 to 3 and 2 to 4. But as mentioned in the thread already at this point it is a "dumb circuit" and shouldnt matter , just smooth wire to braided wire and you will be fine. Example....It was mentioned somewhere in the middle of this thread around page 6 or 7 that someone had a identical setup to mine. That user matched colors even though it was opposite the ins and outs...yet we were both successful in performing the rewire.
As luck would have it I did not have any wire nuts on hand but did have some spade connectors. I did not cut any wires, instead use a jumper wire with 2 males spade connections. Put some heat shrink on the connections I made. Then took some needle nose pliers and crimped the female connections a bit to give a tighter fit. These were actually kind of loose as it was and I was surprised it hadnt failed yet. Made the connections, wrapped with electrical tape, and tucked everything back in the box and replaced cover. Back in business. Smoking some deer roasts for pastrami as I type this and the temps are holding rock steady with little to no temp swings. The pic below is in "warmup phase" and held at 125 for an hour in order to get some "cold/warm" smoke before raising temps. I may go back and try to tune it better to this unit versus the Bradley as I think it starts "throttling" the output too far away from set temp (too soon) and then creeps up to the set point. I think it can be better, will adjust the P value to something that works better for me. Maybe even do the autotune feature. I also read and reread and watched some videos on the unit to make sense of the technical speak in the manual, and then I created myself a "cheat sheet" in laymans terms that I will print out to have on hand for when i want to make changes and program the unit. Currently just using it without the programming. Just one temp mode. And so far I am pleased with it. Well worth the money and effort to have better control of the smoker compared to the OEM controller. Dont wait, just do it. You wont regret it.
Congrats on coming over to the PID side of things! :D
I just got back from my hunting trip and bagged 3 meat deer (2 does, 1 runt of a male that didnt even have knobs or bumps much less horns of any kind) and 1 feral hog.
My brother brought back 2 giant feral hogs and 1 doe.
I think you are going to be more and more impressed with your PID setup and we can help you tinker with a lower P value to help heat up faster if needed.
I look forward to seeing how the venison pastrami comes out. Congrats! :)

SmokingMeatForums.com is reader supported and as an Amazon Associate, we may earn commissions from qualifying purchases.
Similar threads
- Replies
- 2
- Views
- 230
- Replies
- 27
- Views
- 2K
- Replies
- 23
- Views
- 837
SmokingMeatForums.com is reader supported and as an Amazon Associate, we may earn commissions from qualifying purchases.

SmokingMeatForums.com is a community of barbecue and outdoor cooking enthusiasts dedicated to smoking meat.
© 2004-2026 SmokingMeatForums.com