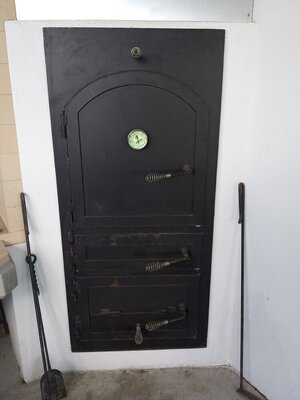
Now I'm up to speed. And I was wrong about insulation, that smoker is very well insulated. That's a great design. As long as there are no issues with intake, draw (draft), and exhaust... or issues with the fire brick or outer block wall you should be good to go.
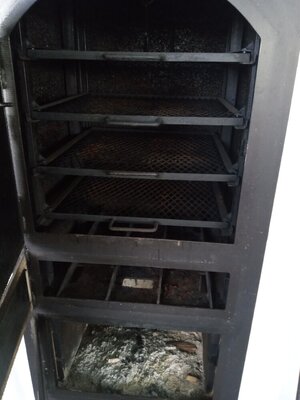
I think I would start with a test fire using lump charcoal. I didn't see any photos of the fire box itself. Is there a charcoal basket, or an elevated rack? My choice for lighting charcoal is a weed burner or a MapPro torch (the yellow tank), but there are plenty of wax style lighter cubes and 'Tumbleweeds' that work too. An inexpensive oven thermometer (rub some cooking oil on the glass dial) will give you an idea of the actual temp on each grate. Move it from grate to grate during your test fire. Another method you can use is called the 'biscuit test'. Buy a cheap tube of biscuits, and make 12 squares of aluminum foil. Put 1 biscuit on each square. When you get the smoker warmed up, place the biscuits on each rack (left, center, right) and close the door. Check after 10 minutes and you will immediately see where your hot and cold spots are. Take a photo for future reference.
If all goes well, a small rib roast is a perfect 1st cook, because they like low pit temps and they are naturally tender. Here are some estimated cook times at various temps. But only use the time as a guide. You want to monitor the internal meat temp so you don't overcook the roast.
3 pound boneless roast (tied) - 245° - 2 hours to reach 128°
4 pound roast - 220°-228° pit temp - 2 hours to reach 125°
5-1/2 pound roast - 230° pit temp - 3 hours to reach 125°
5-3/4 pound roast - 245° average pit temp - 3 hours 45 minutes to reach 127°
One tip that might work for you is to start your fire, then after about 15 minutes, open the main door a few inches and use a torch to warm up the cabinet. This saves some time waiting on the coals to do all of the work. I'm betting once you have an established fire it will be easy to maintain, and hopefully you will have some consistent heat zones.