I was looking for a different article but....
The FDA Food Code recommends cooking chicken to
165°F (74°C). But the pasteurization of chicken is actually a function of both temperature
and time. If you can hold your chicken at
145°F (63°C) for 8.5 minutes, you can achieve the same bacterial reduction as at 165°F (74°C). In his new book Kenji López-Alt uses this principle along with the principle of carryover cooking in large masses of meat to achieve succulent, perfectly safe results at a dramatically lower pull temp. To learn the necessary thermal secrets, keep reading.
The Food Safety Culprit: Salmonella
Verifying the internal temperature of chicken is particularly important given the threat of salmonella bacteria in poultry. Why is there so much concern with this particular bacteria? Salmonella is a very
hardy bacteria. It lives in the temperature range of 35-117°F (2-47°C) which is beyond what most other common food bacteria can tolerate. According to the
CDC, 1 in 6 Americans gets sick from foodborne illness each year, and about
one million of those cases can be attributed to salmonella.
Proper cooking and refrigeration temperatures when dealing with chicken are
critical to avoid foodborne illnesses.
Food Safety is About Temperature and Time
The FDA Food Code suggests cooking chicken to 165°F (74°C) to be sure all bacteria is killed and safe to eat. This temperature is suggested because at 165°F (74°C) the chicken achieves a 7-log[sub]10 reduction—meaning that
99.99999% of the bacteria present are destroyed—instantaneously: a foolproof rule to follow for safety. Salmonella isn’t anything to be trifled with, and 165°F (74°C) is indeed the temperature to target if preparing food for individuals at higher risk of illness (older adults, pregnant women, young children, and others with compromised immune systems).[/sub]
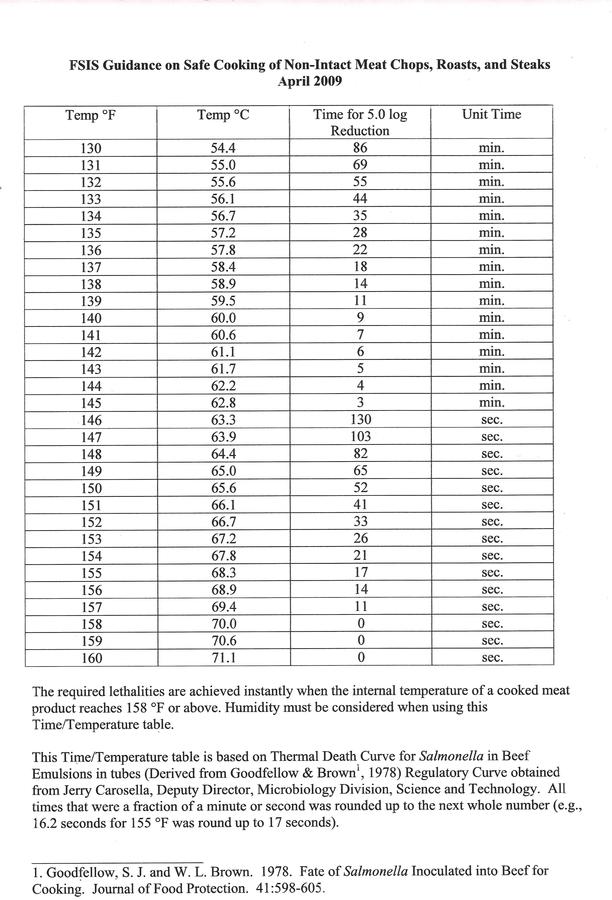
Not widely known is the fact that chicken can achieve the same 7-log10 reduction at temperatures as low as 136°F (58°C) as long as that temperature is held at 136°F (58°C) for at
least 63.3 minutes. As the internal temperature increases, the holding time for a 7-log10 reduction decreases.
In a document from the
[sub]USDA on [/sub]Time and Temperature Tables for Cooking Poultry Products[sub], the time cooked chicken must be held when brought to an internal temperature of 145°F (63°C) is 8.4 minutes. At 150°F (65.5°C) the time is reduced to
only 2.7 minutes![/sub]
Chicken as the Temperature Rises
In
[sub]The Food Lab[/sub][sub], Kenji breaks down what is going on with the protein as the internal temperature of poultry rises:[/sub]
Under 120°F: The meat is still considered raw. The muscle cells are bundled up in long, thin fibers giving the meat its "grain."
At 120°F: The protein myosin begins to coagulate, forcing out some liquid that remains within the protein sheaths at this point.
At 140°F: The remaining proteins within the muscle cells of the breast meat coagulate, forcing all of the liquid out of the cells. The coagulated proteins make the meat firm and opaque.
At 150°F: Proteins in the sheaths themselves rapidly coagulate and contract. Water that was forced out of the cells and collected within the sheaths is squeezed out of the breast meat.
Above 150°F: Muscle fibers in breast meat have become almost completely squeezed dry. Meat is dry and chalky.
160-170°F: When held in this temperature range for ten minutes, collagen in the
leg meat will begin to convert into rich gelatin, keeping the meat moist and juicy even after the muscle fibers have expelled most of their liquid.
Chicken Texture at Different Pull Temps
Below is a breakdown of what the texture of the breast meat of chicken will be at different pull temperatures:
140°F: Pinkish-tinged and almost translucent; extremely soft, with the texture of a warm steak; fleshy.
145°F: Pale, pale pink but completely opaque; very juicy, a little soft. This is Kenji’s favorite doneness temp.
150°F: White and opaque, juicy, and firm.
155°F: White and opaque, starting to turn a little bit stringy; bordering on dry.
160°F and higher: Dry, stringy, and chalky.
According to this temperature guide, the breast meat will become dry if taken too far above 150°F (65.5°C), while the leg meat needs to reach the temperature range of 160-170°F (71-77°C) in order for the connective tissue to dissolve into mouthwateringly rich gelatin. Knowing that salmonella has been scientifically proven to be safely eliminated at temperatures lower than 165°F (74°C), we followed Kenji’s recipe for Simple Whole Roast Chicken to the finest detail, including the 145°F (63°C) pull temperature.
Tracking the Cook
Using
[sub]ThermaData Thermocouple Loggers[/sub][sub], we placed [/sub]
[sub]thermocouple needle probes[/sub][sub] in four locations: the standard recommended location at the deepest point in the breast avoiding bone (the lowest temperature found in the chicken), one in the breast toward the shoulder, another closer to the top of the breast about 1/2" below the skin, and the last probe in the center of the thigh. The data loggers enable us to see how all the temperature gradients rise over time as the lowest temperature reaches our pull temperature, and monitor the carryover cooking through a 30 minute rest to be sure it stays at or above 145°F (63°C) for at least 8.5 minutes.[/sub]
Thermal Tip:
Your chicken is only as safe as the lowest temperature found in the breast meat. Use an instant read digital thermometer like a
[sub]Thermapen[/sub][sup][sub][emoji]174[/emoji] to find the lowest temperature to spot-check once the 145°F (63°C) alarm sounds. [/sub][/sup]
Ingredients
—1 whole chicken, 3-1/2 to 4 pounds
—1-2 tablespoons vegetable oil or olive oil
—Kosher salt and ground black pepper
Instructions
• Line a sheet pan with heavy-duty foil and place a V-rack or cooling rack on the pan. Suspending the chicken above the pan is important to allow for air circulation around the entire bird.
• Preheat oven to
500°F (260°C).
• Remove the neck and giblets and pat the chicken completely dry with paper towels. Dry skin with be more crisp and brown evenly.
Food Safety Tip: Don’t Rinse
Rinsing the raw chicken will cause tiny droplets of contaminated water to spray all around your kitchen increasing the risk of spreading bacteria through cross-contamination.
• Using your hands, separate the skin from the meat.
• Apply oil both under and on top of the skin. Using oil rather than butter will yield crisper skin because butter is about 18% water, which will steam and then cool the skin as it evaporates, giving the skin a spotty appearance with soft spots as it browns.
• Season on all sides with salt and pepper.
To Truss or Not to Truss?
Trussing—the act of tying up the bird’s legs before cooking—is an oft-recommended but totally pointless exercise. It has the opposite effect of what you want for a bird, effectively shielding the inner highs and thereby making the slowest-to-cook part cook even more slowly. Chickens and turkeys should always be left as nature intended them: with their legs wide open, to allow for maximum heating via convection. —
[sup][sub]Kenji López-Alt, [/sub][/sup]The Food Lab[sup][sub], pg. 587[/sub][/sup]
• Place the chicken onto the prepared rack. Place the
[sup][sub]ChefAlarm[/sub][/sup][sup][sub] probe into the deepest part of the breast to track the lowest temperature during the cook. Set the ChefAlarm’s high alarm to 145°F (63°C).[/sub][/sup]
• Place the chicken in the 500°F (260°C) preheated oven and turn the oven temperature down to 350°F (177°C) as soon as the oven door is shut. Continue cooking until the high alarm sounds (cook time will be approximately 1 to 1-1/2 hours depending on the size of the bird).
• Once the alarm sounds, spot-check the breast meat with an instant read thermometer like a
[sup][sub]Thermapen[/sub][/sup][sup][sub] to be sure the ChefAlarm’s reading is the lowest temperature (the exact location of the lowest temperature may shift during the cook). You need to verify that the lowest reading is 145°F (63°C). Check the temperature of the leg meat, as well. It should be in the perfect 170-175°F (77-80°C) range. If not, put the chicken back into the oven for a couple more minutes.[/sub][/sup]
• Once final pull temp has been reached allow the chicken to rest, uncovered, for 15 minutes.
This is critical. It must rest for a full 15 minutes for the full pasteurization of the meat to occur and for the chicken to be safe to eat. To be extra safe, you could use both the built in timer function in the ChefAlarm set to 15 minutes
and the low temperature alarm feature unique to the ChefAlarm. Simply set the low temperature alarm to 145°F (63°C) during the rest to be sure your chicken doesn’t dip below the target temperature for at least 8.5 minutes.
Observing Temperature in Motion
The graph above shows the temperature changes at various points in the whole chicken as measured by our
[sup][sub]ThermaData Thermocouple Loggers[/sub][/sup][sup][sub]. You can see exactly how the internal temperatures increased during the cook. The red horizontal line represents our pull temperature of 145°F (63°C). The most dramatic rises in temperature were, unsurprisingly, in the thigh and the outer breast meat which were most directly exposed to the hot air in the oven. Neither of those areas saw a temperature increase during the rest. Rather, you can see how they began to cool immediately once the inside breast meat reached 145°F (63°C) and the chicken was removed from the oven.[/sub][/sup]
Most importantly, we found that the coolest breast meat (the internal reading above) did NOT cool when the chicken was removed from the oven. See how the purple line above continues to rise from 145°F (63°C) to a maximum temperature of 155°F (69°C) during the resting period—the most dramatic temperature increase due to carryover cooking during the rest.
It is important to note that this continuous rise in internal temperature
after the chicken was removed from the oven is due to the significant mass of the whole chicken being cooked. We would NOT expect to see such carryover cooking in a single chicken breast, for example.
The thigh’s peak temperature, as shown above, of 200°F (93°C) occurred as the internal breast meat reached our pull temp, resulting in a gradient variance of 55°F (30.5°C) between the coolest and hottest parts of the chicken! Many different temperatures occurring in the same roast chicken.
In summary, we were able to observe that with Kenji’s recommended pull temperature the chicken remained in the necessary thermal range above 145°F (63°C) for a full 15 minutes (more than the required 8.5 minutes for pasteurization) after pulling the chicken from the oven, making it just as safe to eat as a piece of chicken that had reached the instantaneous pasteurization temp of 165°F (74°C).
The Real Test: How Did it Taste?
Because the chicken was cooked to a lower temperature, the meat retained more moisture and the result was a juicy and succulent piece of chicken—not a dry bit to be found! Not only was the meat extremely juicy, but the measures taken with drying the meat and separating, oiling and salting the skin, made for crackling-crisp skin. Some of our very willing taste-testing subjects commented this was the best roasted chicken they’d ever tasted.
Because of personal preferences and some individuals being more susceptible to contracting illness, this cooking method may not be for everyone. But with the right tools and expert advice, you can experience better tasting roasted chicken. With the
[sup][sub]ChefAlarm[/sub][/sup][sup][sub] and [/sub][/sup]
[sup][sub]Thermapen[/sub][/sup][sup][sub]‘s precision and accuracy there is no need to question your chicken’s safety. Get roasting![/sub][/sup]
[sup][sub]================================[/sub][/sup]