MES Rewire Simple Guide - No Back Removal Needed!!!

  • Some of the links on this forum allow SMF, at no cost to you, to earn a small commission when you click through and make a purchase. Let me know if you have any questions about this.
SMF is reader-supported. When you buy through links on our site, we may earn an affiliate commission.
Ok. Didn't know there was a std BT with top element. MB is getting out of hand on now four Generations with a million subsets. If you don't really need the broiler then you can ignore that wiring when found or still splice into the two top element wires with a power cord and ground to chassis after the PID mod if you want plugged in broiling unplugged off.
Yeah too many to choose from, ty for the tips!!
 
If it has a max operating temp of 275F then the top broiler is almost pointless... it can't really broil hahaha.
Yeah the Bluetooth feature for the MES has always been reported to never work which is sad since it is a major selling point but has never worked.

One of the guys on the forum uses and likes the Auber PID that has Bluetooth. I believe there are some quirks with the Auber Bluetooth unit BUT it didn't seem to be enough to keep the guy from really enjoying it.

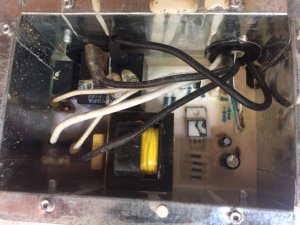
If you don't even care about the top broiler then I'm pretty confident you could just do the rewire like this post mentions as long as you only find and connect the normal smoker heating element wires and they don't include the other broiler element in the circuit. In this case it would operate like any MES on a PID we have discussed in the past.
I should state the temp options for the top broiler is low, med, high lol no idea what temp those are.
 
I should state the temp options for the top broiler is low, med, high lol no idea what temp those are.

Funny. If the max operating temp of the smoker is still 275F then that top broiler element may never really "broil" much hahaha.
Unless that element is not wired into the safety rollout limit switch :emoji_astonished:
 
OK tallbm tallbm dr k dr k . I have to ask , and you guys know more about it than I do .
If both the elements are 800 watts , and the Auber 1510 is good for 1800 watts . Can he bypass factory controller , wire both elements ( series / parallel ? ) and have heat from both top and bottom ?
I would think parallel would work ? As long as you don't over work the Auber .
I guess you could have two wires wire nutted to hot and the other two to neutral if that is proper or not but I don't know how the cooking would be with both on at the same time and if you are stuck with using one or two racks. The instructions mention that the PID can be on 100% of the time at 10 amps/1,200 watts with no concerns with heat build up with the heat sink but any higher amps/watts your limited to a certain amount of time it's on full before changing the proportional higher to get it out of being on constantly or change the output lower from 100% to avoid overheating the PID. This may not be an issue with this small smoker but if it was a custom large uninsulated smoker at 1,600 watts it could be.
 
From what I've read 90 minutes is the time limit to reach temp setting on the 1510 . Just got me thinking about the 2 elements . Works great with one , just seems like there is an idea there some where with 2 .
 
From what I've read 90 minutes is the time limit to reach temp setting on the 1510 . Just got me thinking about the 2 elements . Works great with one , just seems like there is an idea there some where with 2 .
It would preheat that little smoker in no time. There's a snap disc safety sensor on the top element mounting bracket.
John-McLemore-Pin.jpg
 
OK tallbm tallbm dr k dr k . I have to ask , and you guys know more about it than I do .
If both the elements are 800 watts , and the Auber 1510 is good for 1800 watts . Can he bypass factory controller , wire both elements ( series / parallel ? ) and have heat from both top and bottom ?
I would think parallel would work ? As long as you don't over work the Auber .

I think dr k has you covered.
In short yeah two 800watt elements should be no problem for a 1800 watt Auber PID.
As Kurt mentions you would just have to consider a situation where the Auber PID wouldn't be working with 100% output for an extended period of time thereby burning up the PID.
Example would be if you used an Auber PID pulling 1600Watts to heat your house with a heating element and the PID was working 100% output because it could never heat your house to 225F. That would burn out the PID.

With these MES units that should not be an issue and they should heat up with 2 units in no time.
The other issue to consider is that if both elements pull maximum Amps and it exceeds your breaker limit and flips the breaker on you constantly hahhaa.
 
It would preheat that little smoker in no time. There's a snap disc safety sensor on the top element mounting bracket.
John-McLemore-Pin.jpg
Nice catch! I hope that isn't how it is regulated from overheating hahaha. Relying on a safety switch seems like a poor design but what do I know :)
 
My remote failed on me during my third cook this weekend, I think this thread is keeping me from throwing out my smoker (I’ve had various issues so far). I’ve got my head wrapped around this mod but my question is the different number settings for P,I, & D? What do the different number settings do?
 
Something you get with the plug and play Aubers is the ability to set the configurations , and fine tune . Some guys don't use the features , but I do .
Go to section 5 , table 2 . It tells you what does what . It can give you a headache , so don't read to much now . You can do that later if you do the change over .
https://www.auberins.com/images/Manual/WS-1510ELPM/WS-1510ELPM.pdf
 
  • Like
Reactions: tallbm and cnet24
My remote failed on me during my third cook this weekend, I think this thread is keeping me from throwing out my smoker (I’ve had various issues so far). I’ve got my head wrapped around this mod but my question is the different number settings for P,I, & D? What do the different number settings do?

Chop has you well covered. The documentation Auber provides isn't so well put together.

The P, I, and D settings all work together to control how the temperature is managed.
Think of "P" - as the main engine that drives it all but it is a little dumb and needs some help.

Think of "I" - as the best friend of "P" that tries to keep things around the set point and from going too far off the rails.

Think of "D" - as the overly smart guy who is helpful when brought in at the right time and in the right situation to help fine tune. Kind of like picking the proper baseball closer to handle the end of the baseball game knowing what players are coming up to bat but outside of that situation he doesn't get you to the 9th inning for the the win, just puts you over the top.

All 3 work in concert and when dialed in they keep you very very close to your set temp.

The Auber has an "auto-tune" feature to help figure these numbers out for you and for most people gets it right on or close enough. Just set aside like 3 hours for the autotune to run when you execute it :)

I hope this info helps!
 
  • Like
Reactions: pounce and cnet24
Tallbm!! Great reply. Thought you should have brought in the commissioner...a catcher...endless fun possibilities:)
 
Tallbm!! Great reply. Thought you should have brought in the commissioner...a catcher...endless fun possibilities:)

Hahahaha yeah would be fun :)
 
I hope this info helps!
That's a great way to put it . I wrote it down in lay men terms and stood in front of the smoker . I set P then set temp and waited . Wasn't getting to temp fast enough so I increased I until I ( me ) thought it was good . Turned it off cooled it down . Re started . Got to temp then I opened the door to lose heat and watched the recovery . To slow , so I increased D a bit at a time until it turned the element on almost as soon as I opened the door .
I ended up with a smoker that charges to set temp , over runs by 2 degrees , then cools to set temp ( does not go under ) and stays there . Open the door , turns the element on recovers fast with no over run .
 
  • Like
Reactions: cnet24 and tallbm
That's a great way to put it . I wrote it down in lay men terms and stood in front of the smoker . I set P then set temp and waited . Wasn't getting to temp fast enough so I increased I until I ( me ) thought it was good . Turned it off cooled it down . Re started . Got to temp then I opened the door to lose heat and watched the recovery . To slow , so I increased D a bit at a time until it turned the element on almost as soon as I opened the door .
I ended up with a smoker that charges to set temp , over runs by 2 degrees , then cools to set temp ( does not go under ) and stays there . Open the door , turns the element on recovers fast with no over run .

Yeah it just takes a little tweaking to manually dial it in. I had to do that with my HeaterMeter PID. I had a bit of work dialing it in was that the PID algorithms were designed to control heat through a blower fan charcoal and not use an SSR with a slower responding heating element. I couldn't find any feasible PID values to begin with so just trial and errored the entire thing lol.
I finally got it dialed in though and have been in PID heaven since. :)
 
  • Like
Reactions: chopsaw
Thank you for posting this. I just pulled the riveted cover off and the wiring looks the same. I guess they did not change much over the years
 
  • Like
Reactions: tallbm
Maybe obvious to the more electronic savvy but I need to ask anyway. On my Gen 1 I have done the re-wire and am running through an Auber PID. I have also removed the useless internal light so now the stock clamshell controller does nothing other than take up space. I'd like to just be rid of it and make a stainless or aluminum cap to cover the holes where the controller wires come through the top.
_DSC0095.JPG

_DSC0096.JPG
Finally to the question: Can I just snip the wires to the controller and be done with it, or are they still doing something (like completing a circuit or something)?
 
  • Like
Reactions: Atl1530
Maybe obvious to the more electronic savvy but I need to ask anyway. On my Gen 1 I have done the re-wire and am running through an Auber PID. I have also removed the useless internal light so now the stock clamshell controller does nothing other than take up space. I'd like to just be rid of it and make a stainless or aluminum cap to cover the holes where the controller wires come through the top.
View attachment 399066

View attachment 399067
Finally to the question: Can I just snip the wires to the controller and be done with it, or are they still doing something (like completing a circuit or something)?
I did this no back removal with four cuts, two wire nuts. One nut on the white neutral power cord and braided element wire and the other nut on the black hot and other braided element wire. The circuit is closed to the element, not including the circuit board in the bottom where the controller leads are attached. I cut the pin connectors off the top controller leads and tucked an inch or two in the top of the cabinet. No sealing RTV silucone needed. I did put a 40 watt bulb in place of the 15 watt since the socket is ceramic rated at 75 watts directly wired to 16/2 gauge extension cord and heat shrinked for heat insulation. I took the little window out of the bulb housing with the retaining screw and put a piece of alun foil over the window till I pull it for night smokes. Lol. I'm the only one that likes the inside light. But it has to be 40 watt bulb+. 20180302_101908.jpg
I did seal this hole with RTV silicone.
20180228_105045.jpg
Cut original bulb wires flush and put a block of wood on the outside to drill through from the inside holel. The socket having screw terminals made it simple to terminate to the 16 gauge cord.
 
Can I assume this to be true?

My two braided bk wires come out of the same location but I can tell from where the connect witch wires they are.......right?
 

Attachments

  • smoker wiring .jpg
    smoker wiring .jpg
    131.9 KB · Views: 55
SmokingMeatForums.com is reader supported and as an Amazon Associate, we may earn commissions from qualifying purchases.

Hot Threads

Clicky