Fatties, Part one - how I make them

  • Some of the links on this forum allow SMF, at no cost to you, to earn a small commission when you click through and make a purchase. Let me know if you have any questions about this.
SMF is reader-supported. When you buy through links on our site, we may earn an affiliate commission.

gmc2003

Epic Pitmaster
Original poster
OTBS Member
SMF Premier Member
Sep 15, 2012
17,906
14,711
Hopefully this will explain how I make my fatties. It's very similar to how many others on this site make them - It should be since I learned how to make them here. Please excuse any of my directions that aren't clear(I will reread this in the morning and make corrections). I smoked some wings this evening and managed to put a few cold PBR's down the old gullet.


The two most essential items. 1 gallon zip lock bags(they don't have to be the freezer style), and the sausage of your choice. I use about a pound and a quarter of sausage for each fattie.
DSC00584.JPG


Put your sausage into the bag and trim off the two bottom corners. This will allow the air to escape.
DSC00585.JPG


Flatten the sausage with the palm of your hand to start. It makes rolling it easier.
DSC00586.JPG


To flattened use a roller and fill the entire bag evenly.
DSC00587.JPG


Put a peice of plastic wrap down on the counter so the rolling process will be easier. This will also be used when forming the fattie.
DSC00588.JPG


Cut away the top of the plactic bag. Exposing one side of the sausage.
DSC00589.JPG


Cover the sausage with a piece of parchment or wax paper.
DSC00590.JPG


Carefully flip the sausage over on the plastic wrap.
DSC00591.JPG


and remove the rest of the zip lock bag.
DSC00592.JPG

Now lets add some topping. This is a meat lovers fatty. So it has ham, pepperoni, proscuitto, pulled pork, blended pizza cheese and pizza sauce. First layer is the ham. I like to use the bigger slices as the first layer. They make a good barrier to help prevent blowouts.
DSC00593.JPG


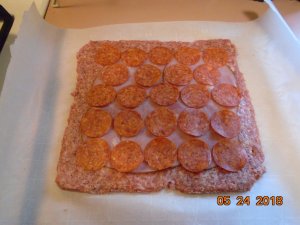
Then add your additional toppings. Keeping in mind to not go to close to the edges of the fatty.
DSC00595.JPG


I like to use shredded cheese in my fatties they seem to roll better.
DSC00596.JPG


Using shredded cheese also allows the sauce to sink into the cheese so it doesn't squeeze out as much.
DSC00597.JPG


The yodeling process. Carefully roll the parchment paper upwards. Leaving the plastic wrap on the counter. As your rolling try to keep the sausage tight to itself. Also once you've rolled the fattie up a quarter of a turn slide the whole fattie back to the edge of the plastic wrap.
DSC00598.JPG

You should end up with something that looks like this in the center of the plastic wrap.
DSC00599.JPG


Completely cover the fattie with the plastic wrap, twist the ends and spin it around a few times to tighten it up. Then set it in the refrigerator.
DSC00600.JPG


This is the end of part 1. Part 2 will be the weave. Thanks for looking and feel free to offer up any tips.

Chris
 

Attachments

  • DSC00594.JPG
    DSC00594.JPG
    121.3 KB · Views: 89
Hopefully this will explain how I make my fatties. It's very similar to how many others on this site make them - It should be since I learned how to make them here. Please excuse any of my directions that aren't clear(I will reread this in the morning and make corrections). I smoked some wings this evening and managed to put a few cold PBR's down the old gullet.


The two most essential items. 1 gallon zip lock bags(they don't have to be the freezer style), and the sausage of your choice. I use about a pound and a quarter of sausage for each fattie.
View attachment 365037

Put your sausage into the bag and trim off the two bottom corners. This will allow the air to escape.
View attachment 365038

Flatten the sausage with the palm of your hand to start. It makes rolling it easier.
View attachment 365033

To flattened use a roller and fill the entire bag evenly.
View attachment 365034

Put a peice of plastic wrap down on the counter so the rolling process will be easier. This will also be used when forming the fattie.
View attachment 365035

Cut away the top of the plactic bag. Exposing one side of the sausage.
View attachment 365036

Cover the sausage with a piece of parchment or wax paper.
View attachment 365041

Carefully flip the sausage over on the plastic wrap.
View attachment 365042

and remove the rest of the zip lock bag.
View attachment 365043
Now lets add some topping. This is a meat lovers fatty. So it has ham, pepperoni, proscuitto, pulled pork, blended pizza cheese and pizza sauce. First layer is the ham. I like to use the bigger slices as the first layer. They make a good barrier to help prevent blowouts.
View attachment 365044

Then add your additional toppings. Keeping in mind to not go to close to the edges of the fatty.
View attachment 365040

I like to use shredded cheese in my fatties they seem to roll better.
View attachment 365047

Using shredded cheese also allows the sauce to sink into the cheese so it doesn't squeeze out as much.
View attachment 365050

The yodeling process. Carefully roll the parchment paper upwards. Leaving the plastic wrap on the counter. As your rolling try to keep the sausage tight to itself. Also once you've rolled the fattie up a quarter of a turn slide the whole fattie back to the edge of the plastic wrap.
View attachment 365051
You should end up with something that looks like this in the center of the plastic wrap.
View attachment 365048

Completely cover the fattie with the plastic wrap, twist the ends and spin it around a few times to tighten it up. Then set it in the refrigerator.
View attachment 365049

This is the end of part 1. Part 2 will be the weave. Thanks for looking and feel free to offer up any tips.

Chris
 
That's the same way I do them !! Oh wait, I learned how from here too :D:D... Great step by step for first timers ..

Thanks for kind words and like Jax. Someone earlier mentioned that the tutorial most of us used had lost it's pictures during the site upgrade. Well since I knew I'd be making a couple for this weekend I thought I'd give it a go. I know it's not the original, but hopefully it will help someone with their first try.

Chris,
Great write-up, great pictures This is on my wish list of food items to smoke.

I am following this thread, can’t wait for part 2.

Thanks yankee, Our family loves these. Give it a whirl and let your imagination run wild with the filling. Just don't overstuff them(like I did on my first two attempts).

Chris
 
Thanks for the read dunlap. I hope this tutorial helps you out - as did the original when I did my first.


Cfarmer, Bdskelly, and smoke23 thanks for the look and like appreciate it.

Chris
 
...And don't be surprised if giggling comes over your shoulder at the last picture.... :D

Sure looks good! Not sure I could sell that to my crowd, but I want to try.
So, does one of these taste more of the sausage? Or a blend of many flavors?
And can I half the size, or might that ruin it?
 
...And don't be surprised if giggling comes over your shoulder at the last picture.... :D

Sure looks good! Not sure I could sell that to my crowd, but I want to try.
So, does one of these taste more of the sausage? Or a blend of many flavors?
And can I half the size, or might that ruin it?

It's more of a blended flavor. It depends on what was on the fork at the time you put it in your mouth. I haven't made them any smaller, but someone did do mini-fatties once. Sonny give it a try I'm sure it would be a hit with the G-kids. Thanks for the like.

Chris
 
  • Like
Reactions: negolien
This seems pretty interesting and looks good, My question is I have a pit boss and I want to give it a try, do we cook this low and slow or 225ish? and for how long. Also would you recommend a light mopping or spray through the cooking process.
 
  • Like
Reactions: negolien
You can go low and slow. I usually go around 250* and cook until the internal is at least 165*. Most times I'll let it go a little further to get the bacon to the desired crispyness or you can crisp the bacon up in the oven under the broiler. No need to mop or spritz. I believe they average a couple of hrs at 250*. Remember you can stuff with whatever you like the skies really the limit. Let us know if you try it and show us some pictures.

Just a note: There are two other threads tied to this thread. One of them will explain the weave and the other will show the final product. Have fun.

Chris
 
Ok. Question. You wrap the fattie in plastic first and then put into fridge before the weave. How long in the fridge? Just until the weave is ready? Also why wrap in plastic again and back in the fridge after the weave and for how long?
 
This seems pretty interesting and looks good, My question is I have a pit boss and I want to give it a try, do we cook this low and slow or 225ish? and for how long. Also would you recommend a light mopping or spray through the cooking process.

Hello George. Yep you can do this on your pit boss for sure, I do them quite often as they are a hit with the boys on the rig. I put them on at 225 for an hour to hour and a half till burger / meat is almost cooked then turn it up to 300 to crisp the bacon for 20-30mins. you can cook them at 250 to 300 as well. I like the longer slower to get more smoke in mine.
 
  • Like
Reactions: negolien
Ok. Question. You wrap the fattie in plastic first and then put into fridge before the weave. How long in the fridge? Just until the weave is ready? Also why wrap in plastic again and back in the fridge after the weave and for how long?

I put the fatty in the fridge for safety reasons while I make the bacon weave. It also allows the fatty to firm up. Once the weave is done then take the fatty out of the fridge and combine the two. Post weave it doesn't matter how long you put it in the fridge. I usually make the fatty in the morning and smoke them later on that day or the next day. If your smokers ready then the fatty can go on right away. I will mention that the fatty along with the bacon will stay together better if you allow it to rest for an hour in the fridge wrapped up tight in the plastic.

Give it a whirl and let us know how it turns out.

Chris
 
This seems pretty interesting and looks good, My question is I have a pit boss and I want to give it a try, do we cook this low and slow or 225ish? and for how long. Also would you recommend a light mopping or spray through the cooking process.

As Charlie said - yes you can. Heck if need be you could do it in an oven. My smoker like to ride it out at 250 so who am I to argue with it. I don't mop or spritz during cooking. The bacon has plenty of moisture. You can add some of your favorite rub to the outside of the bacon if you want to add another layer of flavor. If you try making one let us know how it turns out.

Chris
 
I was told to ask about these. This a definite "To Do" list item. Thanks for the effort, look forward to part II
 
Thanks Pittmac, Give them a try and let us know how they turn out.


Chris

Part 2 and 3 are out there
 
Hopefully this will explain how I make my fatties. It's very similar to how many others on this site make them - It should be since I learned how to make them here. Please excuse any of my directions that aren't clear(I will reread this in the morning and make corrections). I smoked some wings this evening and managed to put a few cold PBR's down the old gullet.


The two most essential items. 1 gallon zip lock bags(they don't have to be the freezer style), and the sausage of your choice. I use about a pound and a quarter of sausage for each fattie.
View attachment 365037

Put your sausage into the bag and trim off the two bottom corners. This will allow the air to escape.
View attachment 365038

Flatten the sausage with the palm of your hand to start. It makes rolling it easier.
View attachment 365033

To flattened use a roller and fill the entire bag evenly.
View attachment 365034

Put a peice of plastic wrap down on the counter so the rolling process will be easier. This will also be used when forming the fattie.
View attachment 365035

Cut away the top of the plactic bag. Exposing one side of the sausage.
View attachment 365036

Cover the sausage with a piece of parchment or wax paper.
View attachment 365041

Carefully flip the sausage over on the plastic wrap.
View attachment 365042

and remove the rest of the zip lock bag.
View attachment 365043
Now lets add some topping. This is a meat lovers fatty. So it has ham, pepperoni, proscuitto, pulled pork, blended pizza cheese and pizza sauce. First layer is the ham. I like to use the bigger slices as the first layer. They make a good barrier to help prevent blowouts.
View attachment 365044

Then add your additional toppings. Keeping in mind to not go to close to the edges of the fatty.
View attachment 365040

I like to use shredded cheese in my fatties they seem to roll better.
View attachment 365047

Using shredded cheese also allows the sauce to sink into the cheese so it doesn't squeeze out as much.
View attachment 365050

The yodeling process. Carefully roll the parchment paper upwards. Leaving the plastic wrap on the counter. As your rolling try to keep the sausage tight to itself. Also once you've rolled the fattie up a quarter of a turn slide the whole fattie back to the edge of the plastic wrap.
View attachment 365051
You should end up with something that looks like this in the center of the plastic wrap.
View attachment 365048

Completely cover the fattie with the plastic wrap, twist the ends and spin it around a few times to tighten it up. Then set it in the refrigerator.
View attachment 365049

This is the end of part 1. Part 2 will be the weave. Thanks for looking and feel free to offer up any tips.

Chris
It be great if someone could put these post in the sticky post because of the Problem with the pictures in the one that is there.
 
It be great if someone could put these post in the sticky post because of the Problem with the pictures in the one that is there.

Those pictures got lost with the new format changeover unfortunately. Thanks for the like pa42phigh I appreciate it.

Chris
 
SmokingMeatForums.com is reader supported and as an Amazon Associate, we may earn commissions from qualifying purchases.
Clicky