Something different

  • Some of the links on this forum allow SMF, at no cost to you, to earn a small commission when you click through and make a purchase. Let me know if you have any questions about this.
SMF is reader-supported. When you buy through links on our site, we may earn an affiliate commission.

rembrandt

Newbie
Original poster
Mar 27, 2020
8
2
So this is my first attempt at a home built smoker.
I would like to do something different, and this is what i came up with.
Not really sure where to put it as there was no submenu for vertical smokers.
Please let me know what you guys think of it. Whether you like it, or think it's shite, all advice and/or suggestions are welcome .

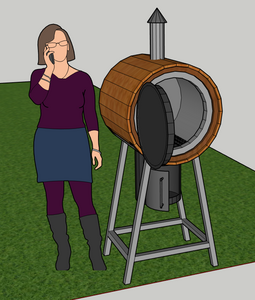
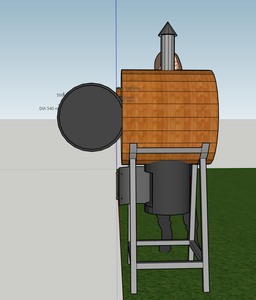
smoker 1.0 (8) compleet.png Woman for scale.
Made a nice drawing in sketchup already.

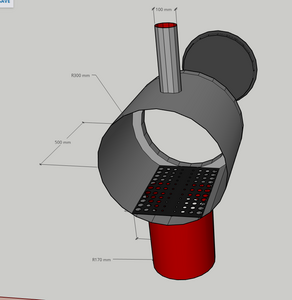
The plan is to make it from 2mm steel plate. Rolling and welding the firebox, cooking chamber with lid and exhaust together.
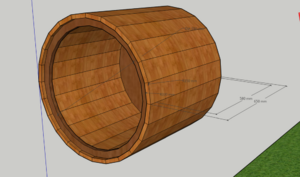
Then insulating only the cooking chamber by making a wooden shell with rockwool (or something else maybe?) around the chamber.
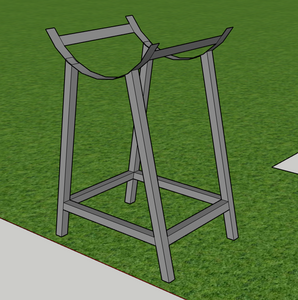
My first thought was to make it so that the smoker just sits in the carriage, making it easy to take of, in case i would like to adjust it in the future.
Dimensions of the cooking chamber are: 600mm diameter and 500mm deep.

Of course i will gladly answer any questions.
Kind regards,
Rembrandt

smoker 1.0 (3) achter.png
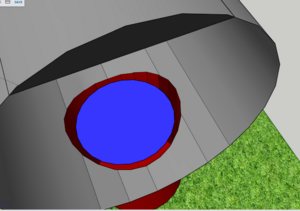
smoker 1.0 (5) omhulsel isolatie.png
smoker 1.0 (6) standaard.png
smoker 1.0 (9) compleet zij.png
 
  • Like
Reactions: kruizer
My first thought is that you have a ton of volume in the cc for such a small rack. I'd add an additional rack or two or reduce the volume of the cc significantly.

This assumes that your rack is to scale within the cook chamber.
 
So 23.5" Di. x 19.5"L. 2300 Sq. In. 16.5 Sq Ft.
yep what is your rack configuration going to be.
also heat is vary direct in the drawing. any thoughts on controlling that??
 
Last edited:
My first thought is that you have a ton of volume in the cc for such a small rack. I'd add an additional rack or two or reduce the volume of the cc significantly.

This assumes that your rack is to scale within the cook chamber.
Is a rack the thing you lay your meat on?
If so: 3 racks is very possible to get in there.
But indeed in hindsight maybe it's a little big, do you think much to big?

So 23.5" Di. x 19.5"L. 2300 Sq. In. 16.5 Sq Ft.
yep what is your rack configuration going to be.
also heat is vary direct in the drawing. any thoughts on controlling that??
Maybe i will put the diffuser plate a little higher so there is a better distribution of the smoke and heat. I was also thinking of some sort of baffle or big flat plate under the diffuser plate, so the heat does not directly go upwards but first to the sides of the diffuser.
 
What you are planning is actually known (at least in my lexicon) as a T-Pit. I have one that was custom built a few years ago. Here are a few pics. I'll post more info on specifics later today or tomorrow. Got a full day of yard work ahead of me. First you're gonna need dampers. See the ones on the side of mine at the fire box. Then you're going to need a substantial heat deflector plate. Your main cooking grate will also need to be elevated for proper heat circulation. Those are just for starters. I'll chime in later with more info. Hang in there....lots of really good info is on the way
093.jpg

096.jpg

097.jpg

099.jpg


P.S. you're also going to need a place for the grease to exit and drip into some sort of container. I'll be back later. Oh...cook chamber is 24" in diameter and 60" long. Fire box is 24" in diameter and about 18" tall. your dimensions can vary of course depending on your needs.

Be back later
Robert
 
I'll chime in later with more info. Hang in there....lots of really good info is on the way

Glad i registered to this forum!

I picked up the steel today and if all goes as planned my roll bender will arrive someday next week. Time enough to adjust plans.
 
Alrighty now. First off apologies for the delay in getting back. It's Springtime in Central Texas and my dearly beloved has me busy as a one-legged man in an a$$ kicking contest getting the yard in shape. My passion is food, cooking, and cooking equipment. Hers is the yard. She supports my hobbies all year so I try to support her when she asks for help. The difference is that her supporting me never involved 11 straight hours of moving mulch all over 20 different plant beds covering almost 4 acres of land :emoji_laughing: That was yesterday and today was the first full cut/trim/edge/fertilize/weed & feed of the season. Oh joy....

Now to the smoker. As stated, you're going to want to raise the main cooking grate to the center of the cook chamber as opposed to having it at the bottom as shown in the pic. In mine the heat deflector plate is two pieces of 8" round diameter 1/2' thick wall steel pipe that is cut lengthwise end to end. Total length of the two pieces is 4 to 5 inches shorter than the inside of the cook chamber. This is placed over the opening between the fire box and cook chamber. Based on your design you'll only need one piece but I have the double doors by my design. The deflector will create a reverse flow smoker that heats from both ends versus just one end in a standard reverse flow. This is a HUGE benefit insofar as even coking temps. You can either put it in the middle and have perfectly balanced temps end to end or you can move it for different temps at each end. Example: I regularly will put a brisket on one end and a few racks of ribs on the other end. I can slide the deflector plate, damp down one end and open the other, and have the smoker at 275 on one end for the briskets and 225 on the other end for ribs. You can also use it to adjust for a prevailing wind that may be blowing and throwing your temp balance off. There is a required number of square inches of opening between firebox and cook chamber based on the size of the cook chamber but I'm not certain what it is. I recommend making it a longer and narrower rectangle versus a square right in the middle. This will allow for better heat distribution to the cook chamber instead of just one very hot spot right in the middle.

I highly recommend setting it up with a smaller top cooking grate up higher to optimize your cooking capacity. This ideally will be about half way up between your main grate and the top of the smoker. Based on where this will sit, you'll want to move your vent stacks to the back of the cook chamber instead of directly in the center but the openings need to be higher than the upper grate. Doing this will put the vents (I do recommend doing two of them spaced about 4" apart) somewhere close to the middle of your upper grate. In this manner the upper grate will experience fully even cooking temps and smoke also as the heat and smoke are rising and exiting the cook chamber. The stacks should also be taller than what is indicated in the rendition you showed and you'll need rain caps/dampers on the tops of them.

When I had mine built and took delivery of it, after doing the burn in I did some major testing to see where the hot and cold spots are. I checked every possible combination of placements of the temp probes and was blown away at how evenly this smoker will maintain temps. The warmest spot was right in the middle above the firebox but only by a few degrees. Temps end to end and top to bottom were exactly the same and stayed within 2-3 degrees for hours at a time. Based on this, when I do a brisket I put the point toward the middle and the flat toward the end for even cooking. I don't get the flat over done and the point still needing time to get to temp.

Please feel free to fire away with any questions you may have. This smoker was my design and is virtually perfect. The only change I'd make if I was to have another one built would be to elongate the opening between firebox and cook chamber as described above. That is my take-away from this design/build experience. In all honesty, I don't think i'll ever need another one. I've owned probably 15 different smokers and this one is about as perfect as a person could ever ask for. Sort of a combination of all the good aspects from all the others rolled into one.

Did I miss anything?
Robert
 
  • Like
Reactions: fivetricks
Glad i registered to this forum!

I picked up the steel today and if all goes as planned my roll bender will arrive someday next week. Time enough to adjust plans.

Just want to make sure you get my response so am sending this quoting your reply. See my response above.

Robert
 
Did I miss anything?
Robert

Absolutely no need for apologizing. I am very happy you are kind enough to take the time for writing down all this info.

Later this evening I will upload an sketch of version 1.1

Things to pay attention to:
1 adjust diffuser plate
2 heat deflector
3 make food grates in sketch
4 exhaust

1: diffuser plate higher and simpler design (less drilling for me)

2: Incorporate deflector in design. maybe 2 heat deflectors that i can slide a bit to make a temp difference like you do?

note: is a deflector really necessary? Can i get away with only 1 diffuser plate?

3: food grates, because i get the idea that my diffuser plate is perceived as a food grate.

4: well I will have to pull out some tricks here. I like the look of the one exhaust. Maybe its possible to put a diffuser plate under the exhaust, in top of the cc, to get an equivalent airflow of 2 vents?
After all its just the way the air flows, right?

Why do my vents need to be taller?
 
Absolutely no need for apologizing. I am very happy you are kind enough to take the time for writing down all this info.

Thank you for understanding. I need to once again ask for that to continue :emoji_wink: I'm in the middle of an epic dinner for me and my dearly beloved and I have about 5 things going at once. I'll try to respond to your questions later but most likely it's gonna be tomorrow. Been a long, hard weekend and I'm looking forward to eating a nice meal, spending time with the one I love, and enjoying a cold adult libation. Good questions though and we will get this dialed in pretty kwik.

Robert
 
  • Like
Reactions: rembrandt
Been a long, hard weekend and I'm looking forward to eating a nice meal, spending time with the one I love, and enjoying a cold adult libation.
well cheers to that!

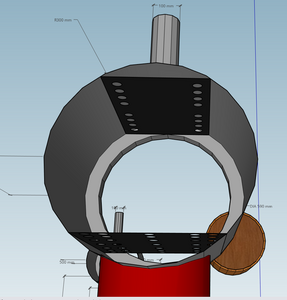
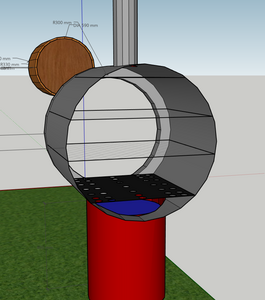
This is 1.1, with the adjustments made, but dont let this version alter your view at it.
ALSO: since everything is made from scratch, funky solutions are possible. Anything goes, give it to me unsalted.:emoji_confused:
1.1 deflector (10).png
1.1 schoorsteen diffuser.png
1.1 cc.png
 
First off, you're over thinking this. That's far better than under thinking it and going into the project half-cocked though.

Things to pay attention to:
1 adjust diffuser plate
2 heat deflector

You don't need both. Get rid of the diffuser plate. All you need is a solid heat deflector plate. Mine is 8" round pipe cut lengthwise and laid over the opening between the firebox and the cook chamber. You can actually cut a piece of flat plate steel wide enough that it will sit inside of the cook chamber toward the bottom 4 to 5 inches above the opening, basically where you are showing the diffuser plate. This will direct the heat to both ends creating a reverse flow effect that you get in higher end smokers, you just get it from both ends as opposed to only one end.

1: diffuser plate higher and simpler design (less drilling for me)

Lower diffuser plate not needed as stated above. Never seen one up high as you have in your drawing and don't see that it brings anything to the party.

note: is a deflector really necessary? Can i get away with only 1 diffuser plate?

Deflector highly recommended for all the reasons previously stated. Diffuser not needed.

3: food grates, because i get the idea that my diffuser plate is perceived as a food grate.

I see the two lines in your drawing showing the food grates. nothing inaccurately perceived on my end.

maybe 2 heat deflectors that i can slide a bit to make a temp difference like you do?

The only reason my deflector plate ins in two pieces is because of the two door design. I can't get a full length piece of steel into half the length of the smoker. You only need one piece cut 4 to 5 inches shorter than the inside length of the cook chamber and you'll be able to slide it for temp adjustment as I mentioned previously.

Maybe its possible to put a diffuser plate under the exhaust, in top of the cc, to get an equivalent airflow of 2 vents?

I still see no reason for the top diffuser. If you're able, make the vent stack oblong or oval. That may help with the heat distribution and even venting.

Why do my vents need to be taller?

The vent stacks create a draw just like a fireplace chimney. The draw will be stronger with a taller vent. This is what keeps the smoke moving through the cook chamber and pulls fresh air into the firebox to sustain your fire. Not necessarily a requirement but it will be much more efficient if the stack is more than a foot or two tall.

I think this address everything in your last post...but I have a feeling there will be more questions, so fire away!!

Robert
 
First off, you're over thinking this.
Most probably, I am.

You don't need both. Get rid of the diffuser plate. All you need is a solid heat deflector plate.
OK. no diffuser. Just a deflector plate that has room for the heat and smoke to pass at the sides.

You only need one piece cut 4 to 5 inches shorter than the inside length of the cook chamber and you'll be able to slide it for temp adjustment as I mentioned previously.
Of course, rembrandt, where's your thought at sometimes :emoji_grimacing: . Much simpler and easier solution.

I still see no reason for the top diffuser. If you're able, make the vent stack oblong or oval. That may help with the heat distribution and even venting.
Because you advised double stacks at first, I thought, well, If a deflector works for heat distribution going into the cc, it might work that way as well for heat exiting the cc, to mimic the double chimney effect?

Though I will probably be able to make an oval chimney (just cut a pipe lengthwise and weld flat sheet in between), I don't think i will like the looks of it.
So that is the reason I'm kind of trying to trick my way out of that problem with the chimney deflector.
Also, if you say a longer is more efficient, but not a necessity, then i will probably leave it as it is.


First you're gonna need dampers. See the ones on the side of mine at the fire box.
One last thing (for now at least): you mentioned dampeners in your first message.
Are there any given ratio's or guidelines for those?
 
SmokingMeatForums.com is reader supported and as an Amazon Associate, we may earn commissions from qualifying purchases.

Latest posts

Hot Threads

Clicky