Old Tank, New Smoker

  • Some of the links on this forum allow SMF, at no cost to you, to earn a small commission when you click through and make a purchase. Let me know if you have any questions about this.
SMF is reader-supported. When you buy through links on our site, we may earn an affiliate commission.

EricBW

Newbie
Original poster
Nov 9, 2020
28
36
Appleton, Wisconsin
Hey guys, new member here. Stumbled across this site when google directed me to the awesome build calculator.

Been a fan of grilling since highschool, bought a Masterbuilt Gravity series grill/smoker about a year ago, and I'm now hooked on smoking. Been wanting to dive into the offset world, just could never get myself to pull the trigger on a decent one. I love building/fabricating stuff, and when I started seeing pictures of tanks of all sorts being turned into smokers I instantly knew that was the route I'd go.

So onto the build.... My buddy had an old 60gal air compressor at the farm that locked up, which he gave me free of charge. Tag on the tank has a build date of 1966 from a barge company, and stated a thickness of .218 on the steel... perfect. I unbolted compressor and motor, those went on his scrap pile, and this came home with me.

20201108_133545.jpg


I got the compressor mounting plate all cut off, and started laying everything out. I have not cut the legs off yet, not sure what I'm doing for a stand/cart at the moment. Figured I might as well leave those on there so I'm not fighting this thing rolling all over the place on me.

I went through all the calculations, and based my door opening off the CC/FB opening placement. I should be smidge over 4" from the RF plate to the cooking surface. Both racks will slide out, so the bottom cut is below the centerline of the tank. I laid everything out with a laser. Mainly because I'm a machinist, and it's a curse doing projects... everything's always gotta be perfect... Was a bit tricky getting the laser all lined up, but only took about 3/4 of a beer to get there.

Didn't take pictures of the whole process, but I used the laser to place my masking tape, and scored the entire perimeter with the cutoff wheel before proceeding farther.


20201108_174024.jpg


20201108_194747.jpg
 
Next I went onto the hinges, not a big fan of the bullet style hinges a lot of people use, so I decided to build my own. I had a piece of 1/4" x 1-1/2" laying around, so I based my design off that. A few cardboard templates and I had something I liked. Hardware is 1/2" fine thread bolts. This stuff ain't going nowhere!

I just cut them out with a grinder, and drilled them all at once in my Mill/Drill. I then bolted them together and machined the surfaces that would sit on the tank so they'd all be the same.

20201109_181620.jpg


After I had all the hinge components fabbed up, I slid them all onto a piece of barstock, used a few magnets, tape measure, digital protractor, and finally got everything all lined up how I liked, and tacked them in place.

Side note, whoever painted this thing must have done 5 coats of implement paint, because it's thick! Might end up taking this to the sandblaster.


20201109_191232.jpg


20201109_193403.jpg
 
  • Like
Reactions: 48°North
And to bring me up to current status on this, I got the door all cut out. Reading what others have experienced I got lucky, because this thing did not spring/move whatsoever, which really had me quite suprised. Tank is pretty dirty and gross inside, but rust isn't too bad at all really.

I will be welding a stop onto the hinges once I know everything will be staying how it is. I'll wait until it's at operating height to see where I would like those placed before I get too carried away.

20201109_201055.jpg
 
Next step is to get this somewhat cleaned out, and get my CC/FB cut all laid out and cut. I've also got strapping ordered to do the seal on the CC door.

I started figuring out how I want to do the FB, but I'm waiting to get the opening cut before I get too far. I'm thinking I'd really like to have a lid on the top to sear/direct cook. When I'm smoking, I'm usually out in the shop all day, and I like the idea of being able to sear some smoked wings or steak for lunch while I've got something big smoking for supper.

Question for you guys regarding meat probes.... whose got good ideas on ports/access for the cables? does everyone just let them pinched in the door? I'd really like to have some sort of pass-thru on the end of the tank those...
 
Look forward to seeing this progress. You could install those rubber probe grommets for your probe wires.
 
  • Like
Reactions: EricBW
I’m in the process of a big electric build, and I’m all about 1/2” foot plates to support k-type probes (work with PIDs or inkbird etc stuff)) They cost a couple bucks and and will seal with a lttle red RTV to way more temp than we cook at...

For meat probes, just put em in the meat and close the door on the wire. The probes are really cheap.
 
  • Like
Reactions: EricBW
Next step is to get this somewhat cleaned out, and get my CC/FB cut all laid out and cut. I've also got strapping ordered to do the seal on the CC door.

I started figuring out how I want to do the FB, but I'm waiting to get the opening cut before I get too far. I'm thinking I'd really like to have a lid on the top to sear/direct cook. When I'm smoking, I'm usually out in the shop all day, and I like the idea of being able to sear some smoked wings or steak for lunch while I've got something big smoking for supper.

Question for you guys regarding meat probes.... whose got good ideas on ports/access for the cables? does everyone just let them pinched in the door? I'd really like to have some sort of pass-thru on the end of the tank those...
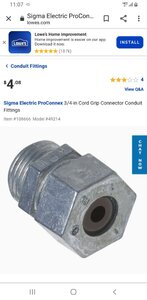
Welcome bud. Cool looking build. I use these for pass through probe ports. Get them at Lowes.
Screenshot_20201110-110731_Chrome.jpg
 
Next step is to get this somewhat cleaned out, and get my CC/FB cut all laid out and cut. I've also got strapping ordered to do the seal on the CC door.

When you weld the strap on the door, blind welding will keep the door from warping..
Skip weld the strap... ever 4" is fine...
One method is notch the door edge... Hold the strap to the door and tack weld from the inside where the notch is....


Blind weld notching.jpg


Plug and Slot blind welds...
Plug and Slot welds.png
...
PlugandSlotWelds.gif
 
Welcome bud. Cool looking build. I use these for pass through probe ports. Get them at Lowes.
View attachment 470214

I never even though of using these, I like this idea. Might even be able to use a couple existing holes.


When you weld the strap on the door, blind welding will keep the door from warping..
Skip weld the strap... ever 4" is fine...
One method is notch the door edge... Hold the strap to the door and tack weld from the inside where the notch is....

I saw you suggest this method in one of the other builds I was looking through (I've been digging through a lot in the last few days). Notch is definitely the route I'm going to go. I really debated TIG welding the front for aesthetics reasons (I love exposed TIG welds) but the time that would require is far too much just for the looks...
 
Update on where I'm at, got the cc/fb opening laid out and cut. Might be a sneak peek of my handle in these pictures as well, looks like this might get an automotive theme....

Ive seen a few people ask how to lay this out, so I took pictures of the process how a machinist overly complicates a process for something that doesnt need to be very accurate lol.

Started off with a height gauge set to my opening plus tank thickness and fb thickness, used that to scribe the line for the top cut.

20201111_182805.jpg


I then used a pair of oldschool calipers to scribe the perimeter line. I went off the body/endcap weld seam crease on this since it was pretty straight.


20201111_183754.jpg


I then mask the lines with painter's tape, and run a sharpie down the edge for contrast. I've got a subset of red/green colorblind called deuteranomoly that gives me problems with certain shades of green/gray, but I can follow the sharpie line through the grinder sparks. I always mark cut direction as well (a habit from car rust repair).

20201111_184112.jpg


Next I score the entire cut with the grinder. This way if the tape burns off, sharpie rubs off, etc I can still see my marks. I then re sharpie the lines in the score marks as well.


20201111_185206.jpg


Then it's as simple as cutting the opening. I always wear a face mask for this sort of thing, I had one wheel blow up from the piece moving due to stresses in the material.


20201111_201126.jpg


I then finished the night off by sanding down paint around the area where the door seals will go, as well as cleaning up all the burrs. Had to call it quits and let the exhaust fan clear all the paint dust out of the shop. Door seals and handle mounts are next at bat!


20201111_191900.jpg


20201111_200915.jpg
 
I got my door all framed out and finished up. I used 1/8" x 1-1/2" CRS for this. I notched the door all the way around every 3" or so, and welded from the back side. For the curved pieces, I just bent the strips over my leg, until I had a nice fit. I cut the corners at 45DEG, and chamfered the front, I'll fill those seams with TIG welds. I also notched around the existing pipe fittings at the top of the door. Undecided if i'd like to use these for meat probe ports, or if i'm going to just put plugs in and weld them. However I figured trying to cut those out and fill them flat is going to lead to more warping, so that's why I didn't go that route.

20201113_214129.jpg


20201113_214133.jpg


20201113_225346.jpg


20201113_225545.jpg


20201113_225619.jpg
 
Looking good. Guessing by the methods you are using to layout things, perhaps you have had a bit of fabrication/machining training?
 
  • Like
Reactions: cooter79
Looking good. Guessing by the methods you are using to layout things, perhaps you have had a bit of fabrication/machining training?


Thanks! And yes, I am a partial partner in a machine shop. I'm the "program, setup, CNC repair, figure out how to do stuff when other guys cant" guy at our shop. haha.

I've got no formal training in real fabrication work of this sort, but I've been building stuff for fun, handling farm repairs, and had project cars my whole life. Buddy of mine is an expert TIG welder/fabricator, picked up a lot from that guy as far as the fab work end of things goes.
 
Last edited:
I'm lucky enough to have a home key for SolidWorks, so I got my firebox situation all figured out while watching the Packer game today. Now its up to when our laser at the shop has time to sneak a personal job in.... But this coming weekend is opening weekend for deer hunting here in Wisconsin, so the shop is a little light on labor for the state holiday.


Fire Box w_lid.JPG
 
I'm lucky enough to have a home key for SolidWorks, so I got my firebox situation all figured out while watching the Packer game today. Now its up to when our laser at the shop has time to sneak a personal job in.... But this coming weekend is opening weekend for deer hunting here in Wisconsin, so the shop is a little light on labor for the state holiday.


View attachment 471093
We’re abouts in the cheese state are you ?
 
SmokingMeatForums.com is reader supported and as an Amazon Associate, we may earn commissions from qualifying purchases.

Latest posts

Hot Threads

Clicky