My RF Vision
- Thread starter smokejumper
- Start date
-
Some of the links on this forum allow SMF, at no cost to you, to earn a small commission when you click through and make a purchase. Let me know if you have any questions about this.
You are using an out of date browser. It may not display this or other websites correctly.
You should upgrade or use an alternative browser.
You should upgrade or use an alternative browser.
SmokingMeatForums.com is reader supported and as an Amazon Associate, we may earn commissions from qualifying purchases.
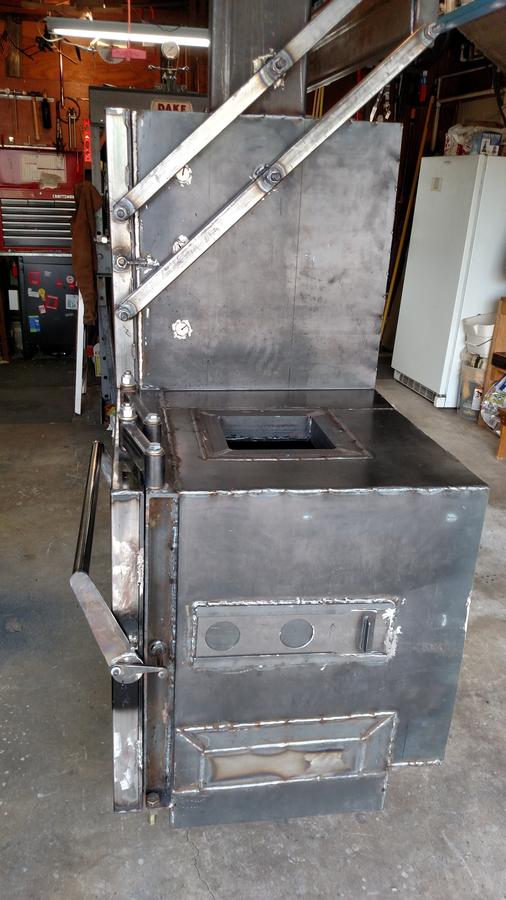
Today I cut a hole in the top of the firebox and added a frame.
When used as a stickburner, it will hold the sacrificial top plate in the FB and be a source of heat for preheating splits.
When using charcoal, it will be used to mount a Stumps style coal chute and burner.
Since the CC will be insulated, it should provide plenty of heat and time to sleep on an overnight cook.
Last edited:
hamrhead1971
Smoking Fanatic
This is one good looking build, Smoke. Easy to tell you have put plenty of thought into what you want. Outstanding fab work.
Thanks hamrhead,
Doing this project has been the key to honing my abilities.
I feel like I am entering the home stretch now.
Doing this project has been the key to honing my abilities.
I feel like I am entering the home stretch now.
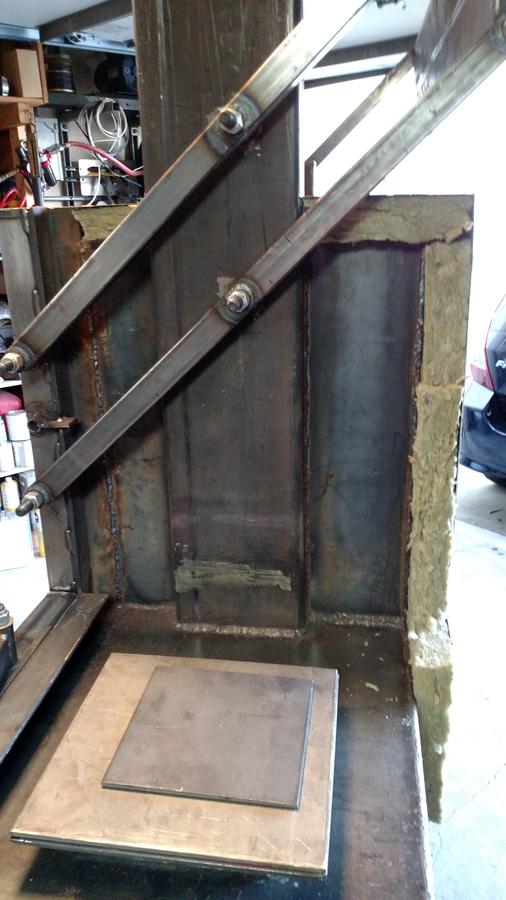
Today I started putting on the insulation and outer skin on the cook chamber.
Got the top and the back done. Skins are 14ga.
At the corners of the long edges, I added angled supports.
With the top in place, I just held the angled piece in position and welded it to the CC.
Then cut the top of the support even with the outer skin then welded the skin to the support.
As always, comments are welcome and thanks for looking.
doug kiser
Fire Starter
- Dec 23, 2014
- 58
- 10
lendecatural
Smoking Fanatic
Benchmark level workmanship there as usual Smoke!
I still have dibs on the brake from post 50 last year, or at least a sketch.....

I still have dibs on the brake from post 50 last year, or at least a sketch.....
Yes you do Len
Benchmark level workmanship there as usual Smoke!
I still have dibs on the brake from post 50 last year, or at least a sketch.....
I can definitely supply the sketch after a little clean up.
Will post it here for everyone's benefit.
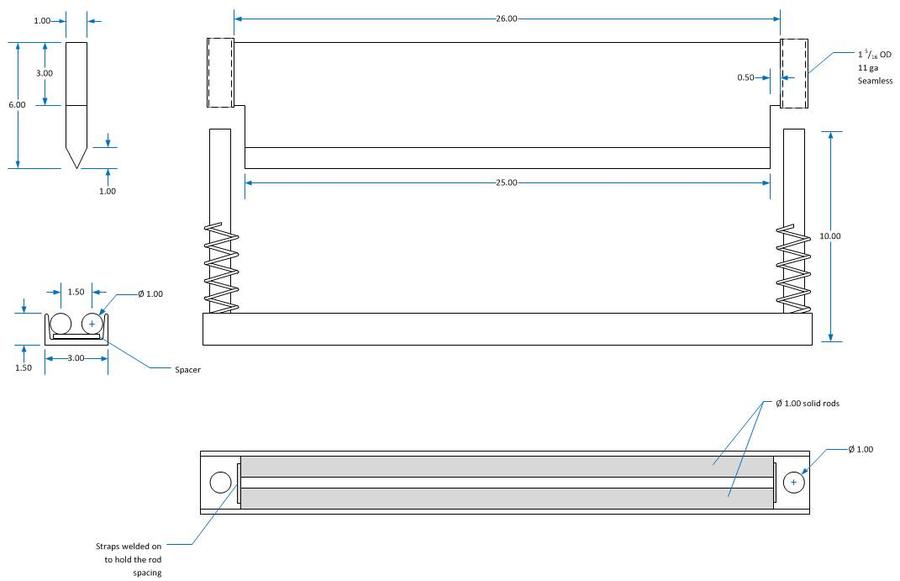
Here is the sketch of my press brake.
The base is 3" x 1.5" x 0.25" C-channel with two 1" diameter solid rods set in to form the groove.
The distance between the rods is .5" to allow me to bend 1/4" plate beyond 90 deg.
I have a 1/4" spacer plate under the rods since the channel is too narrow to allow them to sit flush on the bottom (used what I had laying around for channel, but would go wider if buying new).
Two more 1" diameter solid rods are used for the uprights to guide the anvil.
The anvil started life as a 26" x 6" x 1" plate. Cut in the sides with cutting torch to make room for the springs.
Beveled the edge with cutting torch, then finished with grinder and files.
Key is to take it slow and always have a sliver of the original plate edge visible until the very end.
The pic is not very clear, but the guide tubes welded to the ends of the anvil are 1 5/16" OD seamless 11ga tube.
When putting it all together, only tack everything until it is all aligned and working smoothly, then weld it out.
Used 5" long porch swing springs that I found at Lowes. They are compression springs.
This is a heavy son-of-a-gun, so if you build one, wear your steel-toed boots!
Last edited:
lendecatural
Smoking Fanatic
Well shoot! Wish I had thought of that.
Thanks!!
I was wondering where you got the springs, they looked like motorcycle fork springs.
I got half a dozen sets of old fork springs sitting around that I could have used.
Would have saved me $9.
lendecatural
Smoking Fanatic
Made a bit more progress.
Got the insulation and skins on the FB and the right side of the CC.
Also installed 3 ports for therm wires, one for each rack.
Each has a 3/4-16 bolt drilled and slotted for the wires.
After inserting the probe through the port, slip the bolt over the wire and screw it in.
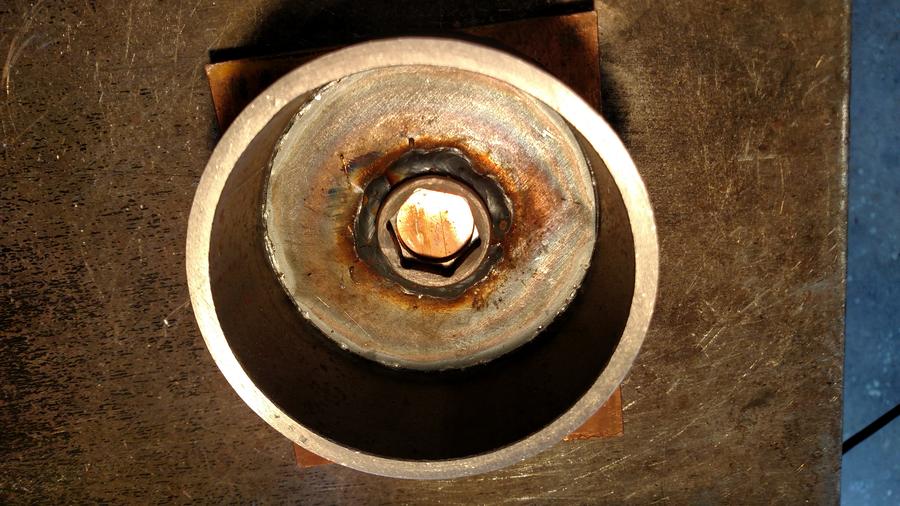
Here is the port with the 3/4-16 threads.
View from the inside showing 1' pipe between the inside and outside.
The hole is big enough to insert a right angle probe through.
That is all for now.
Comments are welcome and thanks for looking.
thomas phillips
Meat Mopper
Wow I am just in awe of your skills at fabricating. That is one cool looking smoker. Great job. Can't wait to see it finished and in action. wow just wow!!!
Well, I got all the insulation and skin on and tacked in place.
Will weld out most of it this coming weekend. A few places will remain just tacked until after the first burn in case I need to make any mods.
Here are my therm mounts.
The Tel-Tru therms have a mounting kit that includes a 0.855" ID washer and nut for the 1/2" pipe threads.
The washer is sized to support all 6 corners of the hex on the thermometer.
I made my mounts by drilling a 3/4" hole in a circular plate and reaming it out to 0.855" to support the therm instead of the supplied washer.
I then welded a section of socket over the hole to engage the hex on the thermometer.
The plate was then welded to a pipe section to act as a guard to protect the therm.
The therm slides in with the threads extending out the back.
I then drilled two 7/8" holes in the CC door where I wanted the therms to mount, set the mount and therm in the hole and tightened the nut on the back to hold it in place.
Functionally, I wanted them in the middle of the door, however with the door handle in place they are partially obscured.
Since these are only back ups in case the Thermoworks digitals fail, I am OK with it.
But aesthetically, they would look better on either side of the door handle.
Not sure if I want to move them or not. What do y'all think?
lendecatural
Smoking Fanatic
I think they are fine since they are backups; however, I can tell it's going to bother you if you don't move them..... Soooo, go ahead and put them where they look best to you since everything else on that smoker is over the top!


SmokingMeatForums.com is reader supported and as an Amazon Associate, we may earn commissions from qualifying purchases.
Similar threads
- Replies
- 6
- Views
- 3K
- Replies
- 21
- Views
- 2K
- Replies
- 7
- Views
- 9K
- Replies
- 3
- Views
- 690
Latest posts
-
-
What to look for shopping for chamber sealer?
- Latest: bmudd14474
-
-
-
Hot Threads
-
Any Android Geeks?
- Started by BrianGSDTexoma
- Replies: 31
- Blowing Smoke Around the Smoker.
-
Evening folks! We are getting a new family member!
- Started by Steve H
- Replies: 27
- Blowing Smoke Around the Smoker.
-
Chasing the perfect Mac and Cheese
- Started by lowcountrygamecock
- Replies: 20
- General Discussion
-
Featured Smoked Chicken (fajita) Enchiladas!
-
Deck the halls with deer balls....
- Started by Buckeyedude
- Replies: 16
- Wild Game


