MES Rewire Simple Guide - No Back Removal Needed!!!

  • Some of the links on this forum allow SMF, at no cost to you, to earn a small commission when you click through and make a purchase. Let me know if you have any questions about this.
SMF is reader-supported. When you buy through links on our site, we may earn an affiliate commission.
Thanks again, I got the Jest of the project. My connections look different, I will need to trace or continuity test the leads from the heating element. I have to go back and look at the specifics. I have 2 access points below my MES. 1 for the main electrical feed and another for a controller in the base of the unit. This second access panel is where I think I will find the Rollout Limit Switch & Heating Element. If so I may have to run some wires to make this connection, but I believe there should be existing wires/connections.

Guess I will order the PID tomorrow and keep you posted on the progress.

Regards,
James

You have correctly identified the 2 panels blow your MES.
Yep, the panel that has the circuit board will have have all wires running to it.

The bigger 16AWG size braided wires (braid color may be different than below) will be the ones that run to the Heating element and to the Safety Rollout Limit switch which then runs again to the other connector the heating element. So for example in this picture:

  • Wire#4 runs directly to the Heating Element prong1
  • Wire#3 runs to the Safety Rollout Limit Switch
    • From the Safety Rollout Limit switch #3 will continue to the Heating Element prong2
full?d=1507263359.png


  • Wire#1 is the Hot wire from the MES plug
  • Wire#2 is the Neutral wire from the MES plug
If you unhook the braided wires from the circuit board AND unhook the braided wires from the heating element you can do a continuity check with your multimeter and identify which ends match up. What it wont tell you is which which wire has the safety rollout limit switch in the mix, but we'll get to that later.

The simple rewire would be to unhook wires 1-4, cut off their ends.
Then splice a smooth wire (1 or 2) with a braided wire (3 or 4), order does not matter. The only thing that matters is that a smooth goes to a braided. Once each smooth is spliced to a braided you are done!

Back to the Safety Rollout Limit Switch now.
On the Back of your MES (not under) you will find a panel for the heating element.
If you have a 2nd panel about halfway up (middle or right side usually) then THAT panel will be the Safety Rollout Limit Switch.

If you have no 2nd panel halfway up... well you probably want to cut one because that switch is a major failure point for both the connectors corroding away AND the cheap plastic switch melting down once the connectors begin corroding. I'd bet money the connectors are already corroding because that's what the Masterbuilt connectors do best :D
If you don't care to mess with the switch and it is working then feel free to stop reading here, if it fails on you later (smoker wont heat up) then start reading again from this point :D

If you look INSIDE your MES on the back wall you will see a round button looking thing the size of a quarter. That is the Safety Rollout Limit Switch.
1641831217900.png


Use a tape measure and you can figure out where it is located on the back OUTSIDE of the MES. You will want to cut yourself a panel to get to this thing. So cut about a 6inch tall by 4 inch wide rectangle here and then cover with a piece of sheet metal and self tapping sheet metal screws when done, panel created!
I would use a dremel or oscillating tool with a blade that can cut through thin metal and carefully make the cut. There is usually a box covering the switch that you have to unscrew off to get to the switch so chances are you won't cut a wire but it may still happen :)

I hope all this info helps :)


very nice write up and tutorial. I am at my wits end with (2) MES30's exhibiting different symptoms. Masterbuilt tech are dick heads and due to my limitd dexterity due to stroke I am at my wits end. Right now I have to "ride th board" and keep a close eye out on internal temps on one unit that doesnt like to not turn off element and scorches to 300 degres. The other sems to turn on and off, but the internal tmp(as mesure by gate level inkbird probe, is typically 25 degrees higher than displayed tmp on PID (I think that;s what it is cslled.
that's all
thank you
john

Hi John.

Well sounds like the MES that doesn't want to shut off probably has a faulty circuit board in the panel underneath the MES. I doubt you can find the replacement circuit board bit if so that would be a simple fix. Without a replacement circuit board your only option is the simple rewire and a PID controller.

The other MES that does cut on/off but runs hotter may actually be a blessing in disguise. It seems most often that an MES unit WONT hit max 275F instead of going over it hahhaa.
If yours cuts off/on but swings high then you should be able to lower your set temperature and wing it from there. Not a bad problem to have.

Now temp swings suck no matter what but the swings are what Masterbuilt uses unfortunately so they can ensure wood chips burn.
The only surefire wire to eliminate the temp swings is a rewire and PID controller.
I think with this unit you may be able to just lower your set temp and be good to go, but yeah still a little dissapointing.


Now a rewire is not hard to do when it comes to the electrical work BUT you may definitely want someone to help pick the thing up and flip it around etc. They are not feathers for sure and I lift mine onto a heavy duty foldout table to work on them so I'm not laying on the ground or squatting all day.
This will be the most difficult part for you by far.

If you decide you want to do the rewires and put in PID controllers let us know. We have the knowledge here to help. You will have to source the muscle though :D
 
OK, so this is my first post on this forum. Looks like there is a lot of good information here.
So I got a used 30" Masterbuilt smoker from a brother-in-law about a year ago. It was only used a few times to roast a couple turkeys. For whatever reason, he no longer wanted it.
I bought it from him and cleaned it up a bit and tried cooking a small 4 lb. pork butt in it. I put it in at 0900, and cooked it slow at 205 degrees all day long with smoke. When I pulled it out at 7:00 at night it was still for the most part raw. So into the slow cooker it went for several more hours to finish cooking. The controller on the smoker is so far off it is unusable. I checked into ordering parts and the price was almost 200.00 for parts. Absolutely ridiculous. Further, everyone seems to have the same problem with these smokers.
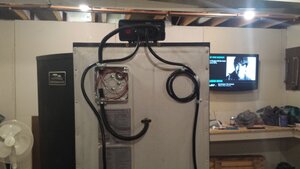
I searched the web and found a video on smoker repair. They wire in a PID Temp controller that comes in a kit with probe and solid-state relay with heat sink. I'm still waiting for it to arrive in the mail, but in the meantime have continued on with the modification. My controller will be mounted in a nice aluminum electrical panel, and I am attaching it a few inches below the rear handle so that I can still cover the smoker with its cover. I also ordered a nice meat thermometer with probes and a wireless unit for monitoring. My smoker is like the one in this video, but in much better shape. I will let you know how this all works out for me! I currently have the aluminum box mounted with rivets on the smoker, waiting for the electronics to arrive. I am also adding a lighted red LED push button switch for on/off power control, and wiring in a 25' orange extension cord for the power cord (cutting off the female receptacle and hard wiring to the controller).

www.youtube.com/watch?v=2qsO83_x_7U

www.amazon.com/Twidec-MV100-B10-Temperature-Controllers-Thermostat/dp/B07LCYWCB1?ref_=ast_sto_dp&th=1&psc=1

www.amazon.com/Eightwood-Extruded-Aluminum-Electronic-Enclosure/dp/B0107WTZHE/ref=sr_1_16?crid=4EMPOYIKOVIP&keywords=Silver+Aluminum+Project+Box+Enclosure+Case+8"+x+5.7"+x+2.7"+203x144x68mm&qid=1642449916&s=industrial&sprefix=silver+aluminum+project+box+enclosure+case+8+x+5.7+x+2.7+203x144x68mm%2Cindustrial%2C31&sr=1-16

www.amazon.com/Wireless-Thermometer-Grilling-Accurate-Digital/dp/B08M6CB1KD/ref=sr_1_2?crid=2L3R36XO590KS&keywords=luyata+meat+thermometer&qid=1642449192&sprefix=luyata+meat+%2Caps%2C39&sr=8-2
 
Last edited:
OK, so this is my first post on this forum. Looks like there is a lot of good information here.
So I got a used 30" Masterbuilt smoker from a brother-in-law about a year ago. It was only used a few times to roast a couple turkeys. For whatever reason, he no longer wanted it.
I bought it from him and cleaned it up a bit and tried cooking a small 4 lb. pork butt in it. I put it in at 0900, and cooked it slow at 205 degrees all day long with smoke. When I pulled it out at 7:00 at night it was still for the most part raw. So into the slow cooker it went for several more hours to finish cooking. The controller on the smoker is so far off it is unusable. I checked into ordering parts and the price was almost 200.00 for parts. Absolutely ridiculous. Further, everyone seems to have the same problem with these smokers.
I searched the web and found a video on smoker repair. They wire in a PID Temp controller that comes in a kit with probe and solid-state relay with heat sink. I'm still waiting for it to arrive in the mail, but in the meantime have continued on with the modification. My controller will be mounted in a nice aluminum electrical panel, and I am attaching it a few inches below the rear handle so that I can still cover the smoker with its cover. I also ordered a nice meat thermometer with probes and a wireless unit for monitoring. My smoker is like the one in this video, but in much better shape. I will let you know how this all works out for me! I currently have the aluminum box mounted with rivets on the smoker, waiting for the electronics to arrive. I am also adding a lighted red LED push button switch for on/off power control, and wiring in a 25' orange extension cord for the power cord (cutting off the female receptacle and hard wiring to the controller).

www.youtube.com/watch?v=2qsO83_x_7U

www.amazon.com/Twidec-MV100-B10-Temperature-Controllers-Thermostat/dp/B07LCYWCB1?ref_=ast_sto_dp&th=1&psc=1

www.amazon.com/Eightwood-Extruded-Aluminum-Electronic-Enclosure/dp/B0107WTZHE/ref=sr_1_16?crid=4EMPOYIKOVIP&keywords=Silver+Aluminum+Project+Box+Enclosure+Case+8"+x+5.7"+x+2.7"+203x144x68mm&qid=1642449916&s=industrial&sprefix=silver+aluminum+project+box+enclosure+case+8+x+5.7+x+2.7+203x144x68mm%2Cindustrial%2C31&sr=1-16

www.amazon.com/Wireless-Thermometer-Grilling-Accurate-Digital/dp/B08M6CB1KD/ref=sr_1_2?crid=2L3R36XO590KS&keywords=luyata+meat+thermometer&qid=1642449192&sprefix=luyata+meat+%2Caps%2C39&sr=8-2
Hi there and welcome!

I hope this thread has all the info you need to do the simple rewire if that's the route you are choosing. I watched the video and he just wired power directly to the heating element. With the simple rewire instructions here you are doing the same thing but doing it so that the MES plug feeds power to the heating element.

A word of caution. I noticed in the youtube video that he put his PID temp probe at the top of his smoker. I have a little concern that the lower half of his smoker is going to get really hot when he runs at 275F since 275F would be measured at the top of his smoker very far away from the heating element.

I didn't hard wire my PID probe I instead put an alligator clip on it and I clip it to the center of the lowest rack from underneath. I find that it gets the fastest response time in measuring the temp and allowing the PID to control things. Now my upper racks won't be as hot as air escapes but that's ok I just smoke on the lower 2 racks AND I always use my remote thermometer probes to measure temp on rack level anyhow. I always know what my smoker is doing where the meat is cooking.

I think you are well on your way buddy and once you get your setup tweaked/tuned with your PID setup, it will be the best electric smoker you can have for the money... besides a bigger MES40 rewired to use a PID :D

Let us know how it goes and ask any questions you have :)
Hi and Thanks for your reply.
I will keep you posted on how this goes. I ordered my PID Controller about a month ago, and it should be arriving soon. There will be some time spent mounting the components, and then switching the PID setting from Celsius to Fahrenheit. I believe the controller is being shipped from China... as almost everything comes from China now a days.
The probe mounting that you mention makes sense. Post a picture of your probe if you can, I might do the same and put it on a stainless steel alligator clip (if I can find one!) Thanks :)
Here u go. I run the wire underneath the rack and then clip to a wire.
I turn the clip so that the "squeeze" part also sits on top of a bar so it is very secure and wont fall off.
I also then just put a piece of foil over the thing so grease to protect it from grease and drippings.

CjiiY1e.jpg

FYI, haven't cleaned the smoker for next use yet.
 
So I was thinking about this today at work. I need to do your modification to retain the safety rollout limit switch..., and make the small cutout panel in the back for access. While I'm in there is there a test for that switch? Am I looking for a resistance value or a closed circuit?
Then, for me I would be wiring the PID Power Relay to the location where the power cord comes in at the circuit board on the bottom (black and white smooth). I believe my original power cord enters the smoker on the lower left rear side. (wiring it in at that location instead of the heating element as was done in the youtube video.) Maybe I can have my cord from the PID come in at that location and pull the wires to the bottom access panel (where your modification is) for a clean installation.

I see your pictures... I'm not really sure what I am looking at. It looks like you have a alligator clip with a wire on it clipped to the rack. Is your temp probe wrapped in aluminum foil and you are just using the clip to hold it secure?
Thank you!

For the switch it's just like chopsaw chopsaw said, the switch is closed so it would be a continuity check on both sides of the switch to see if it is broken or not. If you get a beep on the multimeter then u have continuity.

As for your cord and wiring and all. The rewire in this post has it so your MES plug will feed power to the heating element while keeping the safety switch in the circuit.
The idea is that with an PID built like the following image you can plug the MES into the PID and the PID into the wall. The PID then feeds power on/off to the MES plug to hit and hold the set temp you entered on the PID. (left "Input" outlet is the plug that goes to the wall to get power, right "Output" outlet is where the MES would plug into the PID to receive power)
1642557887687.png

Now when you are creating your PID controller I HIGHLY RECOMMEND you don't use project box outlet/sockets that look like the one in the picture and instead just cannibalize a 16AWG extension cord for your input and output outlets and use cable relief glands to secure it to the box, plus drilling holes for using glands and cords is easier than cutting squares for the the crappy plastic outlets the burn up fast anyhow. Something like this (bought the extension cord below and just cut in half for male and female plugs:
fNKSySr.jpg


If you design your PID controller (box and all) like the images above you could always remove it if needed and easily replace parts without it being directly wired to the MES itself. Life is less complicated this way :)


For my temp probe I have something likes this type of probe with a short blunt sensor at the end. The alligator clip literally slides onto the probe since the clips have a tubular input slot where you pinch to open the clip teeth.

1642557762754.png


I bought a pack of alligator clips like this that slide over the probe and I gently crimped/clamped it on the probe with some needle nose pliers so it holds onto the probe securely:

Once I clip the probe in place on the rack I just cover with a little bit of foil since it isn't water roof and I don't grease or drippings getting into it.

I threw a lot at you here. Let me know what does/doesn't make sense and we'll get ya squared away for sure. No question is a silly one :)
 
  • Like
Reactions: mosparky
OK, so this is my first post on this forum. Looks like there is a lot of good information here.
So I got a used 30" Masterbuilt smoker from a brother-in-law about a year ago. It was only used a few times to roast a couple turkeys. For whatever reason, he no longer wanted it.
I bought it from him and cleaned it up a bit and tried cooking a small 4 lb. pork butt in it. I put it in at 0900, and cooked it slow at 205 degrees all day long with smoke. When I pulled it out at 7:00 at night it was still for the most part raw. So into the slow cooker it went for several more hours to finish cooking. The controller on the smoker is so far off it is unusable. I checked into ordering parts and the price was almost 200.00 for parts. Absolutely ridiculous. Further, everyone seems to have the same problem with these smokers.
I searched the web and found a video on smoker repair. They wire in a PID Temp controller that comes in a kit with probe and solid-state relay with heat sink. I'm still waiting for it to arrive in the mail, but in the meantime have continued on with the modification. My controller will be mounted in a nice aluminum electrical panel, and I am attaching it a few inches below the rear handle so that I can still cover the smoker with its cover. I also ordered a nice meat thermometer with probes and a wireless unit for monitoring. My smoker is like the one in this video, but in much better shape. I will let you know how this all works out for me! I currently have the aluminum box mounted with rivets on the smoker, waiting for the electronics to arrive. I am also adding a lighted red LED push button switch for on/off power control, and wiring in a 25' orange extension cord for the power cord (cutting off the female receptacle and hard wiring to the controller).

www.youtube.com/watch?v=2qsO83_x_7U

www.amazon.com/Twidec-MV100-B10-Temperature-Controllers-Thermostat/dp/B07LCYWCB1?ref_=ast_sto_dp&th=1&psc=1

www.amazon.com/Eightwood-Extruded-Aluminum-Electronic-Enclosure/dp/B0107WTZHE/ref=sr_1_16?crid=4EMPOYIKOVIP&keywords=Silver+Aluminum+Project+Box+Enclosure+Case+8"+x+5.7"+x+2.7"+203x144x68mm&qid=1642449916&s=industrial&sprefix=silver+aluminum+project+box+enclosure+case+8+x+5.7+x+2.7+203x144x68mm%2Cindustrial%2C31&sr=1-16

www.amazon.com/Wireless-Thermometer-Grilling-Accurate-Digital/dp/B08M6CB1KD/ref=sr_1_2?crid=2L3R36XO590KS&keywords=luyata+meat+thermometer&qid=1642449192&sprefix=luyata+meat+%2Caps%2C39&sr=8-2
I like the no back removal using the original power cord but having a power cord with lugs to direct wire to the element and ground to an access screw to the element to ground the chassis is nice to have to use a PID on my other small Mes 30 if that stock controller fails. I do not like the roll out limit switch that can fail at anytime opening way early and cooling the smoker creating a food safety senario so most all 3rd party therms have a high limit alarm for meat and a range for pit probes that are all customizable. Accessing both limit switches on my Mes' and bypassing with a wire nut eliminates that $1 part from having you jumping through hoops to continue cooking in your kitchen oven. My Mes smokers never run unless the pit probe is set to a range like 145-290. I want an alert if pit is too cool and food is safe from an overnight power outage or elec problem or if it's on fire and over 290. A limit switch opens the circuit so you walk out to a cold smoker with a food safety senario to back track you to last temp inside the meat and out or you walk out to a flaming smoker or already burned down. I'll take a notification on the calibrated 3rd party digital therm. A lot of us went to the plug and play Auber bc in a few seconds it unplugs from the receptacle, from the PID sensor and the smoker and is compact to store in the ac since no conformal coating on pcb components and traces that will short from water, condensing humidity to water and dust when left outside even in an unheated detached garage. The PID containment needs to be airtigjt left outside or condensing humidity could be the only issue. A lot of Auber owners don't know the operating temps and humidity limit of their PIDs and at least with a plug and play you can set a timer for 15 min and plug the smoker directly into the receptacle to preheat in cold weather below 32 to heat the top of the smoker a little before bringing out the controller for a warmer environment between 32F and 122F with a max RH of 85%. If you have a plug and play Auber get it inside the ac on those super humid days with cool nights that the dew in the grass soaks you shoes in a few steps in the morning or keep your smoker running and warm through the morning so the controller is warm on top of the smoker above dew points above 70F.
Screenshot_20211117-095120_Email.jpg
 
  • Like
Reactions: MJB05615
Looks like its my turn!
Hahaha well, enjoy your journey to becoming a PID user :D

I'd highly recommend you buy an Auber PID since it is very much less expensive then getting all the parts, tools, and materials to build one on your own AND saves a ton of time having to learn it all.
BUT if you are hellbent on building one, it is a fun and initially challenging project.

Let us know which way you plan to go and ask any questions you have. We'll get you into the world of the PID and relaxing in no time :D
 
  • Like
Reactions: Winterrider
Dr K, that is great info about the rollout limit switch. I think I will eliminate mine! Thank you! :D

All of the items that I listed in my post have been ordered, some already received, and a few things I still need to get.
I am pretty good with wiring so wiring up the PID kit won't take me long. The kit comes with the controller, solid state relay, heat sink, and the temp probe for inside the smoker. I like the temp probe Tallbm is using with the alligator clip, I will have to look for one with metal shielding that will work with a clip, and is compatible with my PID. The product description says it will support all kinds of thermocouples, but comes with a small K-type threaded unit. The PID I believe has high and low alarm temps, I will post more info as I find out! Here is the kit wiring info, looks very easy!
1642726382193.png
 
Dr K, that is great info about the rollout limit switch. I think I will eliminate mine! Thank you! :D

All of the items that I listed in my post have been ordered, some already received, and a few things I still need to get.
I am pretty good with wiring so wiring up the PID kit won't take me long. The kit comes with the controller, solid state relay, heat sink, and the temp probe for inside the smoker. I like the temp probe Tallbm is using with the alligator clip, I will have to look for one with metal shielding that will work with a clip, and is compatible with my PID. The product description says it will support all kinds of thermocouples, but comes with a small K-type threaded unit. The PID I believe has high and low alarm temps, I will post more info as I find out! Here is the kit wiring info, looks very easy!
View attachment 522809

Well you are getting closer my friend! I believe my safety switch is also bypassed at the moment as my last one melted down during a smoke and I never go around to replacing it haha.

Honestly the most difficult part is prepping the project box/enclosure and getting everything in it so that it all fits nice and neatly with the cuts made.

Thanks for posting the diagram. It appears it is a partial representation of what you are planning with no on/off switch in the mix etc. and looks like you are well on your way.
It's not my place to tell you how to wire it all up, but I see you may be able to simplify it a little bit if your SSR only deals with the Neutral wire coming and going out. This would allow the SSR to break the circuit on the Neutral thereby cutting power on/off when signaled to do so

I see in your diagram you have the SSR completing the circuit with Neutral into the SSR and the out wire connecting to Live wire.
With the live wire hooked to the MES and the Neutral hooked to the MES then the SSR could break the circuit along the Neutral wire only.
Tracing the neutral into the SSR to then hop over to the Live wire its a little more involved than tracing a single wire that has the circuit broken on/off by the SSR.

This is your project and you are good with wiring so feel free to disregard this input. I respectfully raise the point as a simplification that makes things easier to trace, which can also lead to increased safety and easier troubleshooting.

This is getting exciting and I can't wait to see what you turn out! :D
 
Last edited:
Pins 4 and 5 are the pulling voltage for the relay. I see what you are saying about the neutral wire. Just wiring into the neutral will simplify things a bit.
I do have a lighted LED push button switch for this, not sure if I will use it. The heating element will draw 6.6 amps (800 watt), the switch is rated 120v/10a. Wish I could find a lighted one with a little higher amperage, but this one should work. What do you think? Too close?
I was using 20A rated lighted rocker switches from China and they all melted down on me. I was so tired of them failing and so pissed off I bought a 100A Marine breaker switch (for boats) and used it and no melt downs hahaha.

I would suggest any switch you use be real metal and more of an automotive or boat type switch that is well above 20Amp or of high trusted quality. Just makes sure the voltage is supported for 20A+ on the switch you buy lol

Last switch I bought to build my brother a PID was this for $15, its 40amp rated and heavy duty:

A little big in size and more costly but won't melt down.
 
Last edited:
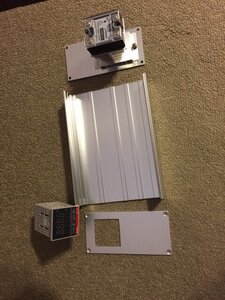
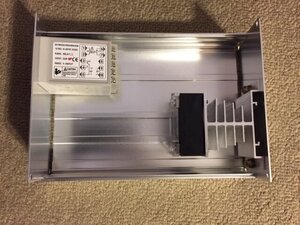
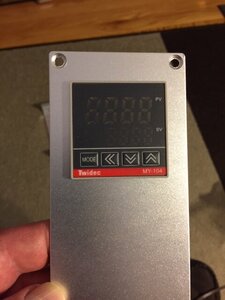
OK, I have been working on this slowly as time and weather permits building the control panel. It was a slow process making the cutout for the controller. Still waiting for the On/Off switch circuit breaker (in shipping). I will probably make up the relay wires tonight...

The other 1/2 of the aluminum enclosure is already riveted to the smoker. I can build and assemble this part, and then attach it to the other 1/2. Progess pictures...
 

Attachments

  • IMG_0820.JPG
    IMG_0820.JPG
    79.6 KB · Views: 42
  • IMG_0824.JPG
    IMG_0824.JPG
    68.1 KB · Views: 33
  • IMG_0821.JPG
    IMG_0821.JPG
    42.5 KB · Views: 34
OK, I have been working on this slowly as time and weather permits building the control panel. It was a slow process making the cutout for the controller. Still waiting for the On/Off switch circuit breaker (in shipping). I will probably make up the relay wires tonight...

The other 1/2 of the aluminum enclosure is already riveted to the smoker. I can build and assemble this part, and then attach it to the other 1/2. Progess pictures...
Looks like you are well on your way!
It's exciting to nerds like me to see this stuff going on even though I'm not the one building it. Also it's exciting because I know what a fantastic machine you will be getting in the end and just knowing you will discover this soon is very cool to me hahahaha :)

Keep us posted :)
 
SmokingMeatForums.com is reader supported and as an Amazon Associate, we may earn commissions from qualifying purchases.

Latest posts

Hot Threads

Clicky