MES 40 Digital Rebuild

  • Some of the links on this forum allow SMF, at no cost to you, to earn a small commission when you click through and make a purchase. Let me know if you have any questions about this.
SMF is reader-supported. When you buy through links on our site, we may earn an affiliate commission.

ianmkane1

Newbie
Original poster
Dec 3, 2023
8
3
I have a Masterbuilt MES 40 with the typical temperature control problems, MB21072719. I'd like to try repairing rather than buying a whole new smoker right now.

Planning on replacing the control panel, heating element and maybe circuit board if necessary, but what about the temperature sensor?
My problem is the smoker "thinks" it's up to temp so won't turn the element on at times, when it's really riding about 30-50 degrees lower as verified by my multi-probe thermometer.

Does anyone have any advice on how to replace the temp sensor without pulling the back panel off? My control panel has the 4 wire + 2 wire for the included meat probe. I was thinking of abandoning the included meat probe as I use my own, and somehow using that wire to get a sensor connected to the new control panel since there's a gasketed access going right through the top of the cabinet under the controller.

I'm sure some of you guys here have done this, hopefully someone's got a tip for me. Thanks.
 
I'd tell you, but I think tallbm tallbm actually enjoys this topic more than anyone here :emoji_laughing:
Yeah, I've read his thread about changing to a PID unit, I was hoping to avoid that route at least for now.

The longer I've had this MES40, the more I wish I never got rid of the UDS I built and ran for years. That was the best smoker I ever had.
 
Simple rewire and add an Auber PID and your MES will be a beast.


And this is the PID:
 
  • Like
Reactions: tallbm
I have a Masterbuilt MES 40 with the typical temperature control problems, MB21072719. I'd like to try repairing rather than buying a whole new smoker right now.

Planning on replacing the control panel, heating element and maybe circuit board if necessary, but what about the temperature sensor?
My problem is the smoker "thinks" it's up to temp so won't turn the element on at times, when it's really riding about 30-50 degrees lower as verified by my multi-probe thermometer.

Does anyone have any advice on how to replace the temp sensor without pulling the back panel off? My control panel has the 4 wire + 2 wire for the included meat probe. I was thinking of abandoning the included meat probe as I use my own, and somehow using that wire to get a sensor connected to the new control panel since there's a gasketed access going right through the top of the cabinet under the controller.

I'm sure some of you guys here have done this, hopefully someone's got a tip for me. Thanks.
Hi there and welcome!

You definitely have run into the common issues with an MES unit and have the right concepts for improving it.

The best way to get your end goals with even less work is to do the simple rewire (cut ends off 4 wires and wire nut to make 2 whole wires) and to buy a PID Controller ($150-160) and then your smoker will perform better than $1,000 electric smokers on the market.

With the PID controller you can drop it's temp probe down the vent and clip to the underside of the bottom rack in the center.
The rewire makes the MES cord feed power to the heating element while keeping the high temp safety switch in the mix.
The PID will take power from the wall and feed it on/off to the MES plug to hit and hold dead on to the temperature you set in the PID controller.
No temp swings, no missing your desired temp, it's rock solid!

Also at this point if you change any wire connectors (and if you cut a panel to the high temp safety switch) you could keep this smoker running through anything short of it getting hit by a car hahaha. It makes it last a looooooong time with easy cheap repairs if they are needed.

Let us know what you think, and as normanaj normanaj posted here is the link to the simple rewire guide:
 
  • Like
Reactions: normanaj
Hi there and welcome!

You definitely have run into the common issues with an MES unit and have the right concepts for improving it.

The best way to get your end goals with even less work is to do the simple rewire (cut ends off 4 wires and wire nut to make 2 whole wires) and to buy a PID Controller ($150-160) and then your smoker will perform better than $1,000 electric smokers on the market.

With the PID controller you can drop it's temp probe down the vent and clip to the underside of the bottom rack in the center.
The rewire makes the MES cord feed power to the heating element while keeping the high temp safety switch in the mix.
The PID will take power from the wall and feed it on/off to the MES plug to hit and hold dead on to the temperature you set in the PID controller.
No temp swings, no missing your desired temp, it's rock solid!

Also at this point if you change any wire connectors (and if you cut a panel to the high temp safety switch) you could keep this smoker running through anything short of it getting hit by a car hahaha. It makes it last a looooooong time with easy cheap repairs if they are needed.

Let us know what you think, and as normanaj normanaj posted here is the link to the simple rewire guide:

So in changing to the PID, does the the MES power cord get plugged in to the PID, or still into the building power supply? Seems like a straightforward project, just trying to wrap my head around the whole thing.
 
So in changing to the PID, does the the MES power cord get plugged in to the PID, or still into the building power supply? Seems like a straightforward project, just trying to wrap my head around the whole thing.
Power cord from the MES is plugged into the PID and the cord from the PID goes in the socket.
 
So in changing to the PID, does the the MES power cord get plugged in to the PID, or still into the building power supply? Seems like a straightforward project, just trying to wrap my head around the whole thing.
Just like Norman said.

MES cord > PID
PID cord > wall outlet

Power goes:
wall outlet > PID > MES (the PID cuts power on/off to the MES to hit and hold set temp)

Pretty straight forward. It gets you to what you want in a tried and true way that is rock solid.
Now if you REALLY want a project, you can build your own PID controller but it won't save you any money once you buy all the parts and components. If you ended up building 2 you would save money on the 2nd one.
If you love these projects than the extra money you spend on building one is chalked up to having fun learning and building something you are using lol :D

Keep asking all the questions you have. A number of us guys run rewired PID controlled electric smokers :D
 
  • Like
Reactions: normanaj
Just like Norman said.

MES cord > PID
PID cord > wall outlet

Power goes:
wall outlet > PID > MES (the PID cuts power on/off to the MES to hit and hold set temp)

Pretty straight forward. It gets you to what you want in a tried and true way that is rock solid.
Now if you REALLY want a project, you can build your own PID controller but it won't save you any money once you buy all the parts and components. If you ended up building 2 you would save money on the 2nd one.
If you love these projects than the extra money you spend on building one is chalked up to having fun learning and building something you are using lol :D

Keep asking all the questions you have. A number of us guys run rewired PID controlled electric smokers :D

Ok you've just about got me convinced to go this route. Is it a good idea to replace the heating element at the same time?
 
As said already , switching to an Auber controller is the way to go , and you'll probably come out cheaper in the long run .
Don't look at it as dumping money in the MES . Your buying a controller that stands alone , and can be used on other things .

You'll be amazed at how good the smoker will be setup like this .
MES power cord get plugged in to the PID, or still into the building power supply? Seems like a straightforward project, just trying to wrap my head around the whole thing.
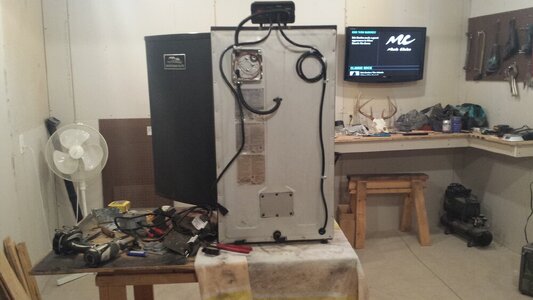
Here's a look at my 30 when I did the change over . You can see the power cord for the MES going up to the controller . The unplugged cord on the left is from the controller , goes to power .
The small cable in the " box " is the temp sensor from the controller . I have it mounted through the back , but you don't have to do that .
20190116_162123.jpg
If it was me , I would get an element to have in case I needed it , but would let the original one run until it dies .
 
Ok I'm checking out my unit to better understand the rewiring.

I'm not 100% sure which gen this unit is, I have the control panel top center rear, vent top rear right.

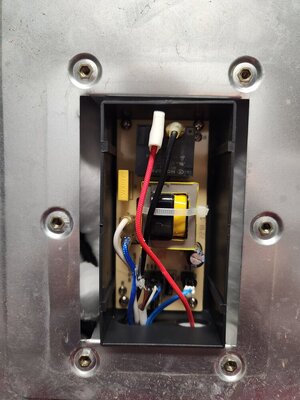
My circuit board is different than your example. In fact I didn't even have to drill out any rivets, the cover plate was screwed in.

I've got smooth black & white, and braided blue & red. I attached a picture, can you guys help identify?

Edit: I traced the line hot & neutral to the power cord (stroke of genius;) ) so that's good. So I just need a hand with the element and safety cutoff lines I think.
 

Attachments

  • 20231203_125136.jpg
    20231203_125136.jpg
    144.2 KB · Views: 84
Last edited:
Ok you've just about got me convinced to go this route. Is it a good idea to replace the heating element at the same time?
I'd just get a back up element if the one now tests at 12 ohms with the lugs disconnected. You may want to check the round over temp snap disk on the back wall and see if it is failing and opening too low of a temp, cutting power to the element by cutting an access in the back wall with a dremel cut off wheel and jumping the sensor. Unless your model came with an access in the back like the element access bc it will fail and not heat up or failing and opens too low of a temp and never gets close to your set temp. Some make a power cord to the element to isolate it with lugs on the hot and neutral and ground the green wire to an element access screw. This bypasses everything plus if my Mes stock controller fails on my other MES I can disconnect the element hook up the power cord to the element, ground the chassis and keep smoking in 15 minutes. I prefer a pit probe set to a range so I get an alert vs thermal safety switches so I cut accesses in both my Mes and got them outta there. The reason I got the MES 30 free on marketplace was because of the thermal safety switch fried lug with the bare wire sticking up in the air. So cut/stripped wires and nutted them together to bypass and use the stock controller bc this smoker is great with it. The MES 40 I did the no back removal and plug the Mes into the Auber WS-1510ELPM. I have a back up element. Unplug and bring in both controllers when not in use out of humidity. You need a digital pit probe with a range alarm or keep the thermal snap disk sensors in circuit if you think that helps with grease fires as you you know a thermal safety switch doesn't with stove top grease fires. A rogue stock controller that over heats is rare and people want that vs most that max at 255 but set to 275. It's the toughest troubleshooting and one of the main reasons Mes don't get to temp or do and start cooling as the controller shows it's calling for heat. The thermal safety doesn't do anything after grease catches fire and is self sustaining or if it's cooling so an alarm tells you to go to the smoker set at 145-290 etc after the cook is under way. 90%+ of the time food safety threads are, "my elec smoker lost power and is cold. Is my food ok?" bc no range pit alarm was set, thermal safety disk fails, clogged pellet pooper jams, minion method fails. Lots of ways but no reports of my smoker caught on fire as it keeps burning without an range alarm set bc the thermal switch does nothing but ruin cooks when it fails.
 
Ok I'm checking out my unit to better understand the rewiring.

I'm not 100% sure which gen this unit is, I have the control panel top center rear, vent top rear right.

My circuit board is different than your example. In fact I didn't even have to drill out any rivets, the cover plate was screwed in.

I've got smooth black & white, and braided blue & red. I attached a picture, can you guys help identify?

Edit: I traced the line hot & neutral to the power cord (stroke of genius;) ) so that's good. So I just need a hand with the element and safety cutoff lines I think.
Wire nut red to black and white to blue.
 
  • Like
Reactions: tallbm
In wiring this way and adding a PID, am I completely bypassing the hi-temp snap disc you mentioned earlier?
And the other wires from the control board harness that are connected to the circuit board just remain in place but won't be doing anything now?
 
You are welcome to try to rebuild the 40 with new parts but be fore warned, they apparently don't exist, Somethings you might get from Masterbuilt, if you can contact them and wait long enough.
The PID you can have in a few days and they answer their phones.
 
Ok I'm checking out my unit to better understand the rewiring.

I'm not 100% sure which gen this unit is, I have the control panel top center rear, vent top rear right.

My circuit board is different than your example. In fact I didn't even have to drill out any rivets, the cover plate was screwed in.

I've got smooth black & white, and braided blue & red. I attached a picture, can you guys help identify?

Edit: I traced the line hot & neutral to the power cord (stroke of genius;) ) so that's good. So I just need a hand with the element and safety cutoff lines I think.
Sounds like you might have a Gen1 MES40. That's what I have. Got it as a curbside freebee. Dead controller, etc. Just hooked a new power cord directly to the element. This power cord is plugged into the Auber PID. The Auber temp sensor runs down the exhaust hole.

Since I don't use the chip loader (mailbox with pellets instead) I was able to flip the element so it is more centered. Fun project. It is my dedicated fish smoker.

Let's see a pic of your smoker.
 
Yeah, I did the rewire at the circuit board panel this afternoon and ordered a new element & the PID. Then I got to thinking maybe the rollout cutoff might be part of what's been giving me trouble.

I'll hook the PID in and if I can't keep the temp I want due to the cutoff, will bypass the internal wiring altogether and pair the element up directly with the PID. I'm always close by when smoking and use the Ink Bird app so if the temp ever got too high or low I'd know about it in good time to correct.
Thanks for all the help today guys, I'll include a picture next time I get out to the garage.
 
Last edited:
  • Like
Reactions: dr k
In wiring this way and adding a PID, am I completely bypassing the hi-temp snap disc you mentioned earlier?
And the other wires from the control board harness that are connected to the circuit board just remain in place but won't be doing anything now?

dr k dr k explained the correct way to splice the wires.

No you won't be bypassing the hi-temp snap disc with this rewiring. It will still be in the mix.

If you want to bypass it you would have to access it (likely have to cut a panel which is a really good idea with how often that part fails) and then wire around it. WARNING: you would be removing the safety mechanism at this point so keep good temp measuring in your smoker so you don't accidently burn down your house and the county :D
 
Thanks for all the replies here everyone. I got my project finished up today.

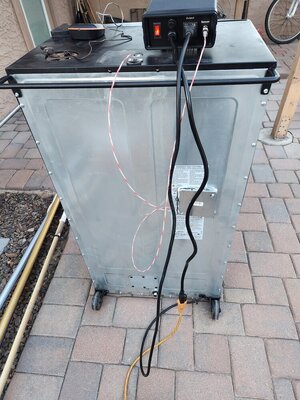
I ended up opening the back to run all new wiring, as well as cut an access in the back for the snap disc. My hole ended up a little wide so I'll seal around the j-box with some foil tape or whatever else I can think of.

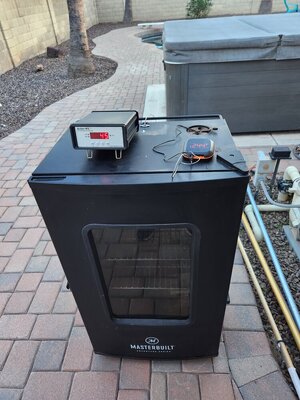
I plugged it in an hour ago and the PID controller has it sitting at 245 perfectly.

Here are a couple pics
 

Attachments

  • 20231217_170730.jpg
    20231217_170730.jpg
    191.5 KB · Views: 68
  • 20231217_170639.jpg
    20231217_170639.jpg
    159.2 KB · Views: 70
SmokingMeatForums.com is reader supported and as an Amazon Associate, we may earn commissions from qualifying purchases.

Latest posts

Hot Threads

Clicky