Gravity Fed Smoker Build - Stumps Clone
- Thread starter goldman smokers
- Start date
-
Some of the links on this forum allow SMF, at no cost to you, to earn a small commission when you click through and make a purchase. Let me know if you have any questions about this.
You are using an out of date browser. It may not display this or other websites correctly.
You should upgrade or use an alternative browser.
You should upgrade or use an alternative browser.
SmokingMeatForums.com is reader supported and as an Amazon Associate, we may earn commissions from qualifying purchases.
Pardon my 3D drawing not to scale but maybe this will help someone. Just chatting with fellow member about possibly a round chute. Like a pipe. Not a bad idea if you aren’t doing a tapered chute it will save days of fabricating and welding

Last edited:
Some more questions came up about insulation, hinges and fire box construction (specifically is it nesessary to extend it beyond the box)
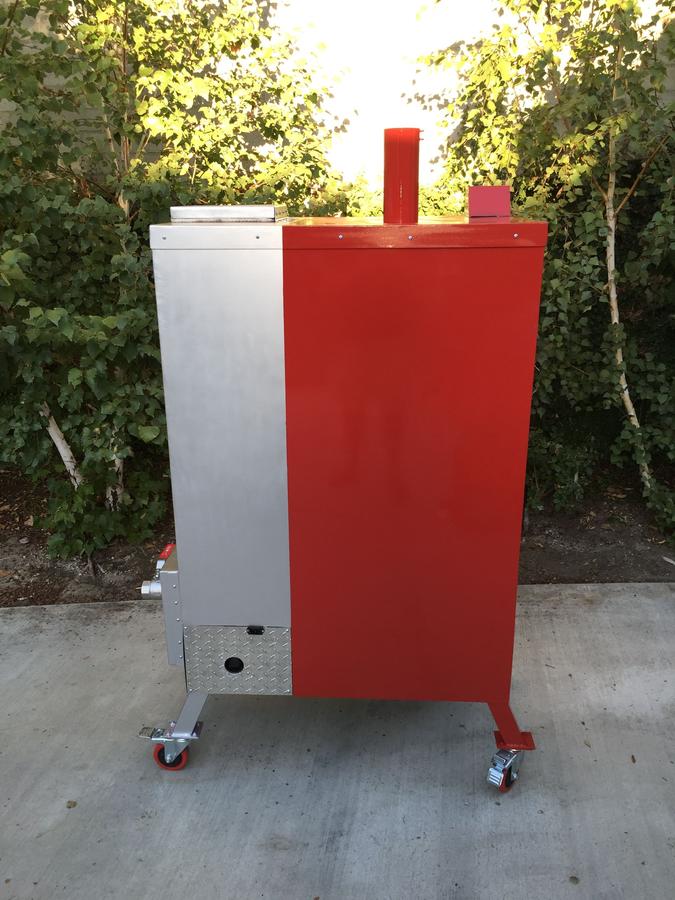
1. I used mineral wool insulation my frame is 2” square tube so I ordered some from Lowe’s of the appropriate thickness. Depends on your climate I’d say. Even in Southern California where we have the best weather in the whole US it burns considerably more fuel in the winter than the summer. If you look at my pictures. Everything I painted in red gets warm but can be safely touched. Everything in silver will burn you if you touch it the silver is 1200 paint where as the red could only handle 500. But the red only gets slightly above 100 degrees to the touch and the silver gets way way up there. For this reason I think insulation would be nice because it would mean you wouldn’t have to worry about touching most of the smoker with your bare hands.
2. I bought a 6 foot hinge and cut it up on my saw and used it for all 3 doors. It’s a mild steel but has lots of strength. I made my doors and installed the gaskets I laid the smoker flat and placed the door on top. This allowed for the thickness of the gasket. I screwed it together with a bunch of screws.
3. It comes flush with the box. Then I extended it past, I don’t remember why I did that I added a 1” x 2” piece of squaretube. Probably wasn’t necessary. Actually in looking at it, it’s totally unnecessary. It just makes an area for ash to collect.
You want a picture of the internals? I don’t think I have it but I’ll send you the link to the fan I used and draw you a diagram tonight. Also I’ll send you the wire you should use to keep the wiring internal. You’ll need a 12 volt transformer too. I went through a lot of different variants on the wire before finding what I liked. I basically “grounded” like a car the negative lead from the transformer to the frame making so I needed half as much wire.
I just did 1 whole packer brisket (meat was shit unfortunately it had been frozen too long and turned out tough even at 208 internal temp). 2 pork butts and 3 baby back ribs and temp was incrediblely stable with the fan system.
I just did 1 whole packer brisket (meat was shit unfortunately it had been frozen too long and turned out tough even at 208 internal temp). 2 pork butts and 3 baby back ribs and temp was incrediblely stable with the fan system.
This is the Fan i used
It feeds into a piece of 1x1.5 I think it is that had a right hand bend into the fire box just above the ash tray
It feeds into a piece of 1x1.5 I think it is that had a right hand bend into the fire box just above the ash tray
Looks like a top quality rig. Great job.Well... I have done it! I completed my first smoker. I was inspired by the Stumps Smoker; though I don't want to say clone. I have used this forum countless times and thank everyone for posting pictures because it inspired me and helped me build mine.
My gravity fed smoker has an internal fan and wiring for hassle free electronically controlled temperature regulation. In can run on 12v DC or 120v AC. The steel cost me $800. The entire temperature system cost $50. I painted it with Rustoleum paint, the red paint is their 500 degree Ford Red Engine Paint, the silver is their 1200 degree Metallic Silver Ultra High Heat paint. I did this because I was concerned about that side panel getting too hot from the firebox. Results look great! I purchased the paint on Home Depot's website $100. It took 7 cans of red and 2 silver. The door handle is from a Viking Dishwasher that I bought on eBay for $40. The 1.5" ball valve is from Smokey Maple and is 304 Stainless Steel purchased on eBay for $35 (super cheap!). Red Casters were purchased from Home Depot in store (and they are super smooth). The final build cost was about $1300 and it took me about 5 months every other weekend to complete.
Of course I had to polish it off with my own logo cause it just turned out so great and works so great! The fan kicks on every half hour, boosts the fire and then shuts off. I have been cooking my pork butt at 270 for 8 - 10 hours and it's marvelous. Same temp for ribs but only 2.5- 3 hours in there. I put a pan of water on the bottom shelf, leaving me 3 shelves to cook on.
If anyone needs advise, help or links I am happy to help so don't hesitate to message me.
swirvin2000
Newbie
- Apr 19, 2019
- 11
- 8
Great Picture, just wondering if the other three sides of the bottom of the shut are solid? it appears in this that the charcoal has about 6 In. of "burn area" for lack of better term, with and additional 8 inches below the grate for air flow and ash.
Has this been enough area to get enough heat? or would you recommend a bit more or less burn area?
swirvin2000
Newbie
- Apr 19, 2019
- 11
- 8
shoot.... not shut.....Great Picture, just wondering if the other three sides of the bottom of the shut are solid? it appears in this that the charcoal has about 6 In. of "burn area" for lack of better term, with and additional 8 inches below the grate for air flow and ash.
Has this been enough area to get enough heat? or would you recommend a bit more or less burn area?
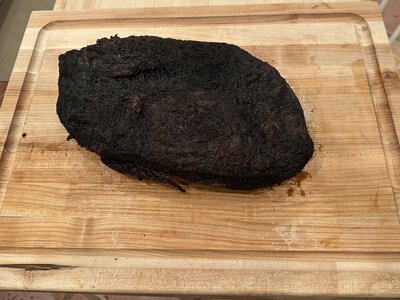
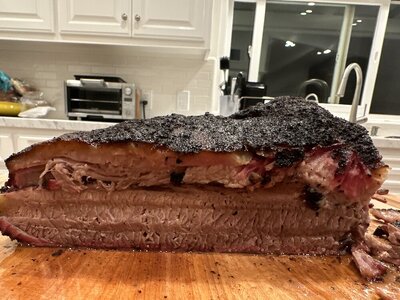
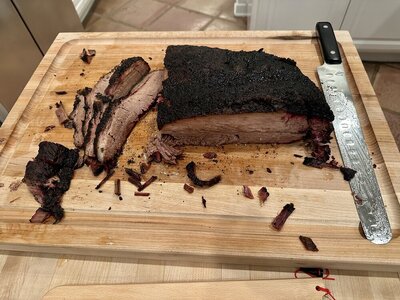
It’s been forever since posting thought I’d share my best brisket ever. Ridiculously good! Cooked at 275° till internal temp was 165°. Wrapped in 3 layers of red butch paper and taped with white masking tape and cooked till 210° internal temp. I used Obe ques Beef Brisket Rub. This brisket was so good it didn’t require injection. Knocked this one out of the park. Smoker works incredibly 5 year later. It’s so reliable I never have to worry about temp fluctuations. I always used a full sheet pan full of water at the bottom shelf to add humidity and helps keep that temperature super consistent.

Still turning out amazing meat 6 years later. Though my true love is pulled pork, brisket just photographs so well and man does it taste amazing.
We recently had a house guest that doesn’t eat red meat so I did smoked salmon and it was a game changer. I don’t like fish but this was amazing.


We recently had a house guest that doesn’t eat red meat so I did smoked salmon and it was a game changer. I don’t like fish but this was amazing.
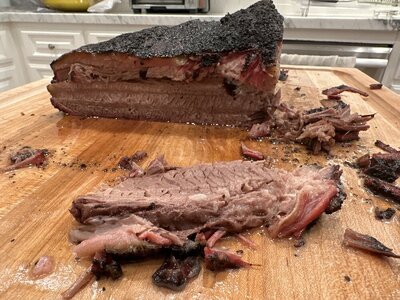
Quick update — I’ve been watching Chudds BBQ and Mad Scientist BBQ on YouTube and wow did I up my game. Fully rendered fat on my briskets, dark black bark. My ribs are better, it’s sensational BBQ. What’s amazing is I didn’t realize my smoker’s full potential till 7.5 years after I built it. It’s as good as an offset YES I SAID IT!
It’s a journey. I look back at the photos from 3 years ago of my brisket and I cringe but it’s part of the evolution.
On the technical side I dumped the 12v transformer for a Milwaukee M12 battery. I bought the socket on Amazon. A 4.0 runs the smoker indefinitely. A 16 hr cook and the battery was half full. But I have options. Alligator clips for 12v lead acid battery, 12v external transformer or M12 battery . If it wasn’t like 500lbs I’d take it to friends houses, very versatile.
Attachments
Last edited:
Just to add in case it helps anyone.
I trimmed the brisket just as on Chud’s BBQ YouTube
Rub:
2 parts 16 mesh black pepper
1 part diamond crystal kosher salt
1 part Lawry’s
Apply rub so brisket is speckled with black pepper.
Cook uncovered at 250° till 180° internal but really it’s when the fat is rendered and as explained by Mad Scientist BBQ your finger pokes through the fat and the fat is yellow.
Wrapped in butcher paper with smoked Wagyu tallow (my wife prefers butter so I have since switched to butter but I prefer the tallow)
Cook at 275° till 205° internal or probes tender
Rest Brisket over night at 160° in oven - but this one I rested 20 hours because we had it for dinner the next night and I will say it was a bit long. Since cooking this I’d say try not to exceed a 16 hr rest otherwise you run the risk of over cooking it. This brisket was sensational even with a 20 hour rest.
The total cook times was about 14 hours but here is my take away. I got a 21lb brisket. It was a monster. It’s shear size meant it would take a while and I really think that contributed to that beautiful bark.
For wood chunks I used California Oak cause thats what we have here and it’s free when I trim my trees I get plenty of it.
Lastly cool tip. I made burgers with the trimming in a Kitchen-Aid meat grinder. I ran it though twice on the smaller die. 80/20 eye balled meat to fat ratio definitively didn’t weight it out I’m guessed at it

just for fun here are some ribs I cooked a few weeks back

I have also been making my own BBQ sauce and it’s surprisingly easy and fun to make and tweak to your taste
I trimmed the brisket just as on Chud’s BBQ YouTube
Rub:
2 parts 16 mesh black pepper
1 part diamond crystal kosher salt
1 part Lawry’s
Apply rub so brisket is speckled with black pepper.
Cook uncovered at 250° till 180° internal but really it’s when the fat is rendered and as explained by Mad Scientist BBQ your finger pokes through the fat and the fat is yellow.
Wrapped in butcher paper with smoked Wagyu tallow (my wife prefers butter so I have since switched to butter but I prefer the tallow)
Cook at 275° till 205° internal or probes tender
Rest Brisket over night at 160° in oven - but this one I rested 20 hours because we had it for dinner the next night and I will say it was a bit long. Since cooking this I’d say try not to exceed a 16 hr rest otherwise you run the risk of over cooking it. This brisket was sensational even with a 20 hour rest.
The total cook times was about 14 hours but here is my take away. I got a 21lb brisket. It was a monster. It’s shear size meant it would take a while and I really think that contributed to that beautiful bark.
For wood chunks I used California Oak cause thats what we have here and it’s free when I trim my trees I get plenty of it.
Lastly cool tip. I made burgers with the trimming in a Kitchen-Aid meat grinder. I ran it though twice on the smaller die. 80/20 eye balled meat to fat ratio definitively didn’t weight it out I’m guessed at it
just for fun here are some ribs I cooked a few weeks back
I have also been making my own BBQ sauce and it’s surprisingly easy and fun to make and tweak to your taste
KimberlyO
Smoking Fanatic
Well above I said it’s as good as an offset. I need to amend that statement. I bought a custom offset from SG Metalworks. I didn’t build it myself because I don’t have the equipment (a forklift) or time as it weighs 1200lbs. It took an engine hoist and 4 guys to install it. I have been cooking on it now for 6 or 7 months and my gravity fed smoker is almost as good.
On brisket, the offset smoker renders fat better the fat is more caramel colored and the bark is darker, meteor black. How much better? If the offset smoker is 100% the gravity fed is 93%. Both premium and very respectable.Now that I have several cooks under my belt, I noticed on my gravity smoker the bottom of the brisket takes a lot of heat, even with a water pan compared to the offset. (I want to make sure you know this is getting very picky here.) It seems to indicate that the foil boat method would work much better on the gravity smoker. Protect the meat and add moisture to the bottom and improve fat render. I still have to give that method a try. The offset put on more smoke flavor, no surprise there. I would amend my statement to the gravity smoker is almost as good on brisket as an offset but much easier to use.
When it comes to ribs, I think it’s indiscernible with the edge going to the gravity smoker since it is infinitely easier to use, set it, and forget it. Both products are fantastic. Both are eons better than a pellet smoker.
Don’t worry my gravity smoker has a new home at our ranch so I cook on it all summer while working outside which is why it’s so great that it regulates itself with a PID. Hands on the land rather than the BBQ and a reward for a hard days work.
Brisket from the gravity smoker is above in a previous post but here is the offset brisket:

Ribs on the offset:

Here is a picture of my offset smoker:

On brisket, the offset smoker renders fat better the fat is more caramel colored and the bark is darker, meteor black. How much better? If the offset smoker is 100% the gravity fed is 93%. Both premium and very respectable.Now that I have several cooks under my belt, I noticed on my gravity smoker the bottom of the brisket takes a lot of heat, even with a water pan compared to the offset. (I want to make sure you know this is getting very picky here.) It seems to indicate that the foil boat method would work much better on the gravity smoker. Protect the meat and add moisture to the bottom and improve fat render. I still have to give that method a try. The offset put on more smoke flavor, no surprise there. I would amend my statement to the gravity smoker is almost as good on brisket as an offset but much easier to use.
When it comes to ribs, I think it’s indiscernible with the edge going to the gravity smoker since it is infinitely easier to use, set it, and forget it. Both products are fantastic. Both are eons better than a pellet smoker.
Don’t worry my gravity smoker has a new home at our ranch so I cook on it all summer while working outside which is why it’s so great that it regulates itself with a PID. Hands on the land rather than the BBQ and a reward for a hard days work.
Brisket from the gravity smoker is above in a previous post but here is the offset brisket:
Ribs on the offset:
Here is a picture of my offset smoker:
Last edited:
SmokingMeatForums.com is reader supported and as an Amazon Associate, we may earn commissions from qualifying purchases.
Similar threads
- Replies
- 150
- Views
- 13K
- Replies
- 28
- Views
- 12K
- Replies
- 3
- Views
- 1K
- Replies
- 7
- Views
- 1K
- Replies
- 28
- Views
- 2K
Hot Threads
-
Is anyone here in the automotive or truck sales business?
- Started by forktender
- Replies: 39
- General Discussion
-
Featured Prime Boneless Striploin Steaks on the Q
- Started by DRKsmoking
- Replies: 26
- Beef
-
Bucket list Smoker - Humphrey's Pint
- Started by dward51
- Replies: 22
- General Discussion
-
Your Favorite Way to Use Leftover Smoked Pork Ribs
- Started by Jim_C
- Replies: 21
- General Discussion


