I have had 30+ pounds hanging from each of the hanging springs on lots of occasions with no issues. That’s with 10/24 aluminum rivnuts. If you are really worried about fastener strength, you could use steel, or if you’re worried about pull-out, you could use a jack nut which will distribute the load over a wider area.
Add hooks for hanging stuff in MES
- Thread starter zwiller
- Start date
-
Some of the links on this forum allow SMF, at no cost to you, to earn a small commission when you click through and make a purchase. Let me know if you have any questions about this.
You are using an out of date browser. It may not display this or other websites correctly.
You should upgrade or use an alternative browser.
You should upgrade or use an alternative browser.
SmokingMeatForums.com is reader supported and as an Amazon Associate, we may earn commissions from qualifying purchases.
Actually makes perfect sense! What you propose is EXACTLY what I was thinking, sheet metal flimsy so go all the way through fender washers etc. Is there any wiring in the top?
In case others look at this thread, this is my smoker and the side walls are stamped to support the rack.
There may be some wiring at the top that goes to the light bulb but I'm guessing that goes around the side of the smoker (under spray insulation) vs over the top of the smoker, but I'm not positive here.
Now I AM positive that the wiring that runs to the controller runs up the back of the smoker (under or on top of the back insulation) and then out of the hole in the top where the controller is. As long as you avoid that spot you are good to go.
With all of that said, I also do like the idea of drilling into the sides of the smoker to make a "rack holder" like the other guys are talking about. Since the MES is already doing that with it's existing racks you have a good idea of how much weight a rack can hold should you want to make a "hook rack" that slides into holders you fasten at the top of the MES via screws into the side walls (and back wall too for more support).
Now the big obstacle to me for making a rack holder for a "hook rack" is whether or not your MES has the light bulb configuration that gets in the way.
If there is no light bulb in the way (some models don't have this) then you could easily make a rack holder with stainless steel 1.5inch right angle brackets and some self taping SS sheet metal screws:
Just place them upside down like this (but on both side walls) where an existing MES rack slides in securely on top of the bracket but where the ceiling of the MES also keeps the rack from just hopping out of place
Finally you could use simple cheap stainless steel "S" hooks on the MES rack to hang the meat. You would be able to adjust the "S" hooks to any position. And if you just cant stand the hooks facing left to right you could lay some thin wooden dowels on top of the MES rack and hook your "S" hooks to the dowels and now your hooks would face back to front... again if that even matters lol.
Stainless Steel "S" hooks:
Lots of good ideas here to kick around.
I think I am really liking the idea of making a rack holder at the top of the MES that uses the stock MES racks and some "S" hooks.
It is:
- less work (like 8 screws with a drill, no drilling through entire wall and filling with RTV)
- more configurable
- hooks are not permanent
- hooks are not in the way (removable)
- uses existing rack unmodified
- the parts are not very expensive for the MOD
Well I just did mine . What I had was an aluminum angel . I used to just use a piece of oak base shoe on the top bracket . Worked , but the xtra 2 1/2 " of height will be nice .
I used a gauge block to install the angle . That way you don't have to measure or level anything .
Butt the angle to the back wall , put your gauge between the angle and the top . Install the screws . Just make sure you gauge it to what you're using to hang from .

Two of the holes were existing . I added the other 3 , pre drilled towards the top of the angle .
I was going to just use my oak rods , but tallbm
mentioned the rack , and I said no kidding ,,,
That's gonna work perfect , and can still use the rods for single hams and such .
Just the oak rod ,

The rack and hooks ,

I did use self tapping wafer head Teks . Just have to be careful you dont strip , takes a bit of pressure to get it to drill
just be ready to back off .
So that's what I did .
Just FYI . If you decide to do this , with the gauge block , be aware of the right side . Dont put it over the hole for the stack . It wont come out .
I used a gauge block to install the angle . That way you don't have to measure or level anything .
Butt the angle to the back wall , put your gauge between the angle and the top . Install the screws . Just make sure you gauge it to what you're using to hang from .
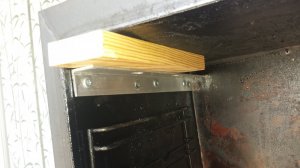
Two of the holes were existing . I added the other 3 , pre drilled towards the top of the angle .
I was going to just use my oak rods , but
That's gonna work perfect , and can still use the rods for single hams and such .
Just the oak rod ,
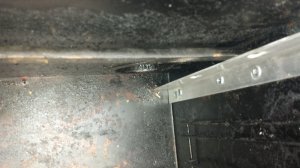
The rack and hooks ,
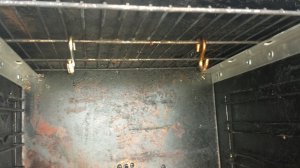
I did use self tapping wafer head Teks . Just have to be careful you dont strip , takes a bit of pressure to get it to drill
just be ready to back off .
So that's what I did .
Just FYI . If you decide to do this , with the gauge block , be aware of the right side . Dont put it over the hole for the stack . It wont come out .
Well I just did mine . What I had was an aluminum angel . I used to just use a piece of oak base shoe on the top bracket . Worked , but the xtra 2 1/2 " of height will be nice .
I used a gauge block to install the angle . That way you don't have to measure or level anything .
Butt the angle to the back wall , put your gauge between the angle and the top . Install the screws . Just make sure you gauge it to what you're using to hang from .
View attachment 393096
Two of the holes were existing . I added the other 3 , pre drilled towards the top of the angle .
I was going to just use my oak rods , buttallbm mentioned the rack , and I said no kidding ,,,
That's gonna work perfect , and can still use the rods for single hams and such .
Just the oak rod ,
View attachment 393097
The rack and hooks ,
View attachment 393098
I did use self tapping wafer head Teks . Just have to be careful you dont strip , takes a bit of pressure to get it to drill
just be ready to back off .
So that's what I did .
Just FYI . If you decide to do this , with the gauge block , be aware of the right side . Dont put it over the hole for the stack . It wont come out .
Did your MES not come with a light or did you remove it?
Since I have rewired and use a PID the light is dead on mine. I didn't go through the hassle to of trying to work it into the rewire with a switch or anything. My porch light gives me all the light I need and I gave up a long time ago trying to keep the window clean to look into my MES so the light was useless to me hahahaha.
No light on that one . Gen 1 sportsman elite 6 rack . Could use a short angle with a light , maybe . Not sure how the light sits in there .
No light on that one . Gen 1 sportsman elite 6 rack . Could use a short angle with a light , maybe . Not sure how the light sits in there .
I guess the metal angle could be added just under the light.
I think the light housing is just screwed into the side wall so that could be removed and then the wires come through a whole or something. I remember someone rewiring the light to work with their PID rewire job but I don't recall seeing pics of the housing being removed.
I have high temp RTV so my thoughts would be to remove the housing. Use aluminum from a soda can to cover the hole via some screws and RTV any gaps and then add the aluminum angle.
Heck the aluminum angle may cover up any existing holes and no RTV may be needed which would be a great win to cover up all the holes left behind from removing the light and it's housing :)
It was me. Took out the 15 watt bulb and put in a 40 watt since the socket is rated at 75 watts after your no back removal rewire. Here's a pic of the housing. Two scews and cut the wire and done in 30 seconds if you want to remove it. I put a block of wood on the outside and driilled through the inside hole to run a 16 guage extension cord for the light. Plug in on, unplug off just like the smoker.I guess the metal angle could be added just under the light.
I think the light housing is just screwed into the side wall so that could be removed and then the wires come through a whole or something. I remember someone rewiring the light to work with their PID rewire job but I don't recall seeing pics of the housing being removed.
I have high temp RTV so my thoughts would be to remove the housing. Use aluminum from a soda can to cover the hole via some screws and RTV any gaps and then add the aluminum angle.
Heck the aluminum angle may cover up any existing holes and no RTV may be needed which would be a great win to cover up all the holes left behind from removing the light and it's housing :)
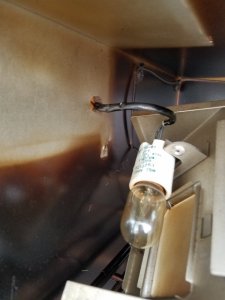
Shrink tube the cord for heat resistance. The socket is awesome it has screw terminals.
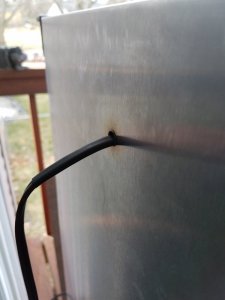
Rtv the hole to seal.
It was me. Took out the 15 watt bulb and put in a 40 watt since the socket is rated at 75 watts after your no back removal rewire. Here's a pic of the housing. Two scews and cut the wire and done in 30 seconds if you want to remove it. I put a block of wood on the outside and driilled through the inside hole to run a 16 guage extension cord for the light. Plug in on, unplug off just like the smoker.
View attachment 393192
Shrink tube the cord for heat resistance. The socket is awesome it has screw terminals.
View attachment 393193
Rtv the hole to seal.
Thanks dr K. That is a great pick!
So for rewire guys like me that don't care about the light is is simply 2 screws and a cut to get rid of the light stuff and then high temp food grade RTV over the holes and that shores things up there.
I may have to do that sometime soon. I like the idea of putting the aluminum angle and sliding a rack up there to use my "S" hooks with.
This will be super handy when I do sausage, hams (some day again), and hanging a turkey!
Thanks so much for all the info! I did the aluminum angle. I have some canadian bacon hanging in there smoking now. I should have measured... Loin is just barely touching bottom rack where AMNPS sits. Think this is an issue? Worried about smoke coverage. I could thrown on a rack... Definitely doing the MB mod next but mounting directly. Also, struck out finding a grinder locally but put pellets in a gallon ziplock and smashed with a paver until course dust. Smells promising!
I think you will be fine . The pellets crushed up do smell good . Reminds me of walking into the hardwood shop .Worried about smoke coverage.
Way easier just to wet the pellets and dry them...IMO. Just takes more patience.....Thanks so much for all the info! I did the aluminum angle. I have some canadian bacon hanging in there smoking now. I should have measured... Loin is just barely touching bottom rack where AMNPS sits. Think this is an issue? Worried about smoke coverage. I could thrown on a rack... Definitely doing the MB mod next but mounting directly. Also, struck out finding a grinder locally but put pellets in a gallon ziplock and smashed with a paver until course dust. Smells promising!
Nice job on the set up . That's gonna be good . I like the loins that have the light and dark meat on them .
Don't know if that's the first time you used a net or not , but remove the netting while it's still hot .
That's taking some nice color all ready .
Don't know if that's the first time you used a net or not , but remove the netting while it's still hot .
That's taking some nice color all ready .
If you are concerned about the bottom burning from being so close to the AMNPS, you could move it more to the left away from the AMNPS.One hour ish check up. A shot of the setup and smoke. Following Marianski's method. 170F until 140F IT. Note to self: always hang heavier end down/toward element/better compaction.
View attachment 393656
First time with netting so thanks. I need to see if someone wants to trade some large netting like for turkey since I now have like a lifetime supply of 15 yards LOL. Loins were $.99/lb and all like that. Not sure if front or back or whatever. I like the color too. Overnight pellicle and 30m fanned...
Not so much worried it will burn but I feel it would be more even temps with larger portion toward element.
Gonna check temps at noon. Hope it's moving along. Party to go to at 4... Gonna be close and might have to crank her up at the end.
Not so much worried it will burn but I feel it would be more even temps with larger portion toward element.
Gonna check temps at noon. Hope it's moving along. Party to go to at 4... Gonna be close and might have to crank her up at the end.
Should be hotter at the top of the smoker, so this is where the fat part needs to be for an even cook...First time with netting so thanks. I need to see if someone wants to trade some large netting like for turkey since I now have like a lifetime supply of 15 yards LOL. Loins were $.99/lb and all like that. Not sure if front or back or whatever. I like the color too. Overnight pellicle and 30m fanned...
Not so much worried it will burn but I feel it would be more even temps with larger portion toward element.
Gonna check temps at noon. Hope it's moving along. Party to go to at 4... Gonna be close and might have to crank her up at the end.
I would agree with that . You know what you're doin .Not so much worried it will burn but I feel it would be more even temps with larger portion toward element.
Upper left on my mes 30 is the coldest spot , but I have a Gen 1 with vent on right .
If you're lookin for larger net I have roll of 28 . I think thats the biggest . Happy to send you some .
SmokingMeatForums.com is reader supported and as an Amazon Associate, we may earn commissions from qualifying purchases.
Similar threads
- Replies
- 12
- Views
- 741
- Replies
- 6
- Views
- 8K
- Replies
- 4
- Views
- 6K
- Replies
- 36
- Views
- 6K
- Replies
- 27
- Views
- 10K
Hot Threads
-
Featured Prime Boneless Striploin Steaks on the Q
- Started by DRKsmoking
- Replies: 45
- Beef
-
Home Help. Is this weight bearing?
- Started by sandyut
- Replies: 25
- Blowing Smoke Around the Smoker.
-
Your Favorite Way to Use Leftover Smoked Pork Ribs
- Started by Jim_C
- Replies: 21
- General Discussion


