Yeah, you've got some great posts in your signature. I think the PID that seems to be endorsed the most here is the:
$150 Auber WS-1510ELPM Multi Purpose Controller:
Auber Instruments, Inc. Multi Purpose Controller [WS-1510ELPM] - The WS-1510ELPM is a versatile temperature controller to have in your home. It can be used for various applications such as Sous Vide cooking, controlling an electric smoker, making yogurt, dough proofing, controlling the...
www.auberins.com
But not sure the wife would appreciate me buying that for hobby tinkering. I was thinking of:
$58 Inkbird PID Temperature Controller Kit and Plastic Junction Box
$12 Combination Toggle Light Switch and Duplex Receptacle Outlet
There is that auusiebrewer dude on YouTube tinkering with all kinds of $20 PIDs that people keep referencing and he even jokes about the instructions terribly translated directly from Chinese, but that did not seem to bother him as he built the PIDs that he used with moonshine-like contraptions, LOL.
If I do tinker, I was wondering if there was a "male" connector recommended to couple the solid and braided "female" spade connectors on those wires rather than cutting off the connectors for tinkering? I was having trouble finding and from Supco on Amazon.
For the rewire connectors you can solder, do male & female 14-16 AWG spade connectors, or go as simple as wire nuts. Wire nuts are the easiest.
As for building a PID that is a pretty cost effective kit but know there is probably $90+ in other materials and tools to build a complete PID Controller even with that kit.
An on/off switch that WON'T burn up (I use marine breaker switches).
I always suggest cannibalizing a 12AWG outdoor rated extension cord for the mail and female ends as well as any wiring you may need internally for the controller box. The enclosure box "outlets" are cheap plastic and melt down, plus cutting squares and rectangles into the enclosure box to fit the outlets is a nightmare. It's easier to drill round holes and buy/use cable relief glands to fasten and hold the male/female ends of the extension cord in place.
A smart design will also incorporate a 15A fuse holder to protect the PID from surges.
There will be wire nuts, connectors, heat shrink insulation wrap (or at least electrical tape), and all the tools to put it all together AND cut holes in the box.
I use my dremel rotary tool to cut the squares/rectangles for the PID controller but work very hard to drill holes using a Universal Bit so I can run cords/cables use relief glands to hold them in place.
Finally, you will want a longer temp probe.
So as you see the cost of all this stuff, $10, here $12 there, adds up and if you have to buy tools then it will easily run more than $150 that a complete PID runs.
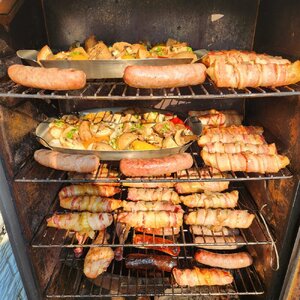
If the Masterbuilt breaks again, I will seriously consider the Auber. How do you guys usually place the PID probe? I keep reading that you place it near the element so do you guys drill a hole near the bottom? I definitely do not want to cut open the back to insert it back into the existing Masterbuilt temp probe. Or should I simply drop it into the vent hole, LOL
To answer your question, I prefer dropping the probe down the vent hole and clipping to the center-bottom of the lowest rack of the smoker. This gives the fastest response time and allows for the probe to be moved around and easily replaced.
I threw a lot of info at you, let me know if this all makes sense or if you have any questions :D