3D Printed Chef's Choice slicer "flap killer" modification

  • Some of the links on this forum allow SMF, at no cost to you, to earn a small commission when you click through and make a purchase. Let me know if you have any questions about this.
SMF is reader-supported. When you buy through links on our site, we may earn an affiliate commission.

johnmeyer

Master of the Pit
Original poster
Nov 19, 2015
1,689
451
Central Coast, CA
[edit] This thread was pulled out and broken off from a similar thread started by Dave Omak after I unintentionally somewhat hijacked his thread. Making this a separate thread was probably a good move by the moderators.

Here is a link to Dave's thread:

Chef's Choice meat slicer modification....

I am adding this introduction to alert any future readers that some of my comments later in this thread may seem a little odd because they were responding to other posts in Dave's thread, and like Dave's initial post, those too were not moved over to this new thread. However, I think you can still follow the idea.

In addition, I have edited this original post from what the moderators copied over from the original thread so that it makes sense on its own. Because this post was initially a response to Dave's post, it makes no sense on its own unless I made these modifications.
[end edit]


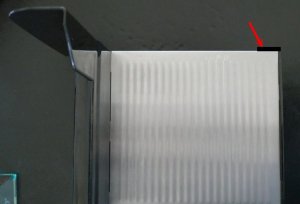
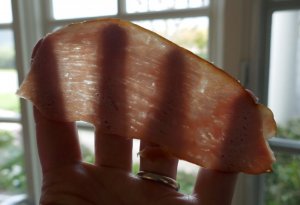
I got a 3D printer from my son for Christmas and have been designing all sorts of replacement parts and gadgets. I just pulled out my slicer and it seems to me that I could easily add a clip to the leading edge of the sliding tray that would close up the gap between the moving bed and the blade which is responsible for creating the hanging flap on the leading edge of the meat which, when it gets big enough, interferes with the meat entering the blade at the bottom, resulting in non-uniform slice thickness. Unlike Dave's design, my idea might let me solve the problem without having to cover any of the existing bed, and without making any permanent modifications that cannot be undone. I don't think the part needs to run for the entire length of the bed, because the problem is at the leading edge.

[edit]This was a wrong assumption on my part. I was right that closing the gap only at the front of the moving plate will indeed stop the flap from forming, but only if the meat is long enough so that the leading edge of the meat is over or beyond my part. A more universal solution (discussed below) will be to extend this prototype for the entire length of the tray. [end edit]

I've Photoshopped what it would look like and have attached my proposed design below. There is a ton of space for the clip to fasten to the edge without interfering with the white nylon sliders underneath. It could be removed for cleaning.

Chef's Choice Clip.jpg

I'll post again once I have this designed and printed.
 
Last edited:
[edit]This post sounds like I am starting all over again because the moderators did not move to this thread some of the responses to the original version of what I wrote above. However, I wrote it the way it stands because I was responding to those people. I have not altered it.[end edit]

I am an engineer and I really appreciate it when someone invents something new, which Dave Omak has done. Having been a part of countless design teams, we always try to work collaboratively to improve on each other's ideas. In this case, I think Dave identified and fixed a key flaw in the Chef's Choice design, but I want to create something simpler, which won't require adhesive, which won't introduce any potential cleaning issues, and which can easily be removed in order to get you back to your stock slicer.

Below is a 3D sketch of a prototype part I am proposing that might provide the same benefit. If it works as intended, it could be removed for cleaning, just like the part on the other side of the blade that helps push the sliced meat away from the blade, which you have to remove and clean after each use. The challenge with my design will be keeping it from getting pushed downward during operation, yet still be removable for cleaning. I could add a tail that would fit under the white nylon sliders, but if I did that you'd have to unscrew that one slider to fit the tail underneath, and that would make this add-on part semi-permanent.

I'll print it out and see how it works.
Chef's Choice Clip v12.png
 
Last edited:
if your little gadget is removable and helps to eliminate the tail on room temperature meats, i'd buy one!
Well, that's exactly what I'm trying to do. Because the flap is the bane of this design, I'd expect every person who owns one of these slicers would want one. I don't think I'd sell it because, like some of the SFM forum operators who don't want to sell rubs (as one example), I worry about liability. However, I'll certainly make the design available, if it works (it may not).

My first prototype fits perfectly and should stay in place, but I printed it backwards (I'm an idiot) so I can't fully test it. The second one will be finished in a few minutes (3D printing is amazing) and I'll try it for slicing some ham.

What I don't know yet is whether only closing the gap at the front of the bed will stop the flap from forming, or whether you need to close the gap along the entire length of the bed, which is what Dave's design does. The flap only forms at the leading edge, so I'm hoping my little clip will do the job.

As for being able to get thinner slices, I guess I was somewhat negative in my initial response to Dave's great OP when I wondered whether closing the gap would make any improvement in how thin a slice you can get. I just spent a few minutes studying my model 615's slicing adjustment mechanism, and while I think Dave's design should completely eliminate the flap problem, I'm not sure any design is going to overcome the problems inherent in the under-designed Chef's Choice slicer control (I don't think anyone will ever get deli pancetta using a 615). If you press on the vertical piece of metal controlled by the slicer thickness dial, it flexes quite a bit with only moderate pressure, and also has a lot of back and forth slop because of the wide tolerance of how the metal bar fits inside of the nylon groove inside of the control knob. Given that, once you get down to really thin slices, the only way I think you can get true, consistent deli thickness is by using quite a bit of skill to keep from flexing this assembly too much while pushing the meat through the slicer.

I'll report back once my part is printed.
 
Last edited:
Progress.

It took a couple of hours and several prototype prints, but I got a version of my design that fits pretty well (the bed is not even close to square, and I'm not going to try to warp my part to fit).

I tried it out just now by doing 35 slices of ham for sandwiches tonight. I sliced them as thin as I could (click on any picture to get a larger version):

Chef's Choice Clip_02.jpg
When I was finished, I turned over the remaining ham and there was absolutely no flap on the leading edge, and a very small flap on the trailing edge:

Chef's Choice Clip_09.jpg

I am not quite ready to declare this a success because ham doesn't have as much of a flap problem as does most beef products. I'll have to see how this works with beef, like a tri-tip. I don't think it made any difference in how thin I was able to slice, but I already covered that in an earlier post.

Finally, for those who might not quite understand what I did, here are a few pictures:

Chef's Choice Clip_03.jpg Chef's Choice Clip_04.jpg Chef's Choice Clip_05.jpg Chef's Choice Clip_06.jpg Chef's Choice Clip_07.jpg Chef's Choice Clip_08.jpg
 

Attachments

  • Chef's Choice Clip.jpg
    Chef's Choice Clip.jpg
    53.9 KB · Views: 90
Last edited:
does the piece of meat have to extend up to or past that corner of the tray in order for your part to work?
Good point. Yes it does.

Now that I've proved out the basic concept, the next step will be to design and print out one that goes the entire length of the bed. There is plenty of room on the trailing edge to fit another clip so that the part is supported on both ends.

P.S. I uploaded this design to the 3D printing share site called Thingiverse:

https://www.thingiverse.com/thing:3522779
 
Last edited:
This picture...
391617-c97bb84918b45c116d537f755447866d.jpg


I thought it was a carving of a pig facing to the right....at first...
OMG, you're right. That is too weird.

BTW, everyone should give Dave points for this idea. My different approach to closing the gap clearly showed, at least to me, that his idea can stop the "flap" from forming. Without that flap disrupting the distance between the meat and the blade, I found this afternoon that you can get much more consistent thickness from slice to slice. I don't think you can achieve slices that are any thinner, but whatever size you can get, you will be able to sustain that thickness without getting half slices when the meat gets pushed away from the blade by the flap.

Also, Dave's approach will work for any size, whereas my prototype only works with large cuts. Making the larger version of my prototype should, in theory, work for any size piece of meat, and be as universal as Dave's design, but without having to alter that main platen, and without having to permanently adhere something to that platen which can never be removed.

I wonder if there is a way to hold down Dave's aluminum without using permanent adhesive?

However, doing the extra work to take my proof-of-concept prototype to the final state is more work than I want to do today. Hopefully, I'll get some time in the next week or two to finish it off. It really does work; it is dirt easy to attach and remove; and it leaves your slicer intact. I think this last point is really important because there has got to be some hidden reason why the designers at Chef's Choice left such a big gap. They've been selling these for a long time and therefore could have easily changed this part of the design a long time ago. I suspect it may have to do with things like small bones getting jammed if the gap is too small. If this turns out to be a big problem, with my design you can just pop off my "flap killer", and you'll immediately be back to your stock slicer.
 
Last edited:
  • Like
Reactions: old sarge
I look forward to seeing the full length version. Thanks to Dave and you for the insight into solving this problem. I will definitely print one with the info you provide! Like to you and Dave!
 
John,
What keeps your clip from being pushed off due to the down pressure of the meat when the blade is cutting ? Purely press fit?
 
John,
What keeps your clip from being pushed off due to the down pressure of the meat when the blade is cutting ? Purely press fit?
Yes, but it's a little more. In my first two posts you'll see that I was worried about the exact point you're asking about.

My solution?

If you look closely at my pictures you'll see that the part is about 0.5mm short of being flush with the top of the tray at the edge.

391622-f72f08065df590eff4e17d74d2516343.jpg


This keeps most of the pressure from the downward cutting force of the blade from being focused on my part, yet still lets my part support the meat enough so it doesn't move un-cut down into the groove and develop a flap. Also, the 3D printer lets me print with absolutely amazing tolerances, so it is a tight fit. Finally, something I hadn't counted on, and this may not be true of every unit out there, but on mine, the two black inner walls on the slicer tray are corrugated slightly instead of being smooth like the top side. The provides additional grip.

When I get around to designing and printing the full-length part I may have a tougher time keeping it from moving down because it will only be supported at the two ends. Even if the two ends don't move the middle might flex, although the PLA plastic I'm using is known for being rigid, and the shape of the part will make it quite stiff in the up/down direction.

I do have an ace in the hole: if your concern turns out to actually be a problem I can add a shoulder to the part that will fit under the nylon runner. I'll have to undo four screws that hold that runner in place in order to insert that flap. If I have to do that, it will negate what I hoped would be a big advantage of my approach, namely quick removal for cleaning.

I won't know until I've built the part and tried it. I think I can make it work simply by first making it non-square so that it fits the crazy geometry of the sliding bed, and then extend it the length of the slicer. If it wasn't for the non-square issue, I could design the big version in less than ten minutes. Like carpentry: square is easy; fitting into an existing non-square space is not.
 
Now that I've seen these mod threads it got me thinking of modifying my 615. I don't have a 3D printer but im thinking of adding a plastic tray over the slide tray. I'm thinking of machining a step out of the center so it doesn't move around. A clamp along the edge catching underneath would secure it plus make it removable for cleaning. When i get a chance I'll model up my ideas
 
Now that I've seen these mod threads it got me thinking of modifying my 615. I don't have a 3D printer but im thinking of adding a plastic tray over the slide tray. I'm thinking of machining a step out of the center so it doesn't move around. A clamp along the edge catching underneath would secure it plus make it removable for cleaning. When i get a chance I'll model up my ideas
You might actually have the best idea yet. If I understand your idea, it would just be a flat piece of plastic, covering the entire tray (just like Dave's aluminum), but with flaps on three sides, like the top of a shoebox with one flap removed. You could easily hold this in place with nothing more than some clips, like those you use to hold a big ream of paper.

The only issue is how do you fabricate it using plastic? Glue it?

BTW, you got me thinking about a few things so I pulled out my slicer. First, my part actually can't go down much because it is only a fraction of a millimeter above the groove and therefore gets pushed back into place every time the carriage returns. The same will be true of the big part. Also, it will be trivial to add a small flap that slides under the nylon part without having to remove it, if this really becomes a problem.That would completely eliminate any downward movement.

It sure is neat to have other people suggest ideas and challenge one's thinking. Thank you!!
 
I sliced my BBB tonight and what I have found is that if the slabs are cold enough there is no flap formation. The meat is rigid enough to prevent it and you can run through the slices fast without having to flip the slab. About 3.5~4 hours in the freezer was perfect.
 
  • Like
Reactions: pc farmer
I sliced my BBB tonight and what I have found is that if the slabs are cold enough there is no flap formation. The meat is rigid enough to prevent it and you can run through the slices fast without having to flip the slab. About 3.5~4 hours in the freezer was perfect.
I find 4 hours in the freezer makes the bacon slicable as well. But I'd still like to fix the root cause. From what I've seen here it seems like a simple fix.
 
Yes near-frozen meat is the easier solution to this problem, and even without a slicer with the flap problem, it is a better way to slice meat. However, sometimes that isn't an option. For instance, I always keep some ham in the fridge because we put it into lots of things. I don't want to have to keep almost freezing and then unfreezing it because multiple freezing degrades it. Also, when the tri-tip comes off the rotisserie, I don't want to wait a couple of hours before I can have a sandwich.
 
SmokingMeatForums.com is reader supported and as an Amazon Associate, we may earn commissions from qualifying purchases.

Hot Threads

Clicky