3D Printed Chef's Choice slicer "flap killer" modification
- Thread starter johnmeyer
- Start date
-
Some of the links on this forum allow SMF, at no cost to you, to earn a small commission when you click through and make a purchase. Let me know if you have any questions about this.
You are using an out of date browser. It may not display this or other websites correctly.
You should upgrade or use an alternative browser.
You should upgrade or use an alternative browser.
SmokingMeatForums.com is reader supported and as an Amazon Associate, we may earn commissions from qualifying purchases.
Ender-3 Pro. My son gave it to me for Christmas. The non-pro version, which is almost identical, is under $200. It absolutely amazing what you can do with it. I've repaired dozens of things that have broken parts, including a broken knob on my old Wollensak tape recorder which my dad bought for the family back in 1960. That knob has been broken since 1970.Sooo What kind of 3D printer do you have?
Here's a link to some of the things I've printed:
https://www.thingiverse.com/johnmeyer/designs
I'm a total noob, and had to teach myself how to use a CAD program. My designs are grade-school stuff, but despite that are really useful.
Last edited:
rob g
Smoke Blower
Ender-3 Pro. My son gave it to me for Christmas. The non-pro version, which is almost identical, is under $200. It absolutely amazing what you can do with it. I've repaired dozens of things that have broken parts, including a broken knob on my old Wollensak tape recorder which my dad bought for the family back in 1960. That knob has been broken since 1970.
Here's a link to some of the things I've printed:
https://www.thingiverse.com/johnmeyer/designs
I'm a total noob, and had to teach myself how to use a CAD program. My designs are grade-school stuff, but despite that are really useful.
If you need a hand modelling stuff let me know. I would just need a sketch with dimensions. I do machine design for a living and use Solidworks.
Gotcha.... very true.Yes near-frozen meat is the easier solution to this problem, and even without a slicer with the flap problem, it is a better way to slice meat. However, sometimes that isn't an option. For instance, I always keep some ham in the fridge because we put it into lots of things. I don't want to have to keep almost freezing and then unfreezing it because multiple freezing degrades it. Also, when the tri-tip comes off the rotisserie, I don't want to wait a couple of hours before I can have a sandwich.
That's mighty nice of you. I wish you were closer so I could look over your shoulder. I've had to figure this out without any help, and it has been a challenge at times.If you need a hand modelling stuff let me know. I would just need a sketch with dimensions. I do machine design for a living and use Solidworks.
The biggest challenge was learning the CAD program I chose, Fusion 360. Even though I've spent a lifetime in the computer business and was around when we were designing the first drawing programs, the Fusion UI is like nothing I've ever used before and it took me several eight-hour days of watching videos and following tutorials before I could do useful things. My designs are crude, but functional.
This flap part is trivial, but I got sidetracked with other things and haven't had the time to deal with the 3-5 degree non-square angle that comes into play when the part gets extended for the entire length of the bed. I think I'll start the design from scratch and only have the clip fasten on the inside and outside edge that is parallel to the blade, and eliminate the end piece. This takes the angle out of the equation. Since I will have a clip on each end of the part, I think I'll have enough grip to support it. Actually, if you look at the 615 slicer bed, there are all sorts of options to fasten the part, and various ways to improve grip, should I have any issues with it moving out of place during use. I think that simply having it be 0.5 mm below the main bed is all that is required to remove most downward pressure, so I think the simpler version should work.
By making it simpler, I think it will only take twenty minutes to sketch. However, it will be a much bigger part so even at prototype resolution it will take 2-3 hours to print instead of twenty minutes.
solman
Smoking Fanatic
- Nov 13, 2015
- 360
- 85
i had some pork belly in the freezer for 4 hours to slice them into bacon, and i was still getting the tail or flap. it was so annoying. that gap is so big it baffles me why the manufacturer made it that way. it's great that you guys are coming up with potential solutions.
I wondered the same thing, and speculated earlier in this thread that it may be to keep things from getting wedged into a tiny gap, especially given the relatively weak motor (compared to a Hobart commercial slicer). Anything that gets wedged could cause a stall, and you only have a few seconds to kill the motor once that happens, or you burn out the motor.... that gap is so big it baffles me why the manufacturer made it that way.
They've been selling this basic design for years, must know about the problem, and could have easily re-engineered this. The fact that they didn't means that there probably is a reason for having that "too large" gap. We'll find out.
It is this line of reasoning that leads me to believe that any solution has got to be easily reversible, back to the original design so that when cutting something with gristle or bones -- or whatever might cause a problem when there is less gap -- you can switch back to the big gap and get the job done.
With my prototype part, it takes less than ten seconds to slide the bed off, push the part off, put the bed back on the slicer, and resume slicing.
Making progress (click on picture to make it bigger):

Changes from prototype:
1. The part is now the full length of bed, so it will stop the flap for any sized piece of meat, and should keep the flap on the trailing edge from developing.
2. I removed the outside wall on front of my part (far left in the picture above) so I don't have to deal with the non-square bed end. That will slightly reduce the surface area to which the part will grip, so I added #3, below.
3. I added little "nibs" on inside of each clip, designed to "pop" under the end of the nylon runner, in order to even more securely fasten the part in place. In the closeup below, the nib is that little bump in the far right of the upper part of the clip.

I'm sure I'll have to tweak a few things after I print rev. 1 (like the size of the nibs), but based on the success of the little clip I made late last week that only fit over the front of the bed, I have high hopes that this will work. I don't know yet if the part will flex in the middle, where it is not supported, and even if it does, whether that will interfere with its function.
More to come ...
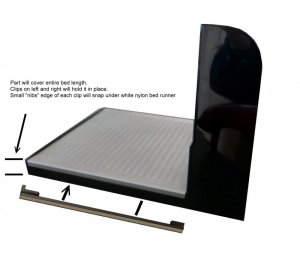
Changes from prototype:
1. The part is now the full length of bed, so it will stop the flap for any sized piece of meat, and should keep the flap on the trailing edge from developing.
2. I removed the outside wall on front of my part (far left in the picture above) so I don't have to deal with the non-square bed end. That will slightly reduce the surface area to which the part will grip, so I added #3, below.
3. I added little "nibs" on inside of each clip, designed to "pop" under the end of the nylon runner, in order to even more securely fasten the part in place. In the closeup below, the nib is that little bump in the far right of the upper part of the clip.
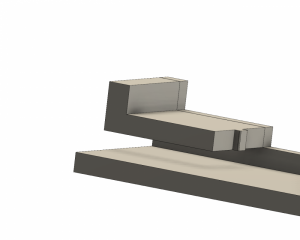
I'm sure I'll have to tweak a few things after I print rev. 1 (like the size of the nibs), but based on the success of the little clip I made late last week that only fit over the front of the bed, I have high hopes that this will work. I don't know yet if the part will flex in the middle, where it is not supported, and even if it does, whether that will interfere with its function.
More to come ...
rob g
Smoke Blower
I had a look under my slide table and the screws holding the plastic way are pretty fine. If they are screwed into a plastic boss I'm not sure I would want to remove them. Drilling a small hole into the upper part of the side of the slide table would give you a place for a small clip to catch in to
I totally agree: I do not want to remove those screws. So the idea is to add nibs that are small enough that they can go over the end of the white nylon slider, relying on the flex in my plastic part, but large enough that once they are on the top side of that nylon, they'll resist downward pressure and help keep the part in place.I had a look under my slide table and the screws holding the plastic way are pretty fine. If they are screwed into a plastic boss I'm not sure I would want to remove them. Drilling a small hole into the upper part of the side of the slide table would give you a place for a small clip to catch in to
Because the bottom of the part is only about 0.5 mm above the groove in the slicer (that groove between the bed and the blade where all the drippings and meat tidbits collect), I think that may be sufficient to keep the part in place, but I thought I'd have a go at adding this feature, just to see what happens.
The first attempt at this part should be finished printing in five minutes.
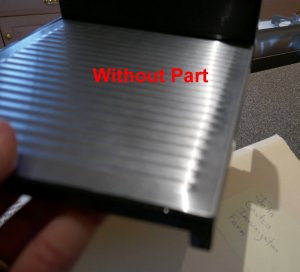
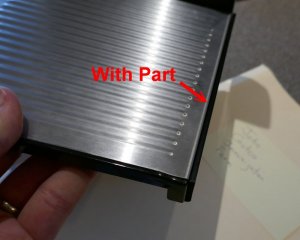
OK, the nibs were a total failure. I had to file them off. I'll need to make a few adjustments because the height of the inside walls on the two clips is wrong. I also may make the clips a little tighter. Other than that, it looks like is is going to work just fine. See pictures below (click on any picture to make it larger).


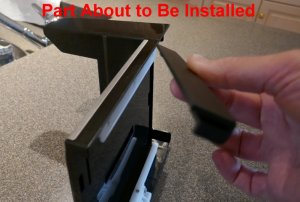
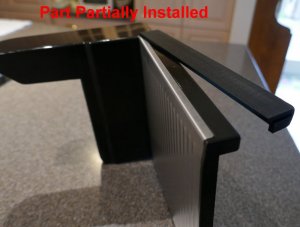
Looking good. As for the gap, I cannot speak authoritatively on the CC since I have not had it long but on the Rival, over time the slide tray developed some play due to wear of the plastic and it was not uncommon for it to hit the blade if I was forcing something thru the slicer. So the gap might be there to prevent that from happening. That is my guess.
That's probably a very good guess. I don't know the Rival slicer, but this popular 615 model, which I think is great for the price, will win no awards for heavy duty build quality and, more importantly, for tolerances. There is a lot of play in almost every part.Looking good. As for the gap, I cannot speak authoritatively on the CC since I have not had it long but on the Rival, over time the slide tray developed some play due to wear of the plastic and it was not uncommon for it to hit the blade if I was forcing something thru the slicer. So the gap might be there to prevent that from happening. That is my guess.
ponzLL
Fire Starter
Fun thread to read, thanks! I'm a fellow 3d printing enthusiast and have a bunch of things I've designed and printed for other hobbies of mine. That's what it's all about!
I'm a fellow 3d printing enthusiast and have a bunch of things I've designed and printed for other hobbies of mine.
What printer do you have, and how long have you been using it?
I did finally "perfect" the design, and my latest version can be found on the Thingiverse link I gave earlier in the thread.
I'm about to slice a lot of turkey breast for club sandwiches which will be tonight's dinner (along with some bacon). I'm really looking forward to using this tonight.
ponzLL
Fire Starter
I have a pair of fully modded out Maker Select V2's. I've had one for 2 years and one for a few months. I also use SLA machines and more industrial 3d printers at work.
Your Maker Select looks somewhat similar to my Ender-3 Pro.I have a pair of fully modded out Maker Select V2's. I've had one for 2 years and one for a few months. I also use SLA machines and more industrial 3d printers at work.
Have you printed any of your own designs on both the Maker Select and also the SLA machines at work? I'm curious about how much better the SLA prints turn out. I love my Ender-3 (it was a gift from my son), and find myself printing out a LOT of parts (I print mostly functional parts, like this "flap killer"), but even though I am incredibly happy with the results, I would love a printer that could give me smoother surfaces; would let me print with at least PETG or, better yet, nylon; would let me print with flexible filament; and would print a little faster (I keep mine going slow in order to get the best results).
As for my flap killer, I just sliced 9 oz. of turkey for the dinner tonight, and it worked perfectly. The clip was just a little loose, so when I was finished I put it under hot water from my instant hot water dispenser (near boiling) and then closed up the clip a bit. It now fits much more tightly.
I am so glad I designed this in a way that doesn't permanently alter or mess up the slicer. I can always go back if something isn't working because of my modification.
I also used the shim I created which fits under the thickness control and keeps it from creeping. Between the flap killer and shim, the slicer has a much more professional feel, and easily creates "deli slices" that are pretty much indistinguishable from what you'd get from an actual deli.
ponzLL
Fire Starter
SLA and FDM printing are wildly different. Parts on an SLA machine can end up with completely smooth surfaces and virtually no visible layer lines because they can get down to insanely high resolution. The issue with SLA is that the parts are usually pretty brittle, and the resin is expensive. I have printed the same parts on both on occasion and the SLA always wins over my printer, visually.
That said, both our printers are capable of almost perfectly matching prints from some of the higher end printers, but they require tweaked slicer settings and mods to stabilize the frame, tweaked jerk and acceleration settings, proper calibration of your extruder, tweaked belt tension, perfectly trammed frame, and things like that.
That was a good idea heating it up to get a better fit!
SmokingMeatForums.com is reader supported and as an Amazon Associate, we may earn commissions from qualifying purchases.
Similar threads
- Replies
- 2
- Views
- 3K
- Replies
- 2
- Views
- 558
- Replies
- 7
- Views
- 2K
- Replies
- 60
- Views
- 3K
Hot Threads
-
Well. Look what Santa dropped off early!
- Started by Steve H
- Replies: 28
- Blowing Smoke Around the Smoker.
-
The Best Egg Salad - Enabler Version
- Started by Chris_in_SoCal
- Replies: 24
- ABT's and all things Appetizers
-
Chicago Cracker-Thin 'Za
- Started by Quiganomics
- Replies: 16
- Pizza
-
Reverse searing equipment
- Started by Pigfarmin101
- Replies: 12
- Grilling Beef
-
HomeMade Dog Food
- Started by KBFlyer
- Replies: 10
- General Discussion


