Whole Hog Cinder Block Build / Function Questions

  • Some of the links on this forum allow SMF, at no cost to you, to earn a small commission when you click through and make a purchase. Let me know if you have any questions about this.
SMF is reader-supported. When you buy through links on our site, we may earn an affiliate commission.
I have no great solution to re-fueling pig roast pits. I think you have to, through experience, learn to slightly over-fuel and then live with some wasted coals when you pull your food. You can control temp by adjusting air flow (by changing the area of intake and exhaust ports) but when the fire is out of fuel, it's Game Over.

That's the big advantage to building a firebox outside your pit. You can keep adding fuel if you run low (and even shovel some out if you over do it) if normal air flows aren't working for you.

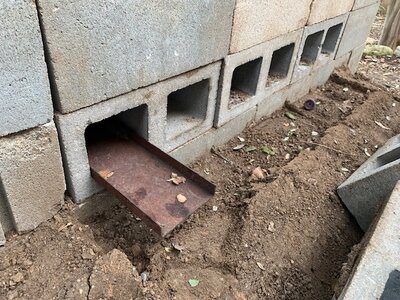
One possible solution to re-fueling in your style of pit is to include some steel rain gutter troughs that feed the fire every few feet and exit low through the side walls. They're plugged when your'e cooking but should you run out of fire you can feed in fresh coals from the outside with just a steel rod (rebar) as a pusher. They'll slide easy
My plan is a roast and not a smoke so I'm stepping away from the fire box idea. I like the idea though of feeding the fire from steel rain gutter material run down the sides. If I went this route with the steel rain gutter I suppose I could just turn one or two blocks per side to open the holes to allow for airflow and then just have openings big enough to have the rain gutters stick out from the pit a bit.

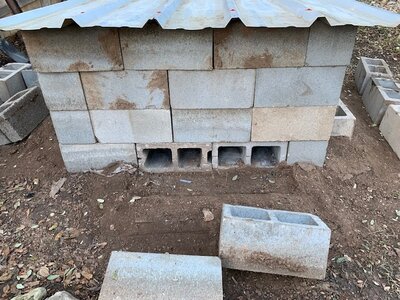
My metal cover does have openings. Should these be filled in or does this help with venting?
 
roof openings close to your lower air intake should be plugged. Roof openings on the side where your exhaust is are OK.
 
hog pit 11 29.jpg

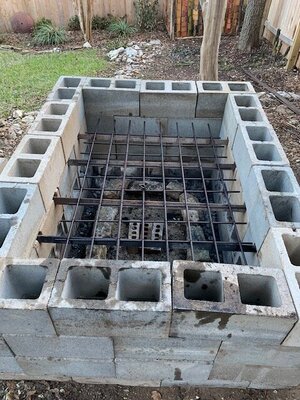
I'm not sure what is considered air intake vs air exhaust. This is what I'm thinking along with a way to add your suggested rain gutters along the inside long walls.
 
I'm not sure what is considered air intake vs air exhaust....
I'd think of it in terms of heat rising. So cool air enters low, providing oxygen for your fire to burn. That air is then heated, so it's less dense and wants to rise to an upper exit point at your roof I'm calling the exhaust. In an offset smoker that hot air is all that's doing the cooking but it carries the good tasting molecules coming from the wood so most people here like to encourage that "smoky hot air" passing over their meat regardless the heat source. You're using the infrared heating of hot coals on the ground bed as your primary heat source. But you don't want the fire to burn unevenly so you want the air to enter low on one side and pass the length of the fire to exit on the opposite side. So I'm assuming your hog and your fire will be spread fairly evenly between your sides 1 and 3 in the pic. And then side 1 would have 2 sideways bricks right next to each other. I'd cut a 4x4 into 3 4" lengths to use as plugs in UP TO THREE of the holes to throttle back the air flow if your fire gets too hot. And then NO holes on side 3. Instead use openings in the roof on that side to let hot air out (exhaust). Plug roof openings anyplace else. I'd put the gutter opening on side 2 & 4, maybe one row up from ground level and in about 4 places, staggered sides 2 and 4. They always have 4x4 style plugs in them, except when adding more coals. So a single 2' length of gutter is plenty--you just need a trough to push the coals into the fire if it starts going out. These also can be sight holes to occasionally visually check the fire. A "vanity mirror" which you angle at 45deg could be useful in avoiding getting on your knees...known as turning mirrors in optical setups.
 
Bill, I really appreciate the help. What you are describing makes sense and is buildable which I appreciate. A few questions/clarifications:

Side 1 would have 2 sideways bricks right next to each other. I'd cut a 4x4 into 3 4" lengths to use as plugs in UP TO THREE of the holes to throttle back the air flow if your fire gets too hot. I thought the openings in the blocks were bigger than 4" x 4"? Have you tried this before?

And then NO holes on side 3. Instead use openings in the roof on that side to let hot air out (exhaust). I'm assuming the open part of the end corrugation of the metal lid is sufficient to accomplish this or do I need to cut a hole in the lid?

I'd put the gutter opening on side 2 & 4, maybe one row up from ground level and in about 4 places, staggered sides 2 and 4. So a single 2' length of gutter is plenty--you just need a trough to push the coals into the fire if it starts going out. When using the gutter as a trough to feed the fire, if you place the gutter in an opening on Side 4 - are you dropping coals on that same side or Side 4 of the pit OR are you reaching across the pit to Side 2 of the pit to feed coals? In either situation why would the openings be staggered across from each other? Seems like an air opening in every other block opening would work best to evenly distribute the coals.
 
I think you're making this harder than it has to be. As someone else suggested get a burn barrel and cut a hole below the bottom seam big enough to fit the head of your shovel in. Drill holes at the bottom third seam and stick rebar through those holes to act as a grate for the barrel. About 3 pieces of rebar. Lay some logs on top of the grates and get a fire started. As the wood burns the coals will fall through the rebar and you scoop those out to feed the pit. Keep feeding whole logs into the barrel so you can always have coals when you need them.

As far as flipping the hog. We always had a piece of field fence under the hog when we started cooking. When it was time to flip we would lay another piece of fence on top of the hog and a person on each end would grab the two pieces with the hog stuck between and flip it.

You do not want to lay coals under the hog where grease might drip on them. I can promise you don't want to catch that grease on fire. We would always lay coal around the inside of the perimeter of the pit.

Hog should be skin side up to cook. It's done and ready to be flipped when the skin separates from the hams. After we flipped we would start scooping out fat, pulling the meat and adding sauce but leaving it in the hog. We would leave the hog on the pit for about 30 minutes to let the sauce mix in with all the meat. I'm from South Carolina and from a region where we prefer vinegar based sauces.

Good luck on the cook.
 
Very likely that I'm over planning and complicating. But I've never done it, I don't want to mess it up in front of 50+ friends and family and I find the details of the pit build and how to maximize its effectiveness very helpful. At least makes me think I'm less likely to screw up. I also like to build things and I enjoy what I've learned and put together as I get feedback. Bill and I - I think are on the same page and his direction with pit design makes a lot of sense to me.
 
Bill, I really appreciate the help. What you are describing makes sense and is buildable which I appreciate. A few questions/clarifications:

Side 1 would have 2 sideways bricks right next to each other. I'd cut a 4x4 into 3 4" lengths to use as plugs in UP TO THREE of the holes to throttle back the air flow if your fire gets too hot. I thought the openings in the blocks were bigger than 4" x 4"? Have you tried this before?

And then NO holes on side 3. Instead use openings in the roof on that side to let hot air out (exhaust). I'm assuming the open part of the end corrugation of the metal lid is sufficient to accomplish this or do I need to cut a hole in the lid?

I'd put the gutter opening on side 2 & 4, maybe one row up from ground level and in about 4 places, staggered sides 2 and 4. So a single 2' length of gutter is plenty--you just need a trough to push the coals into the fire if it starts going out. When using the gutter as a trough to feed the fire, if you place the gutter in an opening on Side 4 - are you dropping coals on that same side or Side 4 of the pit OR are you reaching across the pit to Side 2 of the pit to feed coals? In either situation why would the openings be staggered across from each other? Seems like an air opening in every other block opening would work best to evenly distribute the coals.
My Friend, I've never built a bbq from cinder blocks--I'm flying blind here. Take all I say with a grain of salt.

1. And I don't have a CMU in front of me now, but I think they were sized to capture a true (rough) 4x4 with only ~1/8" to spare which would be tight enough to block most of the air flow. (Air, like liquids, have viscosity.) But lumber keeps shrinking, you get less for more, so I agree one's probably lucky to find one at 3.5x3.5 now-a-days. I frequently wad up aluminum foil to close off unwanted openings of up to .75" so that's an approach. If you want it to be easier/quicker to use these air plugs, you could put a 1x2 edge, on 2 adjacent sides of the "4x4", about an inch in from the end, and then use wooden wedges (like you use to install a door frame) on the other two. I can see drilling a hole in the end of the 4x4 and stick a short piece of broom handle in there as a handle. (It'd look like a tuner in the stopped end of a quarter-wave wooden organ pipe.)

2. I think the corrugation openings in the far side of the metal "roof" will be adequate but you can slide that back, if needed to expose a half or full inch of opening there, if you're not getting enough flow, right? The roof just sits there, right? Just make sure the corrugations on the OTHER end (where the air intake is) are closed off with wadded up foil or something. Otherwise that end of the fire will be much hotter.

3. I was trying to describe the gutter troughs arranged like this:
1670017288041.png


The gutters are loaded with lumps or briquettes and inserted so the ends are at the far edge of the dying fire. You pull our on the gutter as you use your push-pipe to load push the coals out and onto the fire from the far to near side. You do that 4 times. I show 4 blue gutters but of course you only need 1 unless you have 3 helpers. I recommended staggered on opposite sides because I was assuming some gaps in the blocks and the 4x4 plugs and I wanted to balance that unintended airflow in from side to side and end to end. But if you make your plugs fit nice and tight, like a tuner in an organ pipe, you could put all 4 on one side.
And yes you can put in more than 4 but I think that 1/2" steel pipe you're using as a push-pipe can be used to spread the fresh coals out side-to-side so they overlap with the next nearest gutter opening. But season to taste.

Hope this all helps.
 
My Friend, I've never built a bbq from cinder blocks--I'm flying blind here. Take all I say with a grain of salt.

1. And I don't have a CMU in front of me now, but I think they were sized to capture a true (rough) 4x4 with only ~1/8" to spare which would be tight enough to block most of the air flow. (Air, like liquids, have viscosity.) But lumber keeps shrinking, you get less for more, so I agree one's probably lucky to find one at 3.5x3.5 now-a-days. I frequently wad up aluminum foil to close off unwanted openings of up to .75" so that's an approach. If you want it to be easier/quicker to use these air plugs, you could put a 1x2 edge, on 2 adjacent sides of the "4x4", about an inch in from the end, and then use wooden wedges (like you use to install a door frame) on the other two. I can see drilling a hole in the end of the 4x4 and stick a short piece of broom handle in there as a handle. (It'd look like a tuner in the stopped end of a quarter-wave wooden organ pipe.)

2. I think the corrugation openings in the far side of the metal "roof" will be adequate but you can slide that back, if needed to expose a half or full inch of opening there, if you're not getting enough flow, right? The roof just sits there, right? Just make sure the corrugations on the OTHER end (where the air intake is) are closed off with wadded up foil or something. Otherwise that end of the fire will be much hotter.

3. I was trying to describe the gutter troughs arranged like this:
View attachment 649987

The gutters are loaded with lumps or briquettes and inserted so the ends are at the far edge of the dying fire. You pull our on the gutter as you use your push-pipe to load push the coals out and onto the fire from the far to near side. You do that 4 times. I show 4 blue gutters but of course you only need 1 unless you have 3 helpers. I recommended staggered on opposite sides because I was assuming some gaps in the blocks and the 4x4 plugs and I wanted to balance that unintended airflow in from side to side and end to end. But if you make your plugs fit nice and tight, like a tuner in an organ pipe, you could put all 4 on one side.
And yes you can put in more than 4 but I think that 1/2" steel pipe you're using as a push-pipe can be used to spread the fresh coals out side-to-side so they overlap with the next nearest gutter opening. But season to taste.

Hope this all helps.
Bill thank you. Whether you've built one or not, your thoughts on the subject make sense to me. I'm going to rebuild, and test out this approach and see how it burns / meets temperature.

Another question I've been pondering is a "pre-heat" of the pit. When I tested it out before with coals along the perimeter sides I maxed out at about 230 degrees. I've read elsewhere that the block holds heat fairly well and was wondering if a pre-burned fire to heat things up inside might be a good idea. It would then need to be allowed to burn out or I'd need to remove it before I start the burn for the cooking.
IMO, most of your heat to the hog is from infrared radiation from red hot coals. It's NOT like indirect convective heating from typical smokers. With most smokers there are health reasons to not put on the meat until the walls and bulk of the "oven" are hot. I don't think they apply in your case. Besides, I'd estimate it would take many hours to bring the cinderblocks up to their steady-state temp so I can't see wasting the fuel for that.

I'm forgetting earlier posts but I think some folks with "whole hog" experience were recommending >230F so you may want to do another run with more coals and verify you can reach your true desired temp. 230F may be fine, but it may take a whole day to cook your hog. (One of the reasons why I suggested your design includes a way to add fuel during the cook, so as to speed things up.)

Finally I'd ask where was your probe when you measured 230? You want to measure the temp where the hog will be, which should be in "full view" of the hot coals...because that IR load will be much greater than just what convects from the heated air as it goes around the hog and exits. I think you can test this with just a metal 1-gal paint can sideways to represent an animal. The temp under the can, in line with the coals, will be much greater than the temp on top of the can, where the probe is not in line-of-sight with the coals so only hot air convects heat to the probe.

As far as coals in the middle vs coals at the perimeter, you'll probably cook more evenly with perimeter heating. But I believe you'll get to higher temps in the middle. Finally one wise poster noted you'll need a way to quickly flip the thing over so make sure you've got a plan (and an extra set of strong arms) for that.
 
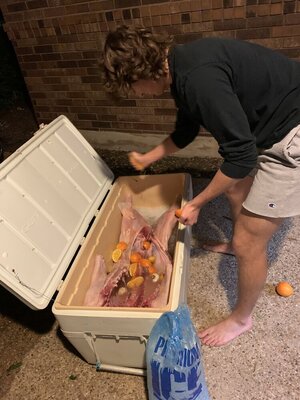
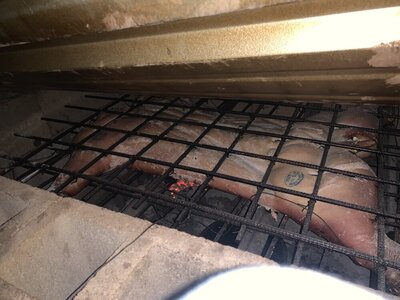
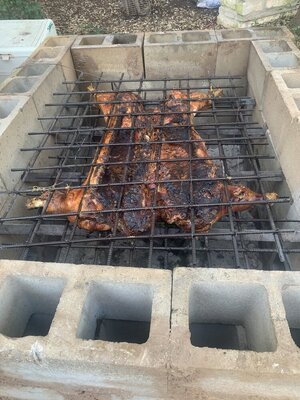
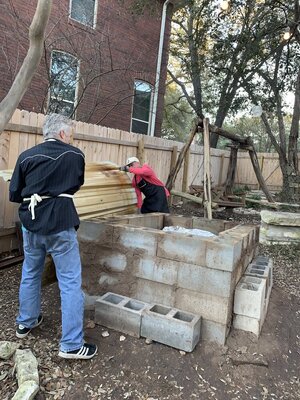
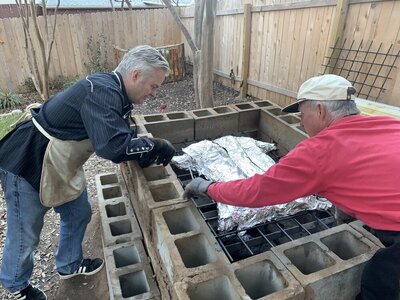
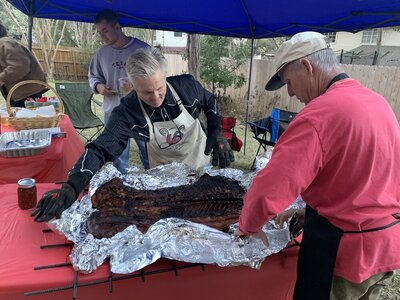
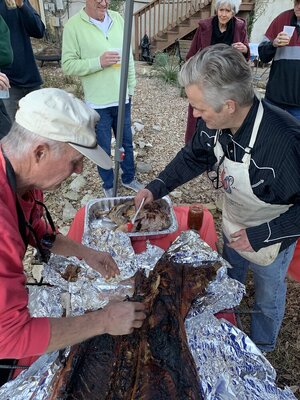
Roast was a big success. Brined it, dried it and then applied kosher salt on skin, and rub on inside. Took 7.5 hours to cook, then tin foiled it and kept it warm for 4 hours at 200 degrees on the pit. More details to come but thanks to all that helped me figure this out along the way!
IMG_7849.jpg IMG_7850.jpg IMG_7853.jpg IMG_7918.JPG IMG_7920.JPG IMG_7923.JPG IMG_7944.JPG IMG_7954.JPG IMG_7968.JPG IMG_7972.JPG IMG_7987.JPG IMG_7999.JPG
 
Last edited:
BRINE RECIPE (Broken Arrow Ranch)
4 gallons + 12 gallons water
15 cups table salt for 20 gallons water. For a basic brine combine ¾ cup table salt (dissolves easier than kosher salt) per gallon of water.
6 oranges, halved
2 lemons, halved
2 bulbs garlic
4 Bay Leaves
In a large pot add 4 gallons of water plus the remaining ingredients.
Squeeze the oranges and lemons as they go in.
Put the pot over high heat and stir occasionally.
Once salt is completely dissolved and the pot reaches a gentle simmer remove the pot from the heat and allow it to cool.

RUB RECIPE
Meathead’s Memphis Dust Rub
– makes 2.5 cups
¾ cup firmly packed dark brown sugar
¾ cup white sugar (I only used brown sugar)
½ cup American paprika
¼ cup garlic powder
2 tablespoons ground black pepper
2 tablespoons ground ginger powder
2 tablespoons onion powder
2 teaspoons rosemary powder

Meathead's Lexington Dip BBQ Sauce Recipe

  • 1 cup distilled vinegar
  • ¼ cup ketchup
  • ¼ cup apple juice
  • 1 teaspoon hot sauce
  • 3 tablespoons light brown sugar
  • ½ tablespoon Morton Coarse Salt
  • 1 teaspoon crushed red pepper
  • 1 teaspoon finely ground black pepper
  • Whisk together all the ingredients and let them sit for at least three hours in the fridge to allow the flavors to meld. Overnight is better. A week is best.
  • Divide the sauce in two. Use one for basting. The locals mop it on the meat with a basting brush once every hour while cooking. If you do mop, a good silicon brush is best. It holds lots of fluid and is easy to clean. A lot of places still use string mops, but I think these are too hard to clean and potential sources of food poisoning.Take the remaining mop and serve it in a cruet on the side so your guests can drizzle on more if they wish.
Note from MPustka. I made 4x this sauce recipe in quantity and ran out and guests were asking for more. It's that good.
 
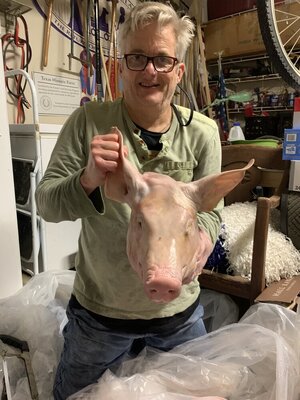
Loved the pictures. Any chance this was part of a "Boar's Head Carol" type of celebration? Very typical for January 5, The Twelfth Night, right before Epiphany.

Did you drink mead? Since it's been so long since I've been to a Boar's Head, I've forgotten exactly what it is, but if enough other alcoholic beverages are drank, it's pretty good stuff.

And for those that have no idea what I'm talking about, this goes back to the early days of Oxford University. A scholar returning from Christmas vacation was attacked by a wild boar. He took his copy of Plato and stuffed it in the animal's mouth, choking it to death. He thereupon towed the dead beast by rope to Oxford (perhaps Cambridge, I don't let facts get in the way of a good story) where they all had a great feast, thereby beginning a near-1000 year old tradition.

Back when men were men. Even Academics.

Great thread!!!
 
  • Like
Reactions: Brokenhandle
Loved the pictures. Any chance this was part of a "Boar's Head Carol" type of celebration? Very typical for January 5, The Twelfth Night, right before Epiphany.

Did you drink mead? Since it's been so long since I've been to a Boar's Head, I've forgotten exactly what it is, but if enough other alcoholic beverages are drank, it's pretty good stuff.

And for those that have no idea what I'm talking about, this goes back to the early days of Oxford University. A scholar returning from Christmas vacation was attacked by a wild boar. He took his copy of Plato and stuffed it in the animal's mouth, choking it to death. He thereupon towed the dead beast by rope to Oxford (perhaps Cambridge, I don't let facts get in the way of a good story) where they all had a great feast, thereby beginning a near-1000 year old tradition.

Back when men were men. Even Academics.

Great thread!!!
Not a Boar's Head, just a 60th birthday. Its interesting because our new church celebrates Boar's Head and I'd never heard of it. Thanks again for your help Bill. Really appreciated.

Did you see the openings on the sides that I fed coals through with a piece of "C" channel?
 
  • Like
Reactions: bill1
Worth mentioning - Because the plan was to cook with the heat source placed around the perimeter of the pit and not in the middle of the pit, I created a sort of curb or edge with old chopped limestone pieces 6-9" away from the perimeter walls so that when I needed to load the perimeter with additional charcoal they wouldn't tumble into the middle of the pit.
 
SmokingMeatForums.com is reader supported and as an Amazon Associate, we may earn commissions from qualifying purchases.

Latest posts

Hot Threads

Clicky