flyboys
Smoking Fanatic
I used to have the 18" WSM, but gave it to my brother in law when he began an interest in bbqing. At the time I was primarily using my MES 30 for convenience. I couldn't justify spending all day around the smoker while my wife was chasing around after our young kids. Well, the kids aren't toddlers anymore and I want to get back to the basics. They are old enough now to help me and learn the basics on cooking real bbq. I like the MES and still use it, but I want the option to cook over a fire again. I also have a Weber Kettle, but the size just isn't cutting it. We have 6 kids, so I need some room to cook!
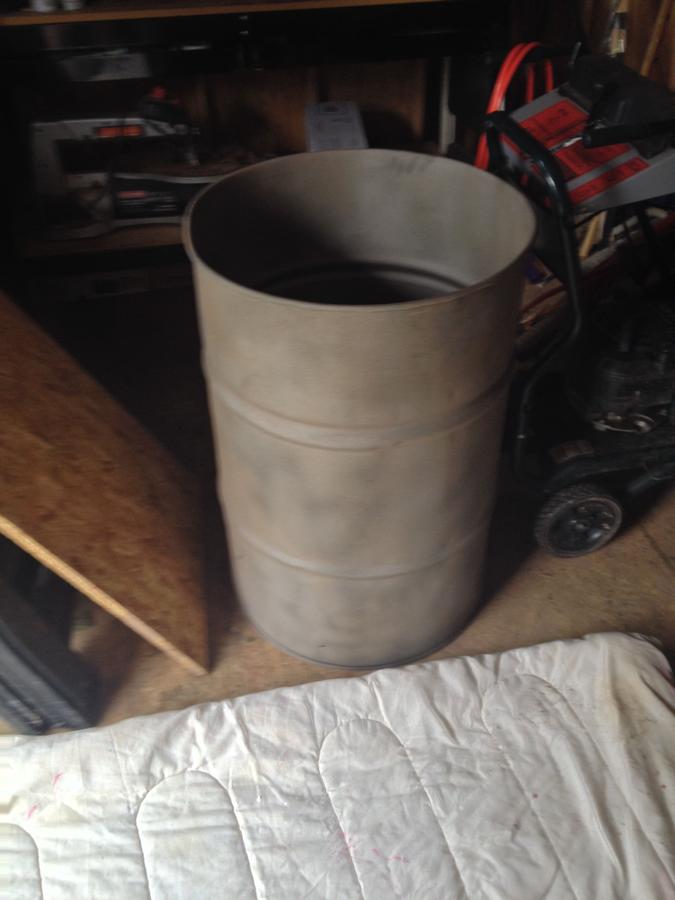
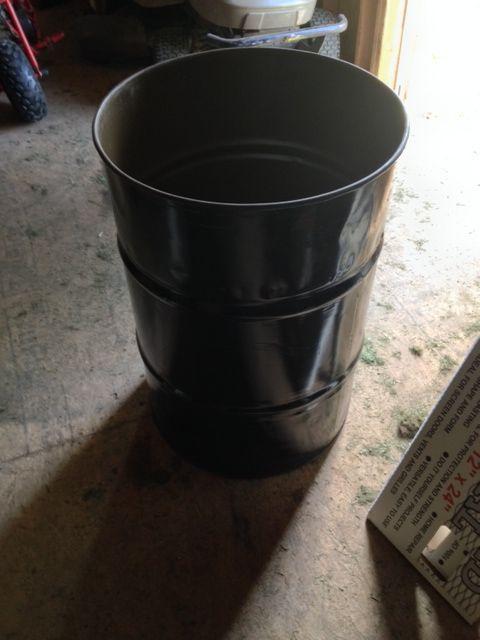
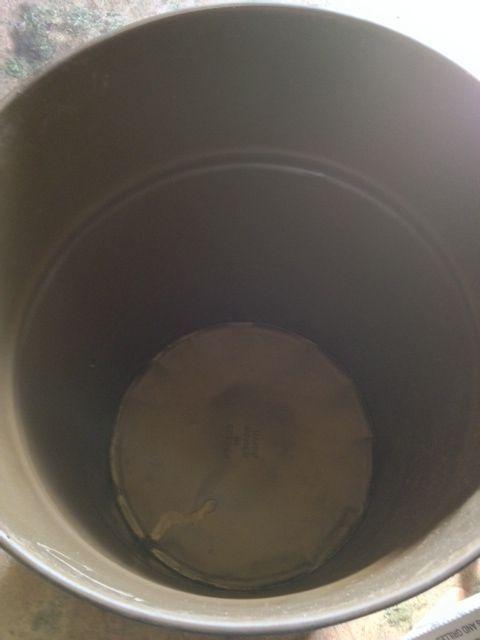
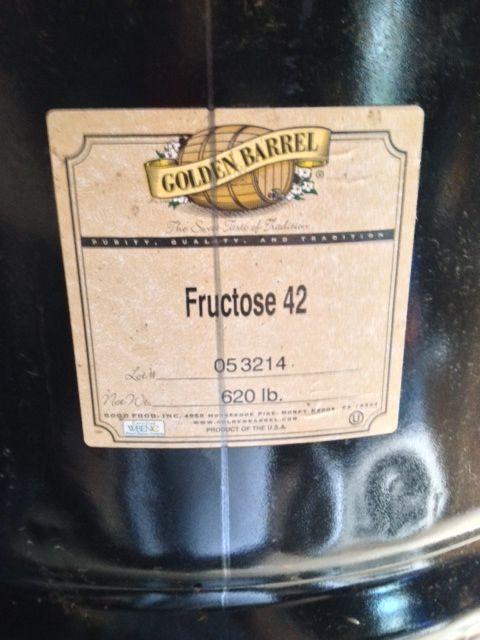
I've been on the hunt, and found a 55 gallon drum in decent shape for $25. It was an open top and used to store Fructose. It didn't have the lid anymore, which isn't a problem. I want two grates in it, so I'm going to use the 22.5 kettle lid. The only setback is it contains a tan lining. After reading up on here and various other places on the internet, I've decided against removing it myself. I found a place that will sandblast it for me for around $20 to $30. If they only sandblast the inside, then I'll do a burn with wooden pallets to remove the exterior paint.
I figured I would start a log for my build including money spent and update it as I'm working on it. I have zero welding experience, so this will be a no weld build. I am currently undecided if I'm going to save the money and piece out my 22.5 inch Weber Kettle or pick up a cheap 22.5 inch grill. I have been striking out with Craigslist so far, but am still holding out till the last possible minute.
My plan is to drill 4 evenly spaced 1" holes around the bottom of the drum 2" up from the bottom for air intake. I will then fill it with black 3/4" pipe nipples. Three of the nipples will have caps, and the 4th I will attach a 90 degree elbow and 24" black pipe with a pipe valve at the end to control air flow. For the lid, my kettle lid does not fit, it is off by about 1/2". I'm either going to buy some metal from home depot to attach to the interior top of the drum, or I'm going to cut out the upper few inches of the bottom part of the 22.5 inch kettle grill to attach. I'm going to attach it with 1/4"x2" ss bolts, and use them to hold my top grate. I'll then back fill it with oven rope and high temp silicone. I'm undecided on which route to go. I'll detail it out step by step below with pictures once I actually get around to doing it. If anyone can give me pointers or help along the way, I'm all ears. I've never done anything like this before and really welcome any and all help.
Hopefully this will help someone else who has been bit by the uds bug. And hopefully someone will add on to this to give me better ideas and prevent me from making a mistake!
10-10-2013, picked up the drum and ordered a Neiko Titanium step drill bit off of Amazon.
Drum- $25.00
Drill Bit- $17.79 (includes shipping)
Total Cost To Date- $42.79
10-12-2013
Built Charcoal Basket
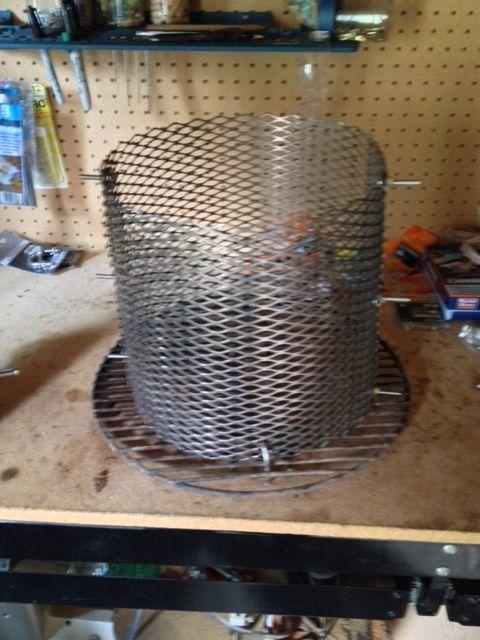
I took two pieces of 12"x24" expanded metal and bolted two sides together with three stainless steel bolts, three ss nuts, and 6 ss washers. I then formed it in a circle by bending it around an empty propane tank I had laying around from my grill. I attached the other end together the same way. I attached it to the charcoal grate of my 22.5 inch weber kettle by using two ss u bolts. The basket is 12" high and measures 12" across. I haven't made the ash catcher yet, so that will be for another day. I plan on making a three inch space between the bottom of the basket and the catcher. I'm also going to have the catcher sit about a half inch or inch off of the bottom of the drum. Or I was thinking about putting a few fire bricks at the bottom of the drum and sitting it on them.
Parts List:
2-12x24 sheets of expanded metal- $18.74
2- SS 1/4x1/8x2 U Bolts- $5.92
1- 10 pack SS 1/4x1 1/2 machine round head screws- $4.44
2- 4 pack SS 1/4 hex nut- $2.36
4- 3 pack SS 1/4 washer- $4.72
Cost- $36.18
Total Cost To Date- $78.97
My step drill bit actually arrived today, 2 days after I ordered it! I chose the regular shipping too! Using a rope, I wrapped it around the drum to measure it. I placed a mark on the rope and measured the rope. It came to about 71". To get the evenly spaced holes, I divided 71 by 4 and marked off 17 3/4" on the rope. I made my first mark 2" from the bottom of the drum and used the rope to make marks at the 17 and 3/4" mark around the entire drum. At each mark, I just measured 2" up from the bottom. Using a T Square, I made the same marks at the top of the drum in line with the bottom marks. I will then use this when I add the holes for my grates. This way everything will be in line on the drum. Apparently I never charged the battery on my drill from the last time I used it, so I was unable to drill and decided to call it a day. I will keep this updated as I work on it. My goal is to have it finished in a few weeks. We are having a party November 3rd and I would like to have that as its maiden voyage!
I've been on the hunt, and found a 55 gallon drum in decent shape for $25. It was an open top and used to store Fructose. It didn't have the lid anymore, which isn't a problem. I want two grates in it, so I'm going to use the 22.5 kettle lid. The only setback is it contains a tan lining. After reading up on here and various other places on the internet, I've decided against removing it myself. I found a place that will sandblast it for me for around $20 to $30. If they only sandblast the inside, then I'll do a burn with wooden pallets to remove the exterior paint.
I figured I would start a log for my build including money spent and update it as I'm working on it. I have zero welding experience, so this will be a no weld build. I am currently undecided if I'm going to save the money and piece out my 22.5 inch Weber Kettle or pick up a cheap 22.5 inch grill. I have been striking out with Craigslist so far, but am still holding out till the last possible minute.
My plan is to drill 4 evenly spaced 1" holes around the bottom of the drum 2" up from the bottom for air intake. I will then fill it with black 3/4" pipe nipples. Three of the nipples will have caps, and the 4th I will attach a 90 degree elbow and 24" black pipe with a pipe valve at the end to control air flow. For the lid, my kettle lid does not fit, it is off by about 1/2". I'm either going to buy some metal from home depot to attach to the interior top of the drum, or I'm going to cut out the upper few inches of the bottom part of the 22.5 inch kettle grill to attach. I'm going to attach it with 1/4"x2" ss bolts, and use them to hold my top grate. I'll then back fill it with oven rope and high temp silicone. I'm undecided on which route to go. I'll detail it out step by step below with pictures once I actually get around to doing it. If anyone can give me pointers or help along the way, I'm all ears. I've never done anything like this before and really welcome any and all help.
Hopefully this will help someone else who has been bit by the uds bug. And hopefully someone will add on to this to give me better ideas and prevent me from making a mistake!
10-10-2013, picked up the drum and ordered a Neiko Titanium step drill bit off of Amazon.
Drum- $25.00
Drill Bit- $17.79 (includes shipping)
Total Cost To Date- $42.79
10-12-2013
Built Charcoal Basket
I took two pieces of 12"x24" expanded metal and bolted two sides together with three stainless steel bolts, three ss nuts, and 6 ss washers. I then formed it in a circle by bending it around an empty propane tank I had laying around from my grill. I attached the other end together the same way. I attached it to the charcoal grate of my 22.5 inch weber kettle by using two ss u bolts. The basket is 12" high and measures 12" across. I haven't made the ash catcher yet, so that will be for another day. I plan on making a three inch space between the bottom of the basket and the catcher. I'm also going to have the catcher sit about a half inch or inch off of the bottom of the drum. Or I was thinking about putting a few fire bricks at the bottom of the drum and sitting it on them.
Parts List:
2-12x24 sheets of expanded metal- $18.74
2- SS 1/4x1/8x2 U Bolts- $5.92
1- 10 pack SS 1/4x1 1/2 machine round head screws- $4.44
2- 4 pack SS 1/4 hex nut- $2.36
4- 3 pack SS 1/4 washer- $4.72
Cost- $36.18
Total Cost To Date- $78.97
My step drill bit actually arrived today, 2 days after I ordered it! I chose the regular shipping too! Using a rope, I wrapped it around the drum to measure it. I placed a mark on the rope and measured the rope. It came to about 71". To get the evenly spaced holes, I divided 71 by 4 and marked off 17 3/4" on the rope. I made my first mark 2" from the bottom of the drum and used the rope to make marks at the 17 and 3/4" mark around the entire drum. At each mark, I just measured 2" up from the bottom. Using a T Square, I made the same marks at the top of the drum in line with the bottom marks. I will then use this when I add the holes for my grates. This way everything will be in line on the drum. Apparently I never charged the battery on my drill from the last time I used it, so I was unable to drill and decided to call it a day. I will keep this updated as I work on it. My goal is to have it finished in a few weeks. We are having a party November 3rd and I would like to have that as its maiden voyage!