Well I have mentioned I would post my mailbox mod.
I didn't use the standard mailbox I instead used the wall hanging type because I was going for a compact, streamlined, and efficient setup.
I wanted to be able to add and remove the mod from the MES easily and quickly. I think I have accomplished my goals BUT I have also learned a lesson or two that has me changing the design a bit and will help anyone else who wants to do a similar mod.
Here is what it looks like.
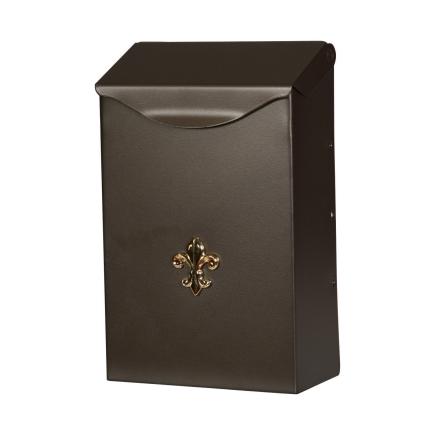
Gibralter steel mount wall mailbox used:
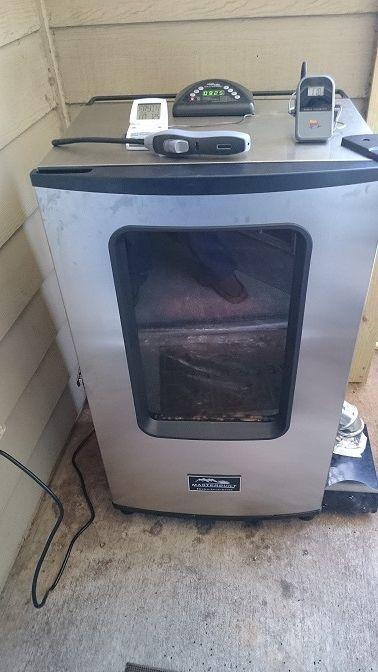
My front View:
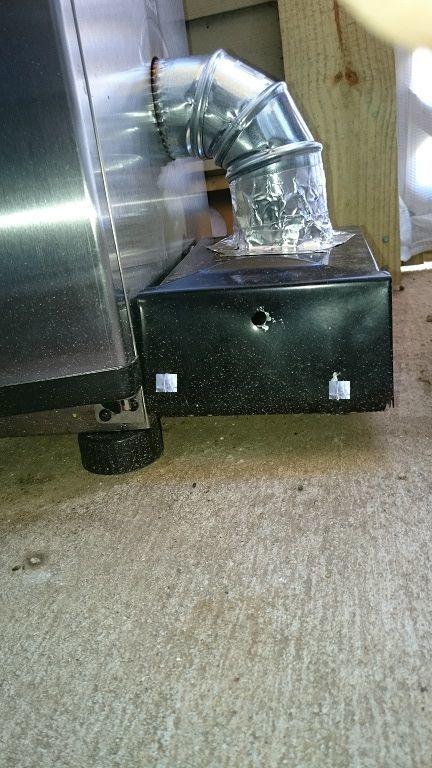
Close up of side mail box ( I taped over two of the 3 holes after some issues today):
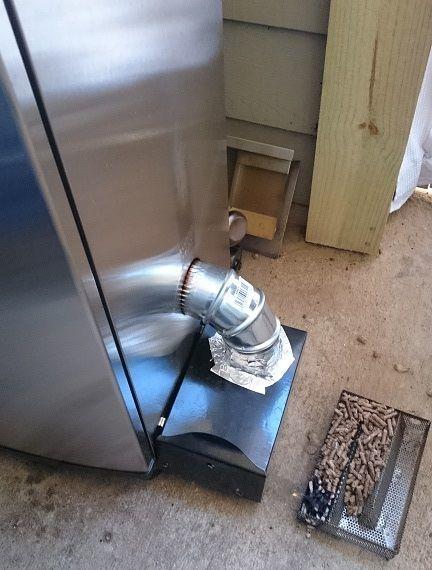
Top view (before tape added):
My Mailbox Mod Goals:
- Mod must be easily added and removed from my MES as I will be moving my MES around a bit and do not need he mod causing issues, falling apart, or breaking.
- Mod must be one piece for easy removal and less hassle
- Mod must be compact, I didn't want a bunch of pieces to deal with that were "unruly" to deal with
- Mod must be efficient, fewest and least amount of materials possible
- Mod must be simple, fewest and least amount of materials possible
- Must allow me to open the MES door at least 90 degrees without disturbing the mailbox mod (figure this positioning out before cutting the hole)
- Mod must not void my warranty by being a permanent modification to my MES
- Mod must work!
Materials: (Total cost approximately $63 because I had none of the stuff before hand. AMNPS was almost half the total cost.)
- Gibralter wall hanging/mount mailbox ($11.11 - Amazon)
- 3 inch 90 degree duct elbow joint (Under $4 - Home Depot)
- AMNPS (A-Maze-N Pellet Smoker $27.74 - Amazon)
- 3M High Temperature Flue Tape (heat resistant up to 600 degrees! $7.88 - Amazon)
- 2 Magnets able to hold 16 pounds each ($12.90 - Amazon, $6.45/ea) - Would not do magnets if had to do over!
Tools used to build:
- Dremel rotary tool with Large Diamond Wheel (to cut the top of the mailbox
- Needle Nose Plyers (to bend the mail box metal as I cut a pie type slits to make the whole for the elbow joint to fit)
- Drill with 3/8 inch bit. Used to drill 3 holes in door. - Would only drill the top hole (1 hole total) if had to do over!
Lessons Learned:
- The unmodified Mailbox naturally has a lot of air intake at the door because the door does not sit flush to the mailbox where the hinge of the door is. There is always about a 1/4 inch of a gap the whole length of the door on the hinge side of the door (bottom side of door where it hinges to open, not visible in picture). The gap lets in plenty of air. Maybe even the top hole in the door is not needed, time will tell.
- The AMNPS is a tight fit to the mailbox. SO fill with pellets first. Put in mailbox to ensure any overly pilled pellets are pushed down tighter into the AMNPS and then pull back out for lighting. This will make sure the AMNPS and pellets have good clearance before any fire is applied. This is just safe and fool proof :)
- Light and start the AMNPS burning process outside of the box. See the last image above. There is so little clearance that you don't want flame burning directly against the top of the mailbox
- Magnets holding the mailbox to the MES seem like a really good idea UNTIL your first serious flame up occurs and the magnets take enough heat to become de-magnetized. This happened to me today because I was hasty and did a few stupid things like not blow out the pellets very well and then I had the foolish idea of "hey why don't I throw a few pellets on top of the already burned down pellets from the AMNPS startup process. This caused flamage so I would not recommend adding more pellets on top of already burned down pellets when there is still more of the row to burn hahaha
- Build legs or stuff something under the mailbox to hold it up. The magnets were amazing until a pellet flame up killed them. I need something fool proof that still meets my goals above
- There is little to no information on Mailbox mods that use this wall hanging box over the standard dome shaped mailbox. I hope my lessons learned help people build a more compact and elegant solutions to continue improving and innovating on the mailbox mod :)
Well everyone if you made it this far I hope this helps you out and/or gives you some food for thought on less typical mailbox mods for the MES and other smokers :)
I didn't use the standard mailbox I instead used the wall hanging type because I was going for a compact, streamlined, and efficient setup.
I wanted to be able to add and remove the mod from the MES easily and quickly. I think I have accomplished my goals BUT I have also learned a lesson or two that has me changing the design a bit and will help anyone else who wants to do a similar mod.
Here is what it looks like.
Gibralter steel mount wall mailbox used:
My front View:
Close up of side mail box ( I taped over two of the 3 holes after some issues today):
Top view (before tape added):
My Mailbox Mod Goals:
- Mod must be easily added and removed from my MES as I will be moving my MES around a bit and do not need he mod causing issues, falling apart, or breaking.
- Mod must be one piece for easy removal and less hassle
- Mod must be compact, I didn't want a bunch of pieces to deal with that were "unruly" to deal with
- Mod must be efficient, fewest and least amount of materials possible
- Mod must be simple, fewest and least amount of materials possible
- Must allow me to open the MES door at least 90 degrees without disturbing the mailbox mod (figure this positioning out before cutting the hole)
- Mod must not void my warranty by being a permanent modification to my MES
- Mod must work!
Materials: (Total cost approximately $63 because I had none of the stuff before hand. AMNPS was almost half the total cost.)
- Gibralter wall hanging/mount mailbox ($11.11 - Amazon)
- 3 inch 90 degree duct elbow joint (Under $4 - Home Depot)
- AMNPS (A-Maze-N Pellet Smoker $27.74 - Amazon)
- 3M High Temperature Flue Tape (heat resistant up to 600 degrees! $7.88 - Amazon)
- 2 Magnets able to hold 16 pounds each ($12.90 - Amazon, $6.45/ea) - Would not do magnets if had to do over!
Tools used to build:
- Dremel rotary tool with Large Diamond Wheel (to cut the top of the mailbox
- Needle Nose Plyers (to bend the mail box metal as I cut a pie type slits to make the whole for the elbow joint to fit)
- Drill with 3/8 inch bit. Used to drill 3 holes in door. - Would only drill the top hole (1 hole total) if had to do over!
Lessons Learned:
- The unmodified Mailbox naturally has a lot of air intake at the door because the door does not sit flush to the mailbox where the hinge of the door is. There is always about a 1/4 inch of a gap the whole length of the door on the hinge side of the door (bottom side of door where it hinges to open, not visible in picture). The gap lets in plenty of air. Maybe even the top hole in the door is not needed, time will tell.
- The AMNPS is a tight fit to the mailbox. SO fill with pellets first. Put in mailbox to ensure any overly pilled pellets are pushed down tighter into the AMNPS and then pull back out for lighting. This will make sure the AMNPS and pellets have good clearance before any fire is applied. This is just safe and fool proof :)
- Light and start the AMNPS burning process outside of the box. See the last image above. There is so little clearance that you don't want flame burning directly against the top of the mailbox
- Magnets holding the mailbox to the MES seem like a really good idea UNTIL your first serious flame up occurs and the magnets take enough heat to become de-magnetized. This happened to me today because I was hasty and did a few stupid things like not blow out the pellets very well and then I had the foolish idea of "hey why don't I throw a few pellets on top of the already burned down pellets from the AMNPS startup process. This caused flamage so I would not recommend adding more pellets on top of already burned down pellets when there is still more of the row to burn hahaha
- Build legs or stuff something under the mailbox to hold it up. The magnets were amazing until a pellet flame up killed them. I need something fool proof that still meets my goals above
- There is little to no information on Mailbox mods that use this wall hanging box over the standard dome shaped mailbox. I hope my lessons learned help people build a more compact and elegant solutions to continue improving and innovating on the mailbox mod :)
Well everyone if you made it this far I hope this helps you out and/or gives you some food for thought on less typical mailbox mods for the MES and other smokers :)

