MES Rewire Simple Guide - No Back Removal Needed!!!

  • Some of the links on this forum allow SMF, at no cost to you, to earn a small commission when you click through and make a purchase. Let me know if you have any questions about this.
SmokingMeatForums.com is reader supported and as an Amazon Associate, we may earn commissions from qualifying purchases.
Is that a TP 20 or an 08 ? My TP 20 gave me trouble .
MES 30 or 40 ?
How do you have the temp probe for the Auber mounted , and is it in the same area as your other therm ?
 
Is that a TP 20 or an 08 ? My TP 20 gave me trouble .
MES 30 or 40 ?
How do you have the temp probe for the Auber mounted , and is it in the same area as your other therm ?
TP 20 purchased 2017
MES 30
Both lower middle of rack
 
TP 20 purchased 2017
Mine too . The probes should be lifetime . I need to get 2 new ones , but I have so
many others I don't worry about it .
My 20 would test good at boiling and in ice water , but in between it was way off .

It's funny how the temps can differ in an MES . Even if just a bit apart . I think the Auber is more sensitive than any remote therm . Just my opinion .
I have the multi use probe for mine . It can be used in water for SV so I've tested it at boiling . I don't know what yours has , so I'm not going to suggest you do that . I thought when I looked up your model it only had one choice for a probe that worked in a smoker only . Mine doesn't have meat probes , just a temp control .
Maybe try moving to a different location , or just hang both thru the top vent and see if it changes . That differential can be adjusted for read out if needed , but get a better idea of which one is reading the true temp .
 
  • Like
Reactions: tallbm
Mine too . The probes should be lifetime . I need to get 2 new ones , but I have so
many others I don't worry about it .
My 20 would test good at boiling and in ice water , but in between it was way off .

It's funny how the temps can differ in an MES . Even if just a bit apart . I think the Auber is more sensitive than any remote therm . Just my opinion .
I have the multi use probe for mine . It can be used in water for SV so I've tested it at boiling . I don't know what yours has , so I'm not going to suggest you do that . I thought when I looked up your model it only had one choice for a probe that worked in a smoker only . Mine doesn't have meat probes , just a temp control .
Maybe try moving to a different location , or just hang both thru the top vent and see if it changes . That differential can be adjusted for read out if needed , but get a better idea of which one is reading the true temp .
Will try that. Thanks
 
I will do that. Thanks.

I did just do a test and noticed an 11 degree difference between the Auber and my therm pro. Any suggestions or if Auber may be right?

Have you taken the Auber inside and done a boil test with it's probe to see if it measures 212F or close in boiling water?
The Auber probe is not water proof so what I do is I put the probe inside a gallon freezer, in the corner of the bag. When I submerge the probe wrapped in the bag the water pressure squeezes the air out of the bag and you can get a good reading.

You can test both your Auber and Thermopro probes this way. If the Auber probe is off I THINK there is an "offset" setting on the Auber so you can add a thermometer adjustment. If it reads 5 degrees low then change the offset so the thermometer reads 5 degrees higher than what it reports with no offset. You get the idea, just tweak so it reflects a true/truer number :)

I hope this info helps and welcome to the PID club :D
 
  • Like
Reactions: lunchboxfl
If the Auber probe is off I THINK there is an "offset" setting
There is . I've been looking for the thread , or post where I went through it with someone . Can't find it . Might be buried in this thread somewhere . It gets mentioned a couple times . Post 76 and post 178 . So much good info in this thread it gets missed .
The lock code is 155 , but find out what you're dealing with before you start changing values .
 
Ok guys, I found this thread after posting about the problems yesterday with my new MES40. I'll have all the parts together by the end of today. I noticed yesterday that there's a small panel on the rear of the cabinet, reading this very helpful thread on how to wire the smoker it shows taking a panel off the underside, I'm wondering did Masterbuilt change the layout???
IMG_20211101_065658566.jpg

IMG_20211101_065613392.jpg
 
Yup . They are all a bit different , so if you get in there and have a question take time to ask . It's pretty simple really , but kind of intimidating at the same time .
You could actually just hook the power cord to the element , but by doing the rewire you keep the limit switch in the circuit . That's how I have mine , and it did save me once .
This is what's behind the back panel on my MES 30 .
1635771963765.jpeg
 
  • Like
Reactions: tallbm
Ok guys, I found this thread after posting about the problems yesterday with my new MES40. I'll have all the parts together by the end of today. I noticed yesterday that there's a small panel on the rear of the cabinet, reading this very helpful thread on how to wire the smoker it shows taking a panel off the underside, I'm wondering did Masterbuilt change the layout???
View attachment 515148

View attachment 515149

Hi there and welcome!

chopsaw chopsaw has your questions covered.

Since you are opening things up and rewiring anyhow it would be good to check the heating element wire connectors. The cheap crappy spade wire connectors that Masterbuilt uses corrode and fail like crazy. I've seen 3 month old MES units with horribly rusted and corroded connectors (mine) when kept out of the weather and with a cover.

If you need high temp ones that would work these should do the trick:

Ask any questions you have, we'll get you hooked up. Also welcome to the PID club :D
 
I posted my report in the wrong place. :emoji_disappointed_relieved: Anyway the Auber worked great with my Masterbuilt slave cabinet. :emoji_sweat_smile:

I noticed the Auber has a heatsink on the bottom. The Auber is black and out in the sun (and on top of my smoker). Has anyone tried adding a fan to the Aubers? I was thinking either AC (via the smoke AC port) or solar. Too bad there are no USB or DC hookups on the Aubers.

Also does anyone know how to change the name of the Auber's probes in the app?

Nice! I posted in your other thread but will repeat here for anyone who sees this thread.

Covering your Auber with some kind of shade shield and putting it on a board or something that get's it off the smoker should do the trick. I would go super low tech if you want a fan and just buy a little nightstand fan and get a splitter extension cord cable and just put the fan to blow on the auber if heat is really an issue. I think shade and lifting will do the trick. I'm here in TX and that does it for the PID controllers here :)
 
  • Like
Reactions: MJB05615
Before I start cutting, my setup appears to be similar to the other newer units. Attached is a pic of the control board. I assume I just cut the circled 4 major wires (black, white, and 2 red) and splice them together and just yank the board, correct?
 

Attachments

  • 20211204_155224.jpg
    20211204_155224.jpg
    91.8 KB · Views: 89
Before I start cutting, my setup appears to be similar to the other newer units. Attached is a pic of the control board. I assume I just cut the circled 4 major wires (black, white, and 2 red) and splice them together and just yank the board, correct?

You are correct!

Just make sure you splice Red to Smooth Black, and the the OTHER RED to smooth White. This will do the trick.
You can toss the board you will never use it again :)
 
You are correct!

Just make sure you splice Red to Smooth Black, and the the OTHER RED to smooth White. This will do the trick.
You can toss the board you will never use it again :)

Thanks. Everything worked great! Love the Wifi Auber.
 
Thanks. Everything worked great! Love the Wifi Auber.
I'm glad to hear, welcome to the PID club!!

An update from my side. I had to work on my MES today. IT stopped heating during a turkey smoke. Get this, corrosion at the heating element BUT it was actually the wire that had corrosion build up between the wire strands and the connector crimp. it had built up like what happens with a car battery.

Identified it, cleaned it. re-crimped new connector and reattached. All good now :)
 
Lately I've seen a number of posts about guys wanting to rewire their MES. I had wanted to post a quick and simple guide for those out there that are curious or those that simply need to rewire but need a little assistance. Well here goes.

Disclaimer: When messing with electrical equipment it is best to consult a local electrical professional to ensure things are done correctly. Be safe and use caution. I am not an electrician and with many things you hear or read, it is your responsibility to verify the information's validity and ensure you and others are safe.

Ok now on to rewiring info :)

Smoker Referenced Below:
  • MES 40 Gen1
Tools and Equipment (at a Minimum):
  • A strong back or a 2nd body to help pick up the smoker and set on a table to be worked on
  • Waist High Table - to put the smoker onto
  • Needle Nose Plyers
  • Wire Crimping Tool - one that crimps, strips, and cuts wires
  • 14-16 AWG Butt Connectors, or Wire Nuts
  • Drill
  • 1/8" Drill Bit that can drill metal - to drill out circuit board rivets
  • #12 - 1" self tapping Sheet Metal Screws/Fastener to refasten circuit board panel back on after rivets are removed. 3/4" long may also be good for this one panel but MAY be a little short. I used 3/4" because that is what I used when pulled the back off my MES
  • Drill Bit to drive the sheet metal screws (I used hex head fasteners but you may find hex + phillips head)
  • Masking Tape/Electrical Tape - some kind of tape that can be used to mark a wire. U need no more than 1 inch worth

Quick Explanation of the Process:

The rewire is actually very simple and does NOT require removing the back of the MES. What is being done is the following:
  • Take existing MES wiring and disconnecting it from the MES circuit board the controller is connected to
  • Connect Hot wire that comes from MES plug, to Hot wire that leads to the safety Roll out Limit Switch & Heating Element
  • Connect the Neutral wire that comes from the MES plug, to the Neutral wire that leads to the Heating element
  • Done!
When done, the MES controller will be bypassed and will receive no electricity. Also the safety mechanism (safety roll out limit switch) will still do it's job and cut off power to the heating element should the heat limit be exceeded. The switch will auto reset after a while and when it does electricity will again be able to flow to the heating element.

IMPORTANT: If you plug the rewired MES into the wall there is NOTHING to control the electricity to the element. If plugged in, the MES will simply just suck electricity and heat up as a dumb circuit. This is why a 3rd party controller like a PID controller is needed.

The PID controller will control the on/off flow of electricity to the heating element according to the set temperature and the temp the PID controller is reading with a probe from within the smoker.

Simple Rewire Steps:

The process should really take between 30 minutes and 2 hours based on how you work, preperation, and confidence/comfort level with the tools and the process.
  1. UNPLUG the MES!!!!
  2. Get the MES up on a table laying flat on it's back or on the front. If you lay it on the front (what I did) be sure not to break the glass window in the door... just use caution
  3. Using the 1/8" drill bit and a drill, drill out the rivets on the bottom panel of the MES.

    The bottom panel is identified by the green square, everything outside of the green square is irrelevant for this step.
    The red arrows identify some rivets on the PANEL. ONLY drill out the panel rivets inside the green square, NOT the rivets outside the green square.

  4. You should see an image similar to the one below but it may be slightly different. Don't worry if it is slightly different because we will be able to easily identify the wires.

  5. Use your hand or the Needle Nose Plyers to disconnect the wires listed below:
    1. Plug Hot Wire - Smooth Black color wire
    2. Plug Neutral Wire - Smooth White color wire
    3. Rollout Limit Switch & Heating Element Hot Wire - Black Braided wire
    4. Heating Element Neutral Wire - Black Braided wire - yes looks just like wire #3

  6. IMPORTANT: Ignore any other tiny wires that may come out of the upper right hole of the compartment. These can be any color (black, green, white, white braided wire, etc.). They will be noticeably thinner than the real wires!

  7. Identify and use a piece of tape Label the black braided wires:
    1. Heating Element NEUTRAL Black Braided wire - Comes out of upper LEFT hole
    2. Rollout Limit Switch & Heating Element HOT Black Braided wire comes out of the upper RIGHT hole

      The key here is to identify the hole that the wire comes out of. Use a piece of tape to flag the wires for quick identification. If you accidentally splice the wires it should be OK and all should still work safely and fine. The thing is the wiring is not TECHNICALLY accurate which may lead to some confusion about which wire goes where.


  8. Cut and splice wires together. Use butt connectors, wire nuts, or any electrical connectors to splice the wires. JUST BE SURE that the connections are tight!!! You want no wiggle between the connection because that causes resistance and resistance causes heat and that will burn up the wire, wiring, etc. which is bad!
    1. Connect wires #1 and #3. Notice they should both come out of the upper right hole/port.

    2. Connect wires #2 and #4. Notice the white wire comes out of the upper right hole/port and the black braided wire comes out of the upper left hole/port. The pic is bad so I tried to erase extra wires and used a Green line to trace the wire and connections. I hope it gives the proper visual.


  9. When all wired up it should look like the image below:

  10. Use the sheet metal screws to fasten the panel back on through the rivet holes.
  11. Safely put the smoker back on the ground
  12. Open the smoker door and plug in the MES to the wall outlet. You should feel that it is heating and if you leave it on long enough you will see the element start turning color showing heat.
Well that is it. This approach is about as simple as it gets to rewire a Gen1 MES. Now every MES generation and model may be a little different but the idea for rewiring is still the same.

Additional Rewire Considerations:

This post is simply showing how to rewire for a 3d party controller to be used, BUT it does not address some week points of the MES wiring. I will note some improvements that should be considered because they are common issues with the MES that you will likely run into an need to fix at some point.
  1. Replace the Heating Element connectors with Hi Temp Stainless Steel female spade connectors - the MES uses poor electrical connectors on the wires that connect to the heating element. They don't seem to be able to stand up to the heat of the element very well and corrode easily. Mine showed signs of corrosion after 3 months of use!!! Google the following connectors as good replacement options:
    Supco T1111c (typical female spade), or Supco T1113c (flag style female spade)

    Again, be sure the connectors are on completely and are crimped complete! You want NO wiggle. Keep working until you get the proper connection.
  2. Replace the Safety Rollout Limit Switch connectors with Hi Temp Stainless Steel female spade connectors - as stated above the connectors that MES uses are poor and corrode easily. The connectors here suffere the same issue.
    The big issue is that most MES smokers do not have a panel to access the rollout limit switch. In this case, you must remove the back of the MES to get to the rollout limit switch
    1. Consider cutting and creating a panel to access this switch in the future
    2. The rollout limit switch is a little delicate so if you happen to damage it go to Amazon and search for: KSD301 for replacement switches should you knock a tab loose or bend it or damage it in any way.


      Again, be sure the connectors are on completely and are crimped complete! You want NO wiggle. Keep working until you get the proper connection.
Best of luck guys and remember to be safe and enjoy smoking! :)

Thanks again, I got the Jest of the project. My connections look different, I will need to trace or continuity test the leads from the heating element. I have to go back and look at the specifics. I have 2 access points below my MES. 1 for the main electrical feed and another for a controller in the base of the unit. This second access panel is where I think I will find the Rollout Limit Switch & Heating Element. If so I may have to run some wires to make this connection, but I believe there should be existing wires/connections.

Guess I will order the PID tomorrow and keep you posted on the progress.

Regards,
James
 
Lately I've seen a number of posts about guys wanting to rewire their MES. I had wanted to post a quick and simple guide for those out there that are curious or those that simply need to rewire but need a little assistance. Well here goes.

Disclaimer: When messing with electrical equipment it is best to consult a local electrical professional to ensure things are done correctly. Be safe and use caution. I am not an electrician and with many things you hear or read, it is your responsibility to verify the information's validity and ensure you and others are safe.

Ok now on to rewiring info :)

Smoker Referenced Below:
  • MES 40 Gen1
Tools and Equipment (at a Minimum):
  • A strong back or a 2nd body to help pick up the smoker and set on a table to be worked on
  • Waist High Table - to put the smoker onto
  • Needle Nose Plyers
  • Wire Crimping Tool - one that crimps, strips, and cuts wires
  • 14-16 AWG Butt Connectors, or Wire Nuts
  • Drill
  • 1/8" Drill Bit that can drill metal - to drill out circuit board rivets
  • #12 - 1" self tapping Sheet Metal Screws/Fastener to refasten circuit board panel back on after rivets are removed. 3/4" long may also be good for this one panel but MAY be a little short. I used 3/4" because that is what I used when pulled the back off my MES
  • Drill Bit to drive the sheet metal screws (I used hex head fasteners but you may find hex + phillips head)
  • Masking Tape/Electrical Tape - some kind of tape that can be used to mark a wire. U need no more than 1 inch worth

Quick Explanation of the Process:

The rewire is actually very simple and does NOT require removing the back of the MES. What is being done is the following:
  • Take existing MES wiring and disconnecting it from the MES circuit board the controller is connected to
  • Connect Hot wire that comes from MES plug, to Hot wire that leads to the safety Roll out Limit Switch & Heating Element
  • Connect the Neutral wire that comes from the MES plug, to the Neutral wire that leads to the Heating element
  • Done!
When done, the MES controller will be bypassed and will receive no electricity. Also the safety mechanism (safety roll out limit switch) will still do it's job and cut off power to the heating element should the heat limit be exceeded. The switch will auto reset after a while and when it does electricity will again be able to flow to the heating element.

IMPORTANT: If you plug the rewired MES into the wall there is NOTHING to control the electricity to the element. If plugged in, the MES will simply just suck electricity and heat up as a dumb circuit. This is why a 3rd party controller like a PID controller is needed.

The PID controller will control the on/off flow of electricity to the heating element according to the set temperature and the temp the PID controller is reading with a probe from within the smoker.

Simple Rewire Steps:

The process should really take between 30 minutes and 2 hours based on how you work, preperation, and confidence/comfort level with the tools and the process.
  1. UNPLUG the MES!!!!
  2. Get the MES up on a table laying flat on it's back or on the front. If you lay it on the front (what I did) be sure not to break the glass window in the door... just use caution
  3. Using the 1/8" drill bit and a drill, drill out the rivets on the bottom panel of the MES.

    The bottom panel is identified by the green square, everything outside of the green square is irrelevant for this step.
    The red arrows identify some rivets on the PANEL. ONLY drill out the panel rivets inside the green square, NOT the rivets outside the green square.

  4. You should see an image similar to the one below but it may be slightly different. Don't worry if it is slightly different because we will be able to easily identify the wires.

  5. Use your hand or the Needle Nose Plyers to disconnect the wires listed below:
    1. Plug Hot Wire - Smooth Black color wire
    2. Plug Neutral Wire - Smooth White color wire
    3. Rollout Limit Switch & Heating Element Hot Wire - Black Braided wire
    4. Heating Element Neutral Wire - Black Braided wire - yes looks just like wire #3

  6. IMPORTANT: Ignore any other tiny wires that may come out of the upper right hole of the compartment. These can be any color (black, green, white, white braided wire, etc.). They will be noticeably thinner than the real wires!

  7. Identify and use a piece of tape Label the black braided wires:
    1. Heating Element NEUTRAL Black Braided wire - Comes out of upper LEFT hole
    2. Rollout Limit Switch & Heating Element HOT Black Braided wire comes out of the upper RIGHT hole

      The key here is to identify the hole that the wire comes out of. Use a piece of tape to flag the wires for quick identification. If you accidentally splice the wires it should be OK and all should still work safely and fine. The thing is the wiring is not TECHNICALLY accurate which may lead to some confusion about which wire goes where.


  8. Cut and splice wires together. Use butt connectors, wire nuts, or any electrical connectors to splice the wires. JUST BE SURE that the connections are tight!!! You want no wiggle between the connection because that causes resistance and resistance causes heat and that will burn up the wire, wiring, etc. which is bad!
    1. Connect wires #1 and #3. Notice they should both come out of the upper right hole/port.

    2. Connect wires #2 and #4. Notice the white wire comes out of the upper right hole/port and the black braided wire comes out of the upper left hole/port. The pic is bad so I tried to erase extra wires and used a Green line to trace the wire and connections. I hope it gives the proper visual.


  9. When all wired up it should look like the image below:

  10. Use the sheet metal screws to fasten the panel back on through the rivet holes.
  11. Safely put the smoker back on the ground
  12. Open the smoker door and plug in the MES to the wall outlet. You should feel that it is heating and if you leave it on long enough you will see the element start turning color showing heat.
Well that is it. This approach is about as simple as it gets to rewire a Gen1 MES. Now every MES generation and model may be a little different but the idea for rewiring is still the same.

Additional Rewire Considerations:

This post is simply showing how to rewire for a 3d party controller to be used, BUT it does not address some week points of the MES wiring. I will note some improvements that should be considered because they are common issues with the MES that you will likely run into an need to fix at some point.
  1. Replace the Heating Element connectors with Hi Temp Stainless Steel female spade connectors - the MES uses poor electrical connectors on the wires that connect to the heating element. They don't seem to be able to stand up to the heat of the element very well and corrode easily. Mine showed signs of corrosion after 3 months of use!!! Google the following connectors as good replacement options:
    Supco T1111c (typical female spade), or Supco T1113c (flag style female spade)

    Again, be sure the connectors are on completely and are crimped complete! You want NO wiggle. Keep working until you get the proper connection.
  2. Replace the Safety Rollout Limit Switch connectors with Hi Temp Stainless Steel female spade connectors - as stated above the connectors that MES uses are poor and corrode easily. The connectors here suffere the same issue.
    The big issue is that most MES smokers do not have a panel to access the rollout limit switch. In this case, you must remove the back of the MES to get to the rollout limit switch
    1. Consider cutting and creating a panel to access this switch in the future
    2. The rollout limit switch is a little delicate so if you happen to damage it go to Amazon and search for: KSD301 for replacement switches should you knock a tab loose or bend it or damage it in any way.


      Again, be sure the connectors are on completely and are crimped complete! You want NO wiggle. Keep working until you get the proper connection.
Best of luck guys and remember to be safe and enjoy smoking! :)
very nice write up and tutorial. I am at my wits end with (2) MES30's exhibiting different symptoms. Masterbuilt tech are dick heads and due to my limitd dexterity due to stroke I am at my wits end. Right now I have to "ride th board" and keep a close eye out on internal temps on one unit that doesnt like to not turn off element and scorches to 300 degres. The other sems to turn on and off, but the internal tmp(as mesure by gate level inkbird probe, is typically 25 degrees higher than displayed tmp on PID (I think that;s what it is cslled.
that's all
thank you
john
 
Thanks again, I got the Jest of the project. My connections look different, I will need to trace or continuity test the leads from the heating element. I have to go back and look at the specifics. I have 2 access points below my MES. 1 for the main electrical feed and another for a controller in the base of the unit. This second access panel is where I think I will find the Rollout Limit Switch & Heating Element. If so I may have to run some wires to make this connection, but I believe there should be existing wires/connections.

Guess I will order the PID tomorrow and keep you posted on the progress.

Regards,
James

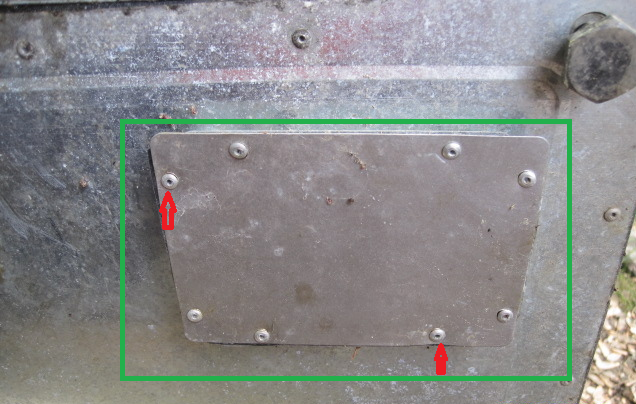
You have correctly identified the 2 panels blow your MES.
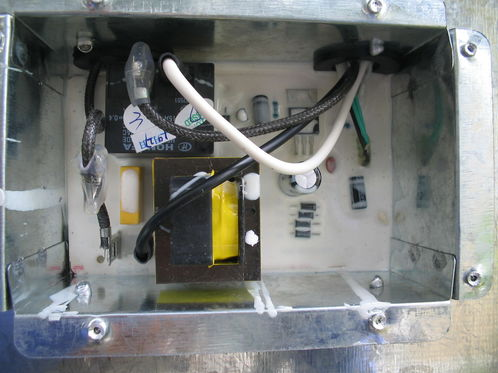
Yep, the panel that has the circuit board will have have all wires running to it.

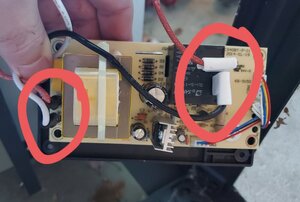
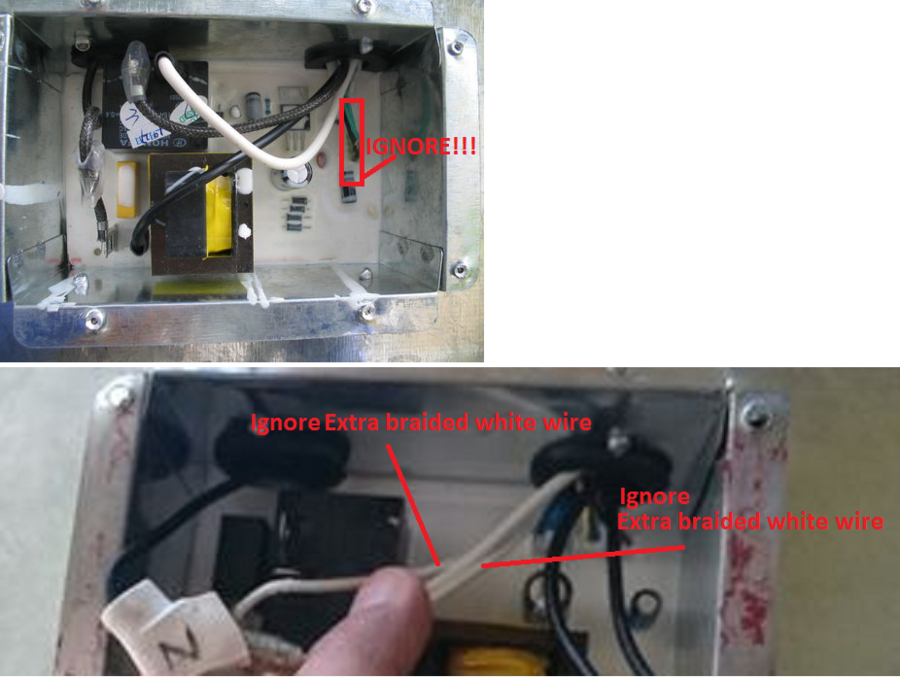
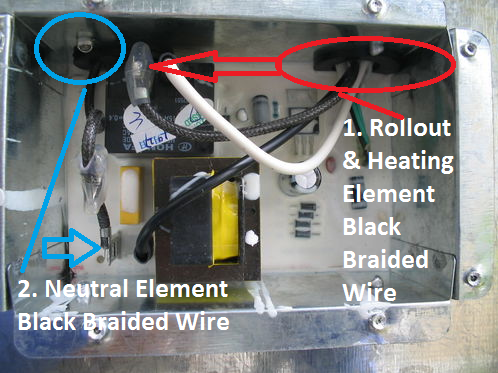
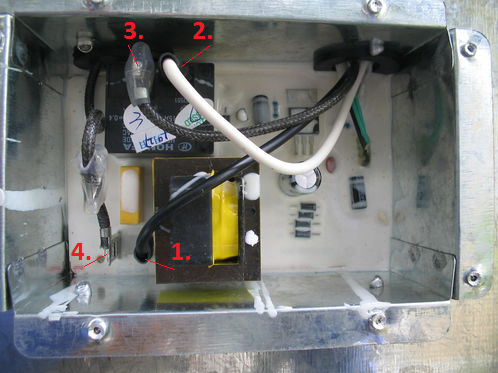
The bigger 16AWG size braided wires (braid color may be different than below) will be the ones that run to the Heating element and to the Safety Rollout Limit switch which then runs again to the other connector the heating element. So for example in this picture:

  • Wire#4 runs directly to the Heating Element prong1
  • Wire#3 runs to the Safety Rollout Limit Switch
    • From the Safety Rollout Limit switch #3 will continue to the Heating Element prong2
full?d=1507263359.png


  • Wire#1 is the Hot wire from the MES plug
  • Wire#2 is the Neutral wire from the MES plug
If you unhook the braided wires from the circuit board AND unhook the braided wires from the heating element you can do a continuity check with your multimeter and identify which ends match up. What it wont tell you is which which wire has the safety rollout limit switch in the mix, but we'll get to that later.

The simple rewire would be to unhook wires 1-4, cut off their ends.
Then splice a smooth wire (1 or 2) with a braided wire (3 or 4), order does not matter. The only thing that matters is that a smooth goes to a braided. Once each smooth is spliced to a braided you are done!

Back to the Safety Rollout Limit Switch now.
On the Back of your MES (not under) you will find a panel for the heating element.
If you have a 2nd panel about halfway up (middle or right side usually) then THAT panel will be the Safety Rollout Limit Switch.

If you have no 2nd panel halfway up... well you probably want to cut one because that switch is a major failure point for both the connectors corroding away AND the cheap plastic switch melting down once the connectors begin corroding. I'd bet money the connectors are already corroding because that's what the Masterbuilt connectors do best :D
If you don't care to mess with the switch and it is working then feel free to stop reading here, if it fails on you later (smoker wont heat up) then start reading again from this point :D

If you look INSIDE your MES on the back wall you will see a round button looking thing the size of a quarter. That is the Safety Rollout Limit Switch.
1641831217900.png


Use a tape measure and you can figure out where it is located on the back OUTSIDE of the MES. You will want to cut yourself a panel to get to this thing. So cut about a 6inch tall by 4 inch wide rectangle here and then cover with a piece of sheet metal and self tapping sheet metal screws when done, panel created!
I would use a dremel or oscillating tool with a blade that can cut through thin metal and carefully make the cut. There is usually a box covering the switch that you have to unscrew off to get to the switch so chances are you won't cut a wire but it may still happen :)

I hope all this info helps :)


very nice write up and tutorial. I am at my wits end with (2) MES30's exhibiting different symptoms. Masterbuilt tech are dick heads and due to my limitd dexterity due to stroke I am at my wits end. Right now I have to "ride th board" and keep a close eye out on internal temps on one unit that doesnt like to not turn off element and scorches to 300 degres. The other sems to turn on and off, but the internal tmp(as mesure by gate level inkbird probe, is typically 25 degrees higher than displayed tmp on PID (I think that;s what it is cslled.
that's all
thank you
john

Hi John.

Well sounds like the MES that doesn't want to shut off probably has a faulty circuit board in the panel underneath the MES. I doubt you can find the replacement circuit board bit if so that would be a simple fix. Without a replacement circuit board your only option is the simple rewire and a PID controller.

The other MES that does cut on/off but runs hotter may actually be a blessing in disguise. It seems most often that an MES unit WONT hit max 275F instead of going over it hahhaa.
If yours cuts off/on but swings high then you should be able to lower your set temperature and wing it from there. Not a bad problem to have.

Now temp swings suck no matter what but the swings are what Masterbuilt uses unfortunately so they can ensure wood chips burn.
The only surefire wire to eliminate the temp swings is a rewire and PID controller.
I think with this unit you may be able to just lower your set temp and be good to go, but yeah still a little dissapointing.


Now a rewire is not hard to do when it comes to the electrical work BUT you may definitely want someone to help pick the thing up and flip it around etc. They are not feathers for sure and I lift mine onto a heavy duty foldout table to work on them so I'm not laying on the ground or squatting all day.
This will be the most difficult part for you by far.

If you decide you want to do the rewires and put in PID controllers let us know. We have the knowledge here to help. You will have to source the muscle though :D
 
SmokingMeatForums.com is reader supported and as an Amazon Associate, we may earn commissions from qualifying purchases.
Great deal on LEM Grinders!

Latest posts

Clicky