I've got a Masterbuilt 30 Gen 1 w/RF, and had issues recently w/the control panel flaking out (turning off on its own, LEDs dying on the display). Also had temperature issues - the MES would not heat up to the temperarture I set on the control panel. I set 275, it goes to 255 or maybe 260. Given it's an older model and MB will at some point just stop making parts for it, I decided to replace both the control panel and heating element while they are available. Mine aren't totally useless, but now I'll have a new working set, and the old ones for backup in the (hopefully) far future when new problems arise. Total cost shipped was about $56.23. The parts arrived today and it was a quick fix, and I ran the smoker for an hour and it was able to get all the way to 275 again.
Pairing the RF w/the new control panel was easy.
- Remote: Press On/Off on RF remote to turn it on
- Smoker: Press On/Off button to turn on smoker
- Smoker: Press and hold Set Temp until you hear a beep (not the first beep when you press it, but a second beep that occurs as you hold it)
- Remote: Press buttons: Meat Probe - Light - Meat Probe - Light (each button two times) and you will hear a confirming beep or set of beeps.
- Remote: Then press the On/Off button and it should turn the smoker on/off, and all other remote buttons should work.
If you have trouble syncing the remote, unplug the smoker, wait a few seconds, plug it in again, and repeat the sync process.
I did discover something interesting when I was disassembling the wood chip housing - there are supposed to be two screws holding it in place at the bottom left of the housing. See first pic below from the instructions, note the two screws illustrated at the bottom left on the wood chip housing in the image. In my case there were no screws, but there was a bolt and nut on the front mounting point. Note the second pic below - the rear mount screw/bolt hole is empty, and the front has a nut/bolt rather than the screw depicted in the replacement instructions. I know assembly configurations often change, but leaving out one of the bolts made me wonder if I actually received a returned unit rather than a new one. Hasn't affected the functionality, but is interesting.
View attachment 454190
View attachment 454189
Replacing the element and display was easy. In fact, the instructions included w/the heating element are some of the most detailed and clear instructions I've seen provided w/a replacement part, kudos to Masterbuilt for that quality. There were no instructions w/the display panel, but that is so easy it really isn't necessary. Enjoy the pics.
Ready to get started...heating element w/new gasket and connecting HW and instructions, and control panel w/mounting screws.
View attachment 454193
View attachment 454221
Begin inside the smoker, removing the wood chip housing. I was hoping this was an optional step (lazy me), but you definitely can't do the heating element replacment w/out removing the wood chip housing.
View attachment 454195
Pic showing my missing mounting screw. Scandal!
View attachment 454196
Just a four screws to remove the wood chip housing - or in my case, two screws and one bolt. ;-) Don't forget to remove the wood chip tube dispensor first. :)
View attachment 454222
Wood chip assembly removed.
View attachment 454197
That's it for now - time to move to the back of the smoker to disonnect the heating element wires.
View attachment 454198
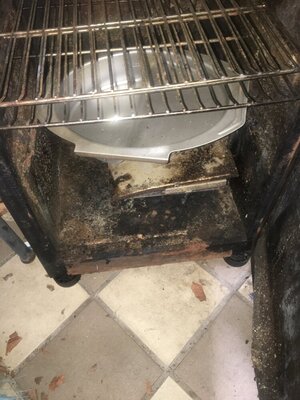
Kinda Fort Knox-like w/all the screws :) Note that the smoker's catch-tray below the work area makes a great place to put screws and other parts of the process while you're doing the replacement.
View attachment 454194
Plate off, mysteries revealed.
View attachment 454199
That's not blood on the metal, it's whatever sealant that MB put on it. However, it might as well be blood. I cut my fingers three times while working on the back of the smoker here...the inside edges of the metal are extremely thin/sharp, and can easily cut you if you brush up against them. Use caution...there be dragons w/nasty teeth. ;-)
View attachment 454200
To get the original connectors off I had to use a razor to cut the rubber heat shrink on the connectors, and then pull off the piece left on the connector using small pliers.
View attachment 454201
Then remove the gasket behind the connectors. There are two screws holding the heating element in place. I forgot to take pics of removing them, but it's dead simple (like most of this process) - just unscrew the two screws that you see when you remove the gasket. You'll be re-using the gasket so be nice to it. :)
View attachment 454202
View from the inside after removing the two screws from the back. The screw/bolt in the middle is connected to a ground that is behind the heating element back plate. Pull the heating element towards you and it will come off the wall a couple of inches. Then you have to reach behind the plate to hold the nut as you unscrew the bolt from the front - and be sure to catch the teeny-tiny lockwashers or they will likely fall to the bottom of the smoker and roll out through the drain hole at the bottom. Nope...I know what you're thinking but I got lucky (for once) and did not drop them! :D
View attachment 454223
Tah-dah - element finally removed.
View attachment 454203
Close-up showing the ground that the heating element was connected to via the last center bolt unscrewed.
View attachment 454204
Re-assembled....just tons of fun (and no way to take pics while doing it) getting one finger behind the heating element back plate to hold the lock washers and nut in place while using a screwdriver to screw in the bolt to the nut from the front.
View attachment 454205
Return to the back to re-assemble/reconnect things. First, screw in the two screws that hold the heating element in place.
View attachment 454206
Put the gasket back in.
View attachment 454207
They want you to replace the connectors, and who am I to argue since they took the time/expense to send replacments to me.
View attachment 454208
Quick clip/wire nut and good to go.
View attachment 454209
New connectors in place.
View attachment 454210
Connected and ready to close up.
View attachment 454211
Close and done w/heating element.
View attachment 454212
New heating element, looking, all sparkly and fresh (sort-of). Don't mind the walls, that's just flavor. The element was a bit out of kilter, angled outward a bit, remedied by a little gentle but firm push on the element.
View attachment 454213
Wood chip housing back in place.
View attachment 454214
Now for the control panel, so easy that pics are amost irrelevant.
View attachment 454215
View attachment 454216
View attachment 454218
Done.
View attachment 454219
Easy to do, and appears to have fixed my problems. Onward to the next smoked delight.