Masterbuilt Smoker Not Working

  • Some of the links on this forum allow SMF, at no cost to you, to earn a small commission when you click through and make a purchase. Let me know if you have any questions about this.
SMF is reader-supported. When you buy through links on our site, we may earn an affiliate commission.

KJNDIVER

Newbie
Original poster
Dec 18, 2020
26
17
Lake Charles, La.
Hey guys, Im new here, located in south Louisiana along gulf coast, this is my first post on this forum. I have scoured the net and youtube looking the answer to my problem but as of yet, to no avail. In my efforts I came across this site and thought I would ask yall for some assistance, as MB support sux as most of us know and its all over the net. I have a Masterbuilt MB25071217 with the digital controller. Ive had this unit for 2 yrs, no problems, until now.

Unit was working perfectly, then Hurricane Laura hit the La coast. I went to take it out to smoke a ham for Thanksgiving and nothing. No heat. Everything appears to be in working order but the unit never heats up. Turn on the panel, set the temp, set the time, you can hear to equipment engage with an audible click ( as always) but no heat. My first searches of the net yielded that i need to check continuity of the element. Both from terminal to terminal and from terminal to element exterior. The terminal to terminal check out fine but the terminal to exterior did not. I was getting some continuity with that check. Okay, element is bad.

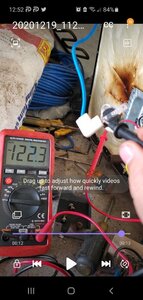
Upon inspection it does appear that the ceramic insulator on one of the terminal ends has separated. Okay, thats my problem. Try to order a new element from MB, no go. Out of stock. Hello Amazon. Find a replacement element , ordered it, it came in this week. Today i go to perform the swap. Still no heat. Everything as before. It all appears to be in working order, but no heat. I take my meter and check the voltage feeding the element. When the unit turns on it only generates 15-18 v feeding the element.

I know this is a 120v unit, but that doenst necessarily mean that it sends 120v to the element, or does it? Should the element see the full 120v from the control panel? I have searched and searched and i cannot find what the voltage output of that panel is, e.g. what voltage is required for the element to work properly. If it required 120v, then obviously ive got a problem somewhere with a what i would assume would be a relay located somewhere on the unit that should feed full 120v power, but isnt.

Just food for thought and to be transparent, this unit stays under cover and out of the direct elements, but when a hurricane comes along those elements tend to go in all directions. There was evidence of wind blown rain and dirt on the side of the unit that i cleaned prior to trying to use. Even though there is no evident short as everything appears to be in working order, as in there are no beeps or other abnormalities with the controller, where else could i look to find my issue? I have not taken the back panel off yet, that was my next step. Thanks in advance for any assistance.
 
Welcome, it sounds like a wiring issue from what I’m reading. I’ll be honest if you are comfortable with electric, great! But I caution everyone because it will bite you . Maybe someone else will chime in with a better suggestion than the lack of mine. Lol
 
Yes, every Masterbuilt schematic I've seen applies the entire 120VAC to the element.
  • However if your unit got wet, other areas could still be shorting to ground and not just the heating element. With power cord unplugged and "under your control", remove the wires to the element...what is the resistance of each to ground?
  • I believe there might also be a fuse, if not on the lower board then on the upper board, that may have opened and which you might need to replace.
  • And are you sure you have the correct heating element? If you got one intended for a 12 or 24Vdc oven in an RV, you could get the results you saw if there was some current limiting designed in. You want something rated 800-1200 watts at 120V or 12-18 ohms.
You sound pretty handy, but from your data it's obvious that you were working hot. I sure hope you have the proper PPE and knowledge for that kind of work? Trust me, things that have been accidentally exposed to water have a funny way of draining water out onto you at inopportune times...making 120V contact quite realistically lethal, not just potentially lethal.
Good luck and be safe!
 
Thats kind of what i assumed, that it would send full voltage, but wasnt sure. Ill check the element wires to ground next. This is the element that i ordered from amazon, listed as a replacement for this model, 800 watt. No worries, i fully understand the risks involved, all appropriate precautions were taken. So, upper board i would assume refers to the board in the digital control panel that sits on top of the unit. You mention lower board, is there another one behind the back panel of the unit? I guess Ill find out soon enough..
 
Not sure about your unit . but, some of them have a lower board in the bottom of the unit. have to lay it on back to access. i lost my MES in the 16 flood in baton rouge. check the ends of all your wires and make sure none of them have melted. I have one that i can part out and see if you can fix yours
 
Hey guys, Im new here, located in south Louisiana along gulf coast, this is my first post on this forum. I have scoured the net and youtube looking the answer to my problem but as of yet, to no avail. In my efforts I came across this site and thought I would ask yall for some assistance, as MB support sux as most of us know and its all over the net. I have a Masterbuilt MB25071217 with the digital controller. Ive had this unit for 2 yrs, no problems, until now.

Unit was working perfectly, then Hurricane Laura hit the La coast. I went to take it out to smoke a ham for Thanksgiving and nothing. No heat. Everything appears to be in working order but the unit never heats up. Turn on the panel, set the temp, set the time, you can hear to equipment engage with an audible click ( as always) but no heat. My first searches of the net yielded that i need to check continuity of the element. Both from terminal to terminal and from terminal to element exterior. The terminal to terminal check out fine but the terminal to exterior did not. I was getting some continuity with that check. Okay, element is bad.

Upon inspection it does appear that the ceramic insulator on one of the terminal ends has separated. Okay, thats my problem. Try to order a new element from MB, no go. Out of stock. Hello Amazon. Find a replacement element , ordered it, it came in this week. Today i go to perform the swap. Still no heat. Everything as before. It all appears to be in working order, but no heat. I take my meter and check the voltage feeding the element. When the unit turns on it only generates 15-18 v feeding the element.

I know this is a 120v unit, but that doenst necessarily mean that it sends 120v to the element, or does it? Should the element see the full 120v from the control panel? I have searched and searched and i cannot find what the voltage output of that panel is, e.g. what voltage is required for the element to work properly. If it required 120v, then obviously ive got a problem somewhere with a what i would assume would be a relay located somewhere on the unit that should feed full 120v power, but isnt.

Just food for thought and to be transparent, this unit stays under cover and out of the direct elements, but when a hurricane comes along those elements tend to go in all directions. There was evidence of wind blown rain and dirt on the side of the unit that i cleaned prior to trying to use. Even though there is no evident short as everything appears to be in working order, as in there are no beeps or other abnormalities with the controller, where else could i look to find my issue? I have not taken the back panel off yet, that was my next step. Thanks in advance for any assistance.
check the ends of all the wires and make sure none of them have burned. I am in baton rouge and have one that i can part out and see if you can fix yours?
 
...This is the element that i ordered from amazon, listed as a replacement for this model, 800 watt....
The wattage is right and the comments in the listing imply they apply at 120V so that's a winner. If the old one was shorting to ground (with leads disconnected) you definitely needed a new one.

But Dernek is right...faulty relays are common problems on these...it would be on the lower board that I think you're discovering. MB sells those boards for a very reasonable price for some models...and they're not replaceable on others. You want to hope your lower board is screwed in, not riveted. If riveted, replacements are not usually available.
If you can remove and troubleshoot it to the relay, it's only an $8 part, but it takes some pretty good mechanical and electrical skills to do the job. I've never done it so I couldn't help you much.
 
  • Like
Reactions: dernektambura
If heating element shorting to the ground and breaker didn't pop then you have bigger problem than masterbuild smoker... just sayin'.....
120 VAC supply to the heater goes via relay normally open contacts...
Low DC voltage, supplied by electronic board activates relay coil....
 
120 VAC supply to the heater goes via relay normally open contacts...
Low DC voltage, supplied by electronic board activates relay coil....

Yea, thats what i was thinking, i am only seeing the voltage required to activte the relay and not full the voltage needed to operate the element. I guess my next step is to do surgery and remove the back panel.
 
Hey guys, Im new here, located in south Louisiana along gulf coast, this is my first post on this forum. I have scoured the net and youtube looking the answer to my problem but as of yet, to no avail. In my efforts I came across this site and thought I would ask yall for some assistance, as MB support sux as most of us know and its all over the net. I have a Masterbuilt MB25071217 with the digital controller. Ive had this unit for 2 yrs, no problems, until now.

Unit was working perfectly, then Hurricane Laura hit the La coast. I went to take it out to smoke a ham for Thanksgiving and nothing. No heat. Everything appears to be in working order but the unit never heats up. Turn on the panel, set the temp, set the time, you can hear to equipment engage with an audible click ( as always) but no heat. My first searches of the net yielded that i need to check continuity of the element. Both from terminal to terminal and from terminal to element exterior. The terminal to terminal check out fine but the terminal to exterior did not. I was getting some continuity with that check. Okay, element is bad.

Upon inspection it does appear that the ceramic insulator on one of the terminal ends has separated. Okay, thats my problem. Try to order a new element from MB, no go. Out of stock. Hello Amazon. Find a replacement element , ordered it, it came in this week. Today i go to perform the swap. Still no heat. Everything as before. It all appears to be in working order, but no heat. I take my meter and check the voltage feeding the element. When the unit turns on it only generates 15-18 v feeding the element.

I know this is a 120v unit, but that doenst necessarily mean that it sends 120v to the element, or does it? Should the element see the full 120v from the control panel? I have searched and searched and i cannot find what the voltage output of that panel is, e.g. what voltage is required for the element to work properly. If it required 120v, then obviously ive got a problem somewhere with a what i would assume would be a relay located somewhere on the unit that should feed full 120v power, but isnt.

Just food for thought and to be transparent, this unit stays under cover and out of the direct elements, but when a hurricane comes along those elements tend to go in all directions. There was evidence of wind blown rain and dirt on the side of the unit that i cleaned prior to trying to use. Even though there is no evident short as everything appears to be in working order, as in there are no beeps or other abnormalities with the controller, where else could i look to find my issue? I have not taken the back panel off yet, that was my next step. Thanks in advance for any assistance.

Hi there and welcome!

It looks like you are well on your way to trouble shooting.

The parts to consider are the following:
  • Electrical Female Spade Connectors - most common part to fail either at element or safety rollout limit switch
  • Top Controller - 2nd most common part to fail, its ... on top haha
  • Heating Element - you have this covered
  • Lower Controller Circuit Board - is underneath the MES. Like if you flipped the MES on it's head you would see a panel where you drill out the rivets (replace with self tapping 3/4 inch sheet metal screes). In there you find the lower circuit board. Your cord plugs into it. The wires to the heating element plugs into it. Finally, the wires from the top controller plug into it. Sometimes connectors go bad here or the relay or something else goes bad. I'm guessing your problem may be here if you had flooding.
  • Safety Rollout Limit Switch - some MES have a panel on the back like halfway up (middle or right hand side when facing back of MES). This switch cuts off when smoker gets too hot as a safety protection. Connectors often fail here and when they can often melt down that switch which is normally closed so when it melts down you cannot get power to the element so replace or just splice around it for the time being
If your lower circuit board is shot and you cannot get a replacement then you can always do the simple rewire down there (cut 4 wire ends, splice to make 2 wires) and build or buy a PID controller and have your MES perform 10X better then it ever did new. Hell better than any MES that has come off the production line haha.

Let us know if you get to this point and we can walk you through it. All us PID guys are 200% happy with the approach and basically ask "why the hell didn't I do this earlier?!?!"
 
  • Like
Reactions: MJB05615
Yea, thats what i was thinking, i am only seeing the voltage required to activte the relay and not full the voltage needed to operate the element. I guess my next step is to do surgery and remove the back panel.
if you see VDC to operate relay coil, take a screwdriver and give a couple good wacks on top of the relay (not to hard)... see what happens.... on board relay is mechanical contraption.... it may free up...
 
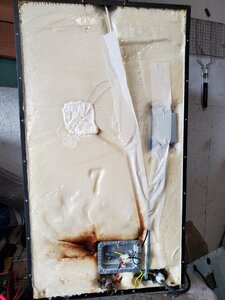
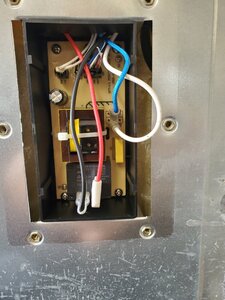
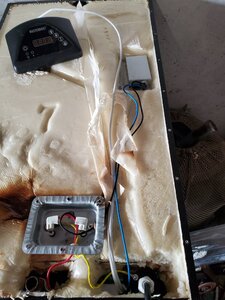
Ok, Im sure most of yall already know what Im about to do and say, but just working thru my thoughts as I investigate and post. I did a little more trouble shooting today, drilled out the the rivets on the back, pulled the panel. A little bit of smoke intrusion but not bad. No corroded or burnt connectors.

1.jpg 2.jpg

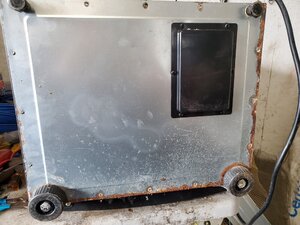
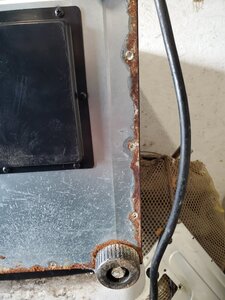
Turn the unit over to remove the bottom panel, drill out the rivets, but one of the threaded inserts spun inside the unit and was unable to remove lower panel, but no need as the board is accessible without complete removal. A little bit of corrosion but overall not bad.

3.jpg 4.jpg

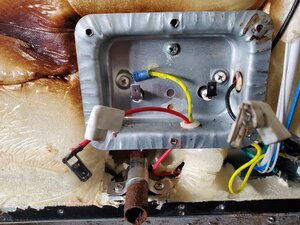
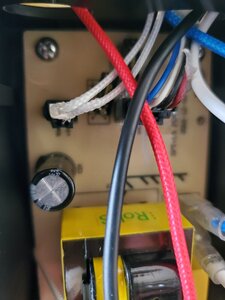
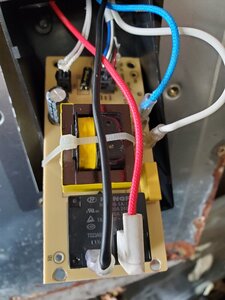
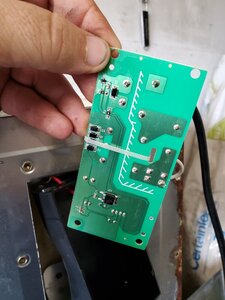
Pulled the cover, inspected. All connectors to be good, no corrosion, no burn.

6.jpg 7.jpg 10.jpg 11.jpg

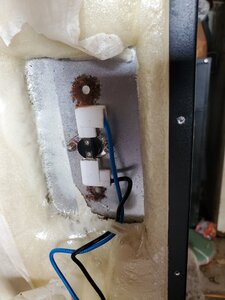
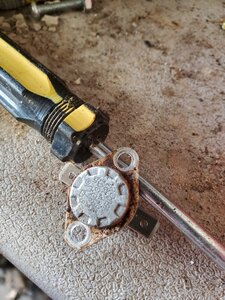
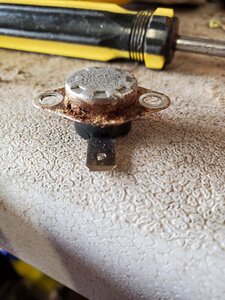
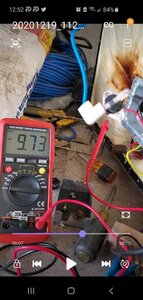
So I study the wiring to see whats going on.... So I check things out from the beginning. Check voltage coming from the cord, white to the panel, black to the relay, 120v, all good. Check voltage again the element, 18v, no bueno. The red wire to the element comes from the relay. The black wire to the element comes from the thermostat. The thermostat is fed power via the blue wire which gets power from the panel and connected to white wire from the cord. So I check the voltages there. When the unit is unplugged, 0v. Plugged in, 1v. Turned on, 4v. And when the controller is set to temp and calling for signal, the relay engages and the blue wire sees 120v. Okay, Ive got voltage to the thermostat. Check voltage on other side of thermostat, which is the wire that feeds the element, 9v. Check the input again, 120v, output 9v. So it seems that the thermostat is shot. That is making the logical assumptions that the relay acts a switch when the unit calls for power and the thermostat acts as a switch and is closed until the temp is reached and then the switch is open. It seems the thermostat (switch) is in a constant open or is damaged internally so that it is not making full contact. I tapped with a screwdriver a few times to "loosen" up anything inside, no bueno. Remove the t-stat , it has some corrosion, but doenst SEEM bad. So i guess that I need a new thermostat. This is confirmed when i bypassed the thermostat and hooked the blue wire directly to the element. When the unit is off, nothing. When the controller calls for signal, since there is 120v between the red relay wire, and the blue wire going to the t-stat, well then the element heats up and works as it should, albeit in a constant on situation. At least I got it narrowed down to what the culprit is, now off to find a replacement t-stat. Between some pitting on the t-stat and my old eyes, it appears to be KSD 301 250v 10A 150*C. I think this would be a simple fix and i should be back in business shortly, but would be interested to see what some of you guys have done with the PID, anybody got a link?

12.jpg 13.jpg 14.jpg 16.jpg 17.jpg 18.jpg
 
Last edited:
...give a couple good wacks on top of the relay...
KJNdiver, this can't hurt and if it's an electromechanical relay may make a difference. From pics folks have posted here, the relay is a black plastic case part, about 1" square. If it sticks above the board a full inch or so, then it's probably electromechanical; if only a quarter inch high then it's probably a solid-state relay which when broken is pretty much unrecoverable.
But where are you getting readings that you're attributing to the relay/control voltage? As I recall how that board is mounted it would be hard to measure this without removing the board. Most relay failures don't result with the coil voltage ending up on the output contacts.
Dernek is right that there's enough confusion here that you maybe didn't need a new element. So have you installed it yet? If so we'll assume that's a done deal and that part can be assumed good. Then the question becomes, what symptoms or measurements have you done since then? If you haven't installed it yet, we'll assume you might want to get a refund so lots of folks (e.g. Dernek) more knowledgeable about this unit than I can help you trouble-shoot it.
And if you're getting bored with trouble-shooting, buying an" inkbird" or equivalent controller bypasses all the MB electronics (including relay board) and puts that all in a new, reasonably-priced external unit. Whether that is an unacceptably ugly fix or a cool modification is up to you but with a new element that is pretty much a guaranteed-successful approach.
 
  • Like
Reactions: dernektambura
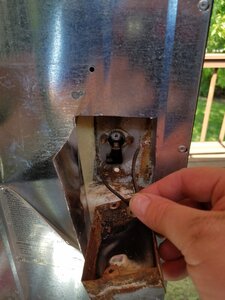
I picked up a free Mes 30 Gen 1 on FB Marketplace this summer and when I plugged in it beeped and the green power light came on. I set the temp and time and the relay on the bottom PCB clicked and red heating light came on but no heat. I use an Auber PID on my Mes 40 Gen 1 and have a spare power cord with lugs soldered on the hot and neutral wire to connect directly to the element as a back up power source since I did the rewire, using what was in the Mes. I unplugged the smoker, took off back bottom element access, disconnected the element wires and hooked up the power cord to the element and wrapped the stripped green ground around an access screw and tightened to ground the chassis. I checked continuty between the hot neutral plug and each to the back of the smoker and then continuity from the ground plug prong to the back of the smoker so all was in order, then plugged it in and it started heating. Unplugged I cut an access in the back panel with a dremel cut off wheel to get to the over temp switch junction box and removed the two screws inside the smoker to remove the cover. One lug was disintegrated and the entire area was rusted out and had to have been hosed out or pressure washed. I cut the other connected wire, stripped each to new wire and put a wire nut on them and hooked up the Mes back to its standard set up and ran a few cycles before unplugging and closing up the new access I made with the sheet metal cut out piece and aluminum tape. That spare power cord connected directly to the element and ground wire to an access screw is a good tool in itself to test elements that short when hot in a gfci. When the gfci trips unplug and check continuity from the plug to the back of the smoker.
20200814_112956.jpg
 
  • Like
Reactions: bill1
KJNdiver, this can't hurt and if it's an electromechanical relay may make a difference. From pics folks have posted here, the relay is a black plastic case part, about 1" square. If it sticks above the board a full inch or so, then it's probably electromechanical; if only a quarter inch high then it's probably a solid-state relay which when broken is pretty much unrecoverable.
But where are you getting readings that you're attributing to the relay/control voltage? As I recall how that board is mounted it would be hard to measure this without removing the board. Most relay failures don't result with the coil voltage ending up on the output contacts.

The relay seems to be working fine. Im almost positive that it is electromechanical as i can hear an audible click when it engages and feel the "vibration" when it engages. I did remove the board. I checked voltage going to the board to verify that is getting power, then i checked voltages coming from the relay to the element. All that checks out good. I did find the voltage is not going across the t-stat properly. So i think that is the culprit and have ordered from Amazon. My terminology may not be up to snuff as to what is what, but Im pretty certain Im doing the proper verification.

Dernek is right that there's enough confusion here that you maybe didn't need a new element. So have you installed it yet? If so we'll assume that's a done deal and that part can be assumed good. Then the question becomes, what symptoms or measurements have you done since then? If you haven't installed it yet, we'll assume you might want to get a refund so lots of folks (e.g. Dernek) more knowledgeable about this unit than I can help you trouble-shoot it.

That very well may be the case. I have already installed the new element. Verified that it works when bypassing the thermostat. So the new element works. I have not tried to hook the old one back up as yet, I may do that and if good keep it for a spare.

And if you're getting bored with trouble-shooting, buying an" inkbird" or equivalent controller bypasses all the MB electronics (including relay board) and puts that all in a new, reasonably-priced external unit. Whether that is an unacceptably ugly fix or a cool modification is up to you but with a new element that is pretty much a guaranteed-successful approach.

I think that may be in the works for the future.
 
Ok, Im sure most of yall already know what Im about to do and say, but just working thru my thoughts as I investigate and post. I did a little more trouble shooting today, drilled out the the rivets on the back, pulled the panel. A little bit of smoke intrusion but not bad. No corroded or burnt connectors.

View attachment 475907 View attachment 475908

Turn the unit over to remove the bottom panel, drill out the rivets, but one of the threaded inserts spun inside the unit and was unable to remove lower panel, but no need as the board is accessible without complete removal. A little bit of corrosion but overall not bad.

View attachment 475916 View attachment 475917

Pulled the cover, inspected. All connectors to be good, no corrosion, no burn.

View attachment 475918 View attachment 475920 View attachment 475921 View attachment 475922

So I study the wiring to see whats going on.... So I check things out from the beginning. Check voltage coming from the cord, white to the panel, black to the relay, 120v, all good. Check voltage again the element, 18v, no bueno. The red wire to the element comes from the relay. The black wire to the element comes from the thermostat. The thermostat is fed power via the blue wire which gets power from the panel and connected to white wire from the cord. So I check the voltages there. When the unit is unplugged, 0v. Plugged in, 1v. Turned on, 4v. And when the controller is set to temp and calling for signal, the relay engages and the blue wire sees 120v. Okay, Ive got voltage to the thermostat. Check voltage on other side of thermostat, which is the wire that feeds the element, 9v. Check the input again, 120v, output 9v. So it seems that the thermostat is shot. That is making the logical assumptions that the relay acts a switch when the unit calls for power and the thermostat acts as a switch and is closed until the temp is reached and then the switch is open. It seems the thermostat (switch) is in a constant open or is damaged internally so that it is not making full contact. I tapped with a screwdriver a few times to "loosen" up anything inside, no bueno. Remove the t-stat , it has some corrosion, but doenst SEEM bad. So i guess that I need a new thermostat. This is confirmed when i bypassed the thermostat and hooked the blue wire directly to the element. When the unit is off, nothing. When the controller calls for signal, since there is 120v between the red relay wire, and the blue wire going to the t-stat, well then the element heats up and works as it should, albeit in a constant on situation. At least I got it narrowed down to what the culprit is, now off to find a replacement t-stat. Between some pitting on the t-stat and my old eyes, it appears to be KSD 301 250v 10A 150*C. I think this would be a simple fix and i should be back in business shortly, but would be interested to see what some of you guys have done with the PID, anybody got a link?

View attachment 475923 View attachment 475929 View attachment 475930 View attachment 475931 View attachment 475932 View attachment 475933

What you are calling the thermostate is the Safety Rollout Limit switch. It is the #2most common area where the connectors fail and/or the switch itself melts down and screws up.
You are right the switch is Normally Closed so if it is messed up and open, it is preventing power from getting to your heating element.

You are also correct that it is a KSD 301 150C. For now you can wire nut the 2 wires together and it would work you just wouldnt have the safety cutoff if your smoker reaches 302F at that height where the switch/sensor was.

When you order another one MAKE SURE you get one that has a solid face and attachment as one piece like these:
Having extra helps.

Also you may want to cut a panel to access that area easily in the future as these things do melt down. Also with your smoker apart you may want to upgrade to high temp connectrs at the heating element and the safety rollout limit switch as those Masterbuilt connectors corrode and fail super fast:

I hope this helps and gets you back up and running fast :)

Not sure what the difference is between the one you recomended and the one that i had already ordered. Appear similar, but appearances can be deceiving. Will do on the cutout, I was already thinking the same thing. I have ordered the connectors as well. May not change right away, but will have on hand for when needed.

 
SmokingMeatForums.com is reader supported and as an Amazon Associate, we may earn commissions from qualifying purchases.

Hot Threads

Clicky