Bingo! Lots of pics with burned up insulation with the back removed in the element right rear corner, being shrouded in the metal chip burner system that traps heat. That's what is bad for insulation but is needed for the hysteresis to down coast to burn chips in the stock chip burner system. Flipping the element like the way MB did with the latest 440 and 430 series fixed that with an open element centered but ruined it with an independent chip/chuck burner with 5 settings on that 150 watt smoke generating element. I was a couple years ahead of MB. Then throw in a top broiler element with it's own snap disc. Too much s,.t to fail. I know my right rear corner was frying before flipping the element. The burner flipped is now a little hotter left as you mentioned but easier to manage sliding the drip pan on the bottom rack a rung or half left to manage temps. If you have an all SS Mes 40, no black paint like the hybrids with moulded rack supports vs wire and just plastic around the door/window, then don't ever let it go. Youngsters on FB masterbuilt pages are replacing entire smokers 2-4x and keep t hrowing $ at MB. At least after years and years of just gen 1, 2 and 2.5 Mes I know all digital foam insulated Mes at a glance I just need to know if it has black paint which is the deal breaker at the door jamb when it bubbles at the seal from boiling water etc in the water pan. Keep your all SS vs black painted Mes.I have a strong hunch that when a stock MES hits 275F at the crappy sensor they install that the area around the element at bottom and around lowest rack of the MES is actually closer to 325F or so. Also their cut off switch is a 305F one so by the time it senses 305F then I'm sure the bottom and area around the element is above 325F.
I wouldn't go on an exercise to find out though. I take Bear's word on what his readings were and when the crackling started. I'm also thinking that with the PID controlling the heating element with a pulse that once the temp is reached the element is going full blast. Just pulsing for a few seconds to hit and hold temp never even turning red hot.
Where the stock MES goes full blast and cycles on and off so if it was getting really hot that element would be red hot and going full bore.
So understanding a bit of this behavior also helps in knowing how NOT to ruin the MES if attempting a 325F smoke in it like I do.
Just more knowledge to keep in the back of your head :)
If knowledge and understanding is not someone's strong suite then I would recommend to them not to attempt this at all hahaha :D
Masterbuilt electric project
- Thread starter Ringer
- Start date
-
Some of the links on this forum allow SMF, at no cost to you, to earn a small commission when you click through and make a purchase. Let me know if you have any questions about this.
You are using an out of date browser. It may not display this or other websites correctly.
You should upgrade or use an alternative browser.
You should upgrade or use an alternative browser.
SmokingMeatForums.com is reader supported and as an Amazon Associate, we may earn commissions from qualifying purchases.
Bingo! Lots of pics with burned up insulation with the back removed in the element right rear corner, being shrouded in the metal chip burner system that traps heat. That's what is bad for insulation but is needed for the hysteresis to down coast to burn chips in the stock chip burner system. Flipping the element like the way MB did with the latest 440 and 430 series fixed that with an open element centered but ruined it with an independent chip/chuck burner with 5 settings on that 150 watt smoke generating element. I was a couple years ahead of MB. Then throw in a top broiler element with it's own snap disc. Too much s,.t to fail. I know my right rear corner was frying before flipping the element. The burner flipped is now a little hotter left as you mentioned but easier to manage sliding the drip pan on the bottom rack a rung or half left to manage temps. If you have an all SS Mes 40, no black paint like the hybrids with moulded rack supports vs wire and just plastic around the door/window, then don't ever let it go. Youngsters on FB masterbuilt pages are replacing entire smokers 2-4x and keep t hrowing $ at MB. At least after years and years of just gen 1, 2 and 2.5 Mes I know all digital foam insulated Mes at a glance I just need to know if it has black paint which is the deal breaker at the door jamb when it bubbles at the seal from boiling water etc in the water pan. Keep your all SS vs black painted Mes.
Great info about the SS vs the painted. Never thought about that.
Yeah I would only roll with the SS simply so it handles elements better. I don't want paint trying to do what SS can do when outside :)
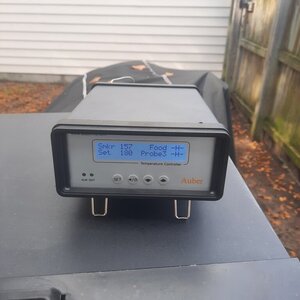
So... doing the trial run as I type for the Auber and the ammo can. So far so good, but looks like I needed to read the directions on the AMNPS. I did read the Auber manual. tallbm, your assessment of the writers involved with that is spot on  Anyhow, looks like the Auber is doing well set at 180. I've been in and out looking at it as I've nothing better to do.. ya right. after settling in it looks like a +1/-2 swing. No autotune or otherwise. I simply set the temp to 180 in the single step mode and let it roll. at first it dropped -3 when cycling, but since then its been rock solid at +1/-2. I just can't stop laughing at the fact of a $200 controller running a smoker with an attachment that looks like a drunk hillbilly put it together. No offense to the drunk hillbillies, as I've been known to pull a cork a time or two myself
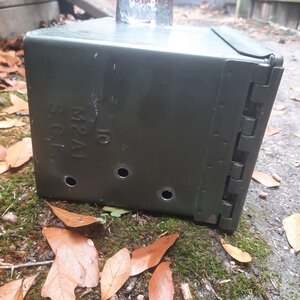
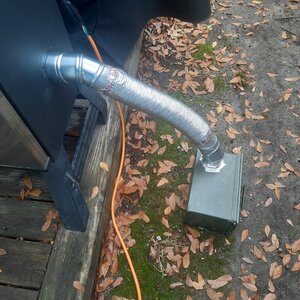
For what its worth, the 3' elbows and hose are all trial and error. I'm not fond of the look, so once I consider this a done deal, I'll clean up the connections between the elbows and the aluminum hose and paint it all hi temp grill black. Also, I used a 2-3/4 hole saw because I had one and said.... I can make it work. Oh boy did I have to grind the rest out so the elbow would fit. Besides, the air compressor needed to earn its keep. I put three 3/8" holes in the end of the ammo can. Standard 5.56 can someone at work gave me a few of. My only complaint is where the outlet is to run this. If the chip loader and top vent were reversed it would be far better, but I run an extension cord to the pellet pooper so I'll just shut up and deal with it.
Looks like properly lighting the AMNPS is paying off... I guess we'll see.
Heads up if anyone is looking, Auber running a Thanksgiving sale. I dove in and a proud new owner of the wifi model.
Oh nice!!! And they rarely run sales or discounts so good catch!Heads up if anyone is looking, Auber running a Thanksgiving sale. I dove in and a proud new owner of the wifi model.
Also good idea on just buying one vs building one. You THINK it doesn't cost much to build one then you buy all the parts, tools, consumables (connectors, shrink wrap, etc.), and find out it cost way more to build AND is a pain in the ass if you don't have the proper setup like a drill press, a nice way to cut rectangles, etc. etc.
Buy once cry once in this case.... unless you just love projects and the money isn't that big of an issue. I built a PID for my brother and saved maybe $40 vs buying an Auber. I had lots of consumables left over from another PID build that allowed me to save $40 but the time spent over 2 days was worth well more than $40 if you want to actually factor that in :)
So... doing the trial run as I type for the Auber and the ammo can. So far so good, but looks like I needed to read the directions on the AMNPS. I did read the Auber manual. tallbm, your assessment of the writers involved with that is spot onAnyhow, looks like the Auber is doing well set at 180. I've been in and out looking at it as I've nothing better to do.. ya right. after settling in it looks like a +1/-2 swing. No autotune or otherwise. I simply set the temp to 180 in the single step mode and let it roll. at first it dropped -3 when cycling, but since then its been rock solid at +1/-2. I just can't stop laughing at the fact of a $200 controller running a smoker with an attachment that looks like a drunk hillbilly put it together. No offense to the drunk hillbillies, as I've been known to pull a cork a time or two myself
For what its worth, the 3' elbows and hose are all trial and error. I'm not fond of the look, so once I consider this a done deal, I'll clean up the connections between the elbows and the aluminum hose and paint it all hi temp grill black. Also, I used a 2-3/4 hole saw because I had one and said.... I can make it work. Oh boy did I have to grind the rest out so the elbow would fit. Besides, the air compressor needed to earn its keep. I put three 3/8" holes in the end of the ammo can. Standard 5.56 can someone at work gave me a few of. My only complaint is where the outlet is to run this. If the chip loader and top vent were reversed it would be far better, but I run an extension cord to the pellet pooper so I'll just shut up and deal with it.
Looks like properly lighting the AMNPS is paying off... I guess we'll see.
View attachment 516076View attachment 516077View attachment 516078
Nice!!!
Yeah there are some minor tricks to helping the AMNPS run smoothly.
1. Microwave pellets for 1 min 25 sec, pull out of microwave mix around and rest for 2 min, microwave another 1 min 25 sec. This zaps the unforseen undetectable humidity from the pellets.
2. Light with a propane torch and ensure a flame is burning for 10 continuous minutes.
3. Tweak the airflow in your mailbox mod with more or less holes in the proper spots.
4. Do not expect the use of only 100% cherry pellets to ever stay lit hahaha
That does it :)
Cherry.... I've heard that, often. I used Lumber Jack Apple/Cherry blend, Still, looks like a bit more airflow won't hurt.
Cherry.... I've heard that, often. I used Lumber Jack Apple/Cherry blend, Still, looks like a bit more airflow won't hurt.
Yeah as long as something is mixed with cherry it seems to do fine. I've also heard/read that if you use cherry dust it has no problem. You can make dust by wetting pellets an then puff up then dry em and they crumble to dust.
I've had a little bit of trouble with 100% Maple as well but it's not nearly as bad as cherry.
Nice!!!
Yeah there are some minor tricks to helping the AMNPS run smoothly.
1. Microwave pellets for 1 min 25 sec, pull out of microwave mix around and rest for 2 min, microwave another 1 min 25 sec. This zaps the unforseen undetectable humidity from the pellets.
2. Light with a propane torch and ensure a flame is burning for 10 continuous minutes.
3. Tweak the airflow in your mailbox mod with more or less holes in the proper spots.
4. Do not expect the use of only 100% cherry pellets to ever stay lit hahaha
That does it :)
Back at it again while doing things around the house. I used Lumberjack Apple blend pellets this time (60/40 Red Oak Apple mix according to their website) and I drilled two more 3/8 holes on the underside of the can about an inch or so in from the edge, spaced out close to the two lower holes on the side.... to say the least, way too much airflow. Smoke! Smoke! Smoke! White Smoke in compartment 01-24-1-L... oh stop... Navy flashback there. I nuked the pellets far longer than I did yesterday, followed the instructions above for the minute 25 twice with the rest between. Lit with the map gas torch and let it burn for 10 minutes. I only filled one leg of the maze as I figured that would be enough to tell me what is going on. I have the vent on top of the MES wide open, Auber is holding steady at 180 +1/-2.
Its been going for almost two hours now and I've been playing with different configurations of the holes. I blocked the bottom two off to start, and am now running on one hole, bottom right of the side opposite of the elbow. Prior to that I had that hole open and the lower left covered half way, smoke flow reduced but still not the TBS I'm looking for. Still smelled a touch bitter so here we are with the one hole. Gonna have a cocktail and let it settle down and see how this works out.
Last edited:
Back at it again while doing things around the house. I used Lumberjack Apple blend pellets this time (60/40 Red Oak Apple mix according to their website) and I drilled two more 3/8 holes on the underside of the can about an inch or so in from the edge, spaced out close to the two lower holes on the side.... to say the least, way too much airflow. Smoke! Smoke! Smoke! white smoke in compartment 01-24-1-L... oh stop... Navy flashback there. I nuked the pellets far longer than I did yesterday, followed the instructions above for the minute 25 twice with the rest between. Lit with the map gas torch and let it burn for 10 minutes. I only filled one leg of the maze as I figured that would be enough to tell me what is going on. I have the vent on top of the MES wide open, Auber is holding steady at 180 +1/-2.
Its been going for almost two hours now and I've been playing with different configurations of the holes. I blocked the bottom two off to start, and am now running on one hole, bottom right of the side opposite of the elbow. Prior to that I had that hole open and the lower left covered half way, smoke flow reduced but still not the TBS I'm looking for. Still smelled a touch bitter so here we are with the one hole. Gonna have a cocktail and let it settle down and see how this works out.
So just a single 3/8 hole is all you are running in the bottom of the ammo can?
Yep. This might take more tinkering than I might be willing to do. Turned off the Auber and took the dog for a walk, still smoking on return. opened the door long enough to get the temp probe out, went back to doing nothing. Took pic of the AMNPS and put in back in the ammo can, let it go for 10-15 minutes or so... still smoking. Looking at the ash as compared to the black, I'm not doing something right.


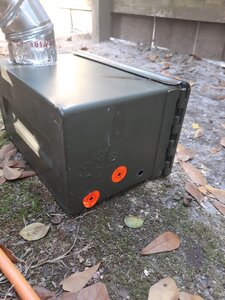
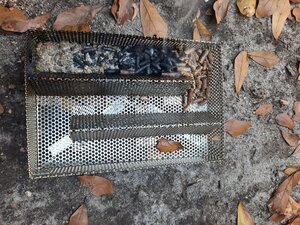
Can't argue. Just posting where I'm at, but I'm with you.... No way.No way that's enough air.. I have like 6 - 7/8" holes.
Just to post an update I did fire mine up today after the Last round of mods.
The last thing I did was put 6 1/4 inch holes in the bottom of the ammo can and added a stack to the outside.
This fixed my tray going out. Last I checked it is still lit.
Here is the deal breaker for me though. It isn't enough smoke. Yes it's there and yes it's clean but it just seems like it's not enough. I may get a small tube to put in with the tray or I may just use the tube alone. It seems to produce a good amount of smoke and the taste is there.
Thanks to all who have contributed here.
TLDR: if you are using an ammo can attached directly to the mes, make sure the air inlet holes are on the bottom and the edges are well sealed. Even then, it's not alot of smoke. This may be perfectly acceptable to some folks.
You may want to run the AMPNS full of pellets a time or two even if you don't plan to let it burn them all. The extra pellets will block air as well. I've never gotten too much smoke off 1 row.Yep. This might take more tinkering than I might be willing to do. Turned off the Auber and took the dog for a walk, still smoking on return. opened the door long enough to get the temp probe out, went back to doing nothing. Took pic of the AMNPS and put in back in the ammo can, let it go for 10-15 minutes or so... still smoking. Looking at the ash as compared to the black, I'm not doing something right.
View attachment 516194View attachment 516195
I recommend smoking some inexpensive boneless skinless chicken when it goes on sell (don't have to fight with skin if skinless) and see if the smoke production really is too heavy. Sometimes some white smoke seems like it might be too heavy but is ok, especially if you have no great airflow to blow it away from the vent. I see more smoke when I burn 2 rows in my ANPS vs 1 row. Super thick smoke is just what you want to avoid :)
The fun part is you eat the results :D
Just to post an update I did fire mine up today after the Last round of mods.
The last thing I did was put 6 1/4 inch holes in the bottom of the ammo can and added a stack to the outside.
This fixed my tray going out. Last I checked it is still lit.
Here is the deal breaker for me though. It isn't enough smoke. Yes it's there and yes it's clean but it just seems like it's not enough. I may get a small tube to put in with the tray or I may just use the tube alone. It seems to produce a good amount of smoke and the taste is there.
Thanks to all who have contributed here.
TLDR: if you are using an ammo can attached directly to the mes, make sure the air inlet holes are on the bottom and the edges are well sealed. Even then, it's not alot of smoke. This may be perfectly acceptable to some folks.
Oh my friend I have the answer to your problem. Burn 2 rows at once. I use Pit Boss MCH blend and it is kind of weak alone. I add more Hickory to it to help it out but on anything 5hrs or less using my enhanced blend there I burn 2 rows.
Also don't worry if you put a full tray of that perfect smoke on pork butt, brisket, etc. you will have plenty of smoke flavor.
My lessons learned:
- 2 rows if the cook is 5hrs or less and not using 100% hickory or 100% mesquite, they are powerful enough to not burn 2 rows.
- 1 whole tray puts great flavor if you burn it all up on a long smoke
- Enhance any weaker blends you buy with more of the stronger or better flavor wood you have. This is why I buy Lumberjack for the 100% wood and then add to blends or make my own blends :)
YA NAILED THAT ONE!!!!Ask any questions you like about the Auber's. Their manual was written by a drunk 2nd grader so it can be hard to understand at times
Hahahah yeah it's wild. The good thing is that once you figure out what to do, it's actually not that hard and it's copy down the 3 or so button presses and then rinse and repeat :)YA NAILED THAT ONE!!!!
This is part of the reason I went wifi. I do like monitoring the Cook remotely but the access to the settings seems much easier.Hahahah yeah it's wild. The good thing is that once you figure out what to do, it's actually not that hard and it's copy down the 3 or so button presses and then rinse and repeat :)
Even then, it's not alot of smoke. This may be perfectly acceptable to some folks.
Not sure you caught it but the tube puts out much more smoke than the tray. Another option. There are some fans of the tube. It's well known to stay lit too. Everyone has their own preference. Same with how to light it. I had to tinker a few times to get where I am. Totally worth it than dumping chips every half hour.
EXACTLY the same here.This is part of the reason I went wifi. I do like monitoring the Cook remotely but the access to the settings seems much easier.
You guys think the PID settings you use for yours will be the same for the wifi? I have not researched this fully yet.
SmokingMeatForums.com is reader supported and as an Amazon Associate, we may earn commissions from qualifying purchases.
Similar threads
- Replies
- 2
- Views
- 6K
- Replies
- 8
- Views
- 6K
- Replies
- 6
- Views
- 4K
- Replies
- 15
- Views
- 2K
Hot Threads
-
Well. Look what Santa dropped off early!
- Started by Steve H
- Replies: 28
- Blowing Smoke Around the Smoker.
-
The Best Egg Salad - Enabler Version
- Started by Chris_in_SoCal
- Replies: 23
- ABT's and all things Appetizers
-
Chicago Cracker-Thin 'Za
- Started by Quiganomics
- Replies: 16
- Pizza
-
Reverse searing equipment
- Started by Pigfarmin101
- Replies: 12
- Grilling Beef
-
HomeMade Dog Food
- Started by KBFlyer
- Replies: 10
- General Discussion


