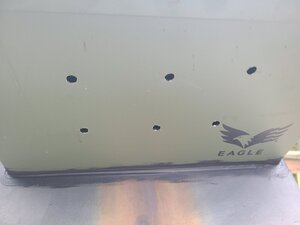
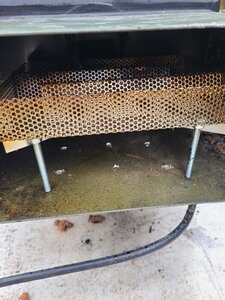
Masterbuilt electric project

  • Some of the links on this forum allow SMF, at no cost to you, to earn a small commission when you click through and make a purchase. Let me know if you have any questions about this.
SMF is reader-supported. When you buy through links on our site, we may earn an affiliate commission.
Wind blowing into the top side vent hole will back draft more than a top vent that wind blows across. If you're still having burn issues I'd get that entire tray between the air coming in the bottom six hole at the bottom lid seal and the chip loader hole to the smoker. Patch/ seal the damper hole you cut. No need for damper on ammo can. Six pencil holes along the length of the amnps. View attachment 515266
I do think wind was alot of my issue.

Thank you all for the suggestions. I will continue to work on this.
 
I am smoking some dinos today as a test. I started with the tray and added some chops to the pellets.

No go, wouldn't stay lit. On a whim, I filled up my old amaze n tube, lit it and stuck it in the cabinet.

It is still going strong 2 hrs later.

I may continue to fiddle with the ammo can holes on the bottom and stack ideas but it's good to know I have a temporary solution. Just reporting back here in case others encounter this.
 
When using a tube with an electric smoker, I suggest filling it up half way, turn it on it's side and shake it left to right. When done the tube should be half filled, horizontally. This is plenty of pellets for an electric smoker. It also works for regular size mailboxes like what I use. Using a totally filled up amaze n tube in these smokers generates too much smoke.
 
  • Like
Reactions: Ringer
I am smoking some dinos today as a test. I started with the tray and added some chops to the pellets.

No go, wouldn't stay lit. On a whim, I filled up my old amaze n tube, lit it and stuck it in the cabinet.

It is still going strong 2 hrs later.

I may continue to fiddle with the ammo can holes on the bottom and stack ideas but it's good to know I have a temporary solution. Just reporting back here in case others encounter this.

Never tried chips but believe I read many guys failing with a chip/pellet combo in the past.
I have hard that some broken up charcoal at the bottom of the tray and then pellets on top keeps things going well. Never tried it but maybe someday I will with 100% cherry pellets since they HATE to burn alone. I just never have charcoal so I will need to get a few briquettes from my brother sometime so I can break them up and try.
 
  • Like
Reactions: Ringer
Here is the test result. I pulled them at 203 degrees and they are resting now.
 

Attachments

  • 20211102_152119.jpg
    20211102_152119.jpg
    103.7 KB · Views: 33
  • 20211102_171850.jpg
    20211102_171850.jpg
    186.8 KB · Views: 40
  • Like
Reactions: dr k
If you're hesitant to "experimentally" drill more holes in the bottom of your "firebox", you can make a manifold that directs your existing side damper's air inlet down to the bottom of your pellet tray....
  • push the pellet tray to the side of your fire/ammo box (ie the front side of your smoker) so it's about 1/4" from the side without a damper.
  • cut a piece of sheet metal (5 or 6 thicknesses of heavy gauge aluminum foil may work) so that it fits at an angle from the top of your damper to the edge of the pellet tray. I think you can form about a 30-60-90 triangle this way.
  • notch the bottom of this manifold sheet about 2" wide and 1" high so the only path for the incoming air is down to the underneath of the pellet tray. This will be like adding holes to the bottom without actually cutting the holes.
  • make sure this slanted manifold extends all the way from the "bottom" of the ammo box to the "top" (handle) so that there's no leakage path for the air to take to the burning pellets except down and over.
 
  • Like
Reactions: Ringer
Lookin pretty good! How'd everything perform with your new changes?
Still getting flame out inside the ammo box. I ended up putting a tube full of pellets inside the cabinet and it burned the entire time. Good smoke all in all.
 
If you're hesitant to "experimentally" drill more holes in the bottom of your "firebox", you can make a manifold that directs your existing side damper's air inlet down to the bottom of your pellet tray....
  • push the pellet tray to the side of your fire/ammo box (ie the front side of your smoker) so it's about 1/4" from the side without a damper.
  • cut a piece of sheet metal (5 or 6 thicknesses of heavy gauge aluminum foil may work) so that it fits at an angle from the top of your damper to the edge of the pellet tray. I think you can form about a 30-60-90 triangle this way.
  • notch the bottom of this manifold sheet about 2" wide and 1" high so the only path for the incoming air is down to the underneath of the pellet tray. This will be like adding holes to the bottom without actually cutting the holes.
  • make sure this slanted manifold extends all the way from the "bottom" of the ammo box to the "top" (handle) so that there's no leakage path for the air to take to the burning pellets except down and over.
Thank you for the detailed suggestion, I may give this a shot.
 
  • Like
Reactions: bill1
Still getting flame out inside the ammo box. I ended up putting a tube full of pellets inside the cabinet and it burned the entire time. Good smoke all in all.

Yeah sounds like more air needed or changes to airflow needed for your tray. It is reported that the tube doesn't need as much air, hence guys with pellet grills and other grill types using it successfully.
 
  • Like
Reactions: Ringer
Yeah sounds like more air needed or changes to airflow needed for your tray. It is reported that the tube doesn't need as much air, hence guys with pellet grills and other grill types using it successfully.
I'm going to pick up one of the stacks you recommended and most likely turn my ammo can mod into more of a mailbox mod using a length of duct piped into a flange attached to the pellet dump hole.

It may be a little while but I'll post back here when I get to it.
 
Looks like things are moving along, Ringer. I still haven't got to rewiring mine yet. Got it in the garage and flipped it on its head to find no drilling required. All the covers are screwed on. Got side tracked yet again. Maybe today or tomorrow. What size ammo can is that you're using?

20211103_050305.jpg 20211103_050328.jpg
 
Last edited:
  • Like
Reactions: tallbm and Ringer
Looks like things are moving along, Ringer. I still haven't got to rewiring mine yet. Got it in the garage and flipped it on its head to find no drilling required. All the covers are screwed on. Got side tracked yet again. Maybe today or tomorrow. What size ammo can is that you're using?

View attachment 515357View attachment 515358
Nice, it looks like yours is moving right along. Won't be long now.

I'm using a 50 cal can. Plenty of room for a tray and then some in that size.
 
On a whim, I filled up my old amaze n tube, lit it and stuck it in the cabinet.

It is still going strong 2 hrs later.
Still getting flame out inside the ammo box. I ended up putting a tube full of pellets inside the cabinet and it burned the entire time. Good smoke all in all.

A ubolt modified 12-18" tube burning ground pellets/dust will give you as much burn time as a fully loaded tray.
 
  • Like
Reactions: Ringer
I finally got around to this yesterday after work and oh boy did I over think this whole thing. I swear I went thru this whole thread and a few others, but looks like I missed it. Anyway, I was just about to start cutting the terminals off the wires and splice them together with some handy dandy solder splices when It dawned on me I didn't need to do that. All I had to do was unplug the two connectors from the power plug and the element and put them together, Voila, done. Plugged it in to see if it worked and we have a winner. Now onto the ammo can.


Pulled that plastic box out and removed the controller
20211103_050305resize.jpg
Much neater than before. Zip tied the wires that remained.
20211104_175019tresize.jpg

Anyone wants this thing and the box it was in, let me know. It worked before I took it out, and I have zero use for it.
20211104_174928resize.jpg
 
  • Like
Reactions: dr k
I finally got around to this yesterday after work and oh boy did I over think this whole thing. I swear I went thru this whole thread and a few others, but looks like I missed it. Anyway, I was just about to start cutting the terminals off the wires and splice them together with some handy dandy solder splices when It dawned on me I didn't need to do that. All I had to do was unplug the two connectors from the power plug and the element and put them together, Voila, done. Plugged it in to see if it worked and we have a winner. Now onto the ammo can.


Pulled that plastic box out and removed the controller
View attachment 515484
Much neater than before. Zip tied the wires that remained.
View attachment 515486

Anyone wants this thing and the box it was in, let me know. It worked before I took it out, and I have zero use for it.
View attachment 515485
As others have suggested in this thread there may be some things you want to try to get better airflow through the ammo can.

Don't use a damper on the side like I did.

It has been recommended that you can:
1. Use a stack on the exhaust
2. Relocate the ammo can to a shelf under the cabinet and use ductwork to pipe the smoke in.
3. Drill 6 pencil sized holes under the amnps tray.

I have been unable to keep a tray of pellets lit thus far with my setup.

A tube stays lit inside the cabinet just fine for me.

Just food for thought, pun intended.
 
Last edited:
As others have suggested in this thread there may be some things you want to try to get better airflow through the ammo can.

Don't use a damper on the side like I did.

It has been recommended that you can:
1. Use a stack on the exhaust
2. Relocate the ammo can to a shelf under the cabinet and use ductwork to pipe the smoke in.
3. Drill 6 pencil sized holes under the amnps tray.

I have been unable to keep a tray of pellets lit thus far with my setup.

A tube stays lit inside the cabinet just fine for me.

Just food for thought, pun intended.
I plan on piping the smoke in. Already have the elbows and aluminum flex pipe.

The exhaust stack is something I was wondering about. I don't have any experience with air flow as it relates to smokers.

My biggest concern is the airflow holes on the ammo can. My setup is going to sit on my wood deck, so I'm thinking that I'll need to put the ammo can on a metal pan or something. I just have visions of embers etc getting out of the can somehow.
 
  • Like
Reactions: Ringer
Yes if a ammo box or mailbox is being used on a wooden deck, I would protect the deck with a metal sheeting material, metal tray, etc. When installing holes on the bottom of the ammo or mailbox, might consider some legs on the box to help allow a good airflow to the holes on the bottom.
Here's the bottom side of my mailbox showing some wooden legs and holes in da' bottum.
D1C993D9-313E-492C-A7A7-1D4F0BCCC57B.jpeg
 
Last edited:
  • Like
Reactions: Ringer
I went ahead and made some changes.
I added a stack and patched the damper hole in the ammo can and poked 6 pencil sized holes in the bottom.

I'll post back the results when I can test
 

Attachments

  • 20211105_164817.jpg
    20211105_164817.jpg
    151.4 KB · Views: 37
  • 20211105_164847.jpg
    20211105_164847.jpg
    45.9 KB · Views: 34
  • 20211105_164912.jpg
    20211105_164912.jpg
    192.1 KB · Views: 30
  • 20211105_164758.jpg
    20211105_164758.jpg
    138.3 KB · Views: 28
Last edited:
I finally got around to this yesterday after work and oh boy did I over think this whole thing. I swear I went thru this whole thread and a few others, but looks like I missed it. Anyway, I was just about to start cutting the terminals off the wires and splice them together with some handy dandy solder splices when It dawned on me I didn't need to do that. All I had to do was unplug the two connectors from the power plug and the element and put them together, Voila, done. Plugged it in to see if it worked and we have a winner. Now onto the ammo can.


Pulled that plastic box out and removed the controller
View attachment 515484
Much neater than before. Zip tied the wires that remained.
View attachment 515486

Anyone wants this thing and the box it was in, let me know. It worked before I took it out, and I have zero use for it.
View attachment 515485
Yeah I saw yours had the clips which is nice and easy. If no clips you just cut and splice. Same result in either case :)


I went ahead and made some changes.
I added a stack and patched the damper hole in the ammo can and poked 6 pencil sized holes in the bottom.

I'll post back the results when I can test
How's it working now?
 
SmokingMeatForums.com is reader supported and as an Amazon Associate, we may earn commissions from qualifying purchases.

Latest posts

Hot Threads

Clicky