Looking for wiring assistance - MES 30 20071317

  • Some of the links on this forum allow SMF, at no cost to you, to earn a small commission when you click through and make a purchase. Let me know if you have any questions about this.
SMF is reader-supported. When you buy through links on our site, we may earn an affiliate commission.

ts383

Newbie
Original poster
Jun 8, 2018
4
0
I've got a MES 30 that is one the "hybrid" models (as identified in Bear's thread) and am looking to bypass the controller so that I can use my Auber WS-1510DPMS. Unfortunately, the wiring is a bit different than any of the examples I've seen before:

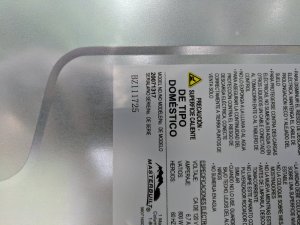
IMG_20180622_142233.jpg
Fig 1: Model # info

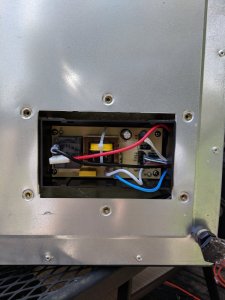
IMG_20180622_142134.jpg
Fig 2: The wiring, once the bottom panel has been removed (Bonus, this model has screws that hold the protective plate over this wiring, so no drilling out of rivets -- I think)

The awesome instructions from the MES re-wire thread don't seem to have an easy analog here, as I lack any black braided wires, and instead have a red and blue.

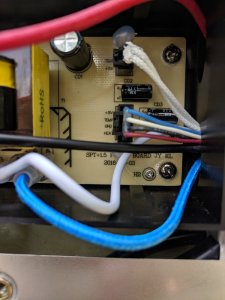
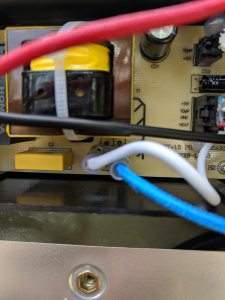
I'll attach some additional views of the wiring at the end of this post.

For those more electrically blessed than I, does anything jump out at you in regards to identifying the Plug Hot/Neutral wires, and the Limit Switch and Heading element wires?

TIA,
-Tom


Additional Pics:

IMG_20180622_142151.jpg
IMG_20180622_142145.jpg
 
The element plate and snap disk switch plates should have screws to take pics. It looks like the black wire is hot power cord going to the black relay and the braided red on the relay going to the snap disk then the element. So those two should be wire nutted together. If there is a blue wire in the element area then that would be wire nutted to the white neutral power cord. You can ohm out the wires for continuity from the the plug end to each white and black power cord ends. Then the red and blue ends to the snap disk and element ends.
 
I’ve done this exact mod. The only thing you need to do is wire nut the black and red wires that are on the relay. Super simple.
 
I’ve done this exact mod. The only thing you need to do is wire nut the black and red wires that are on the relay. Super simple.
Wow simple. I guess wire nutting blue to white is optional unless you want to eliminate those connectors.
 
Wow simple. I guess wire nutting blue to white is optional unless you want to eliminate those connectors.
If you look close at the board, the blue and white neutral are on the same terminal. Some guys even install a switch so you can have external control (Auber) or the factory MES control. My MES temp was so far off I decided to go Auber and never look back
 
dr k, you nailed it. Dry tested just by plugging in, and sure enough, the heating element kicked on w/o using the default controller.

Plugged in the Auber, and am running it through it's paces now to test the evenness of temperature.


Thanks so much!
 
If you look close at the board, the blue and white neutral are on the same terminal. Some guys even install a switch so you can have external control (Auber) or the factory MES control. My MES temp was so far off I decided to go Auber and never look back
I couldn't get much higher than 250*F with food in the smoker and 12* swings each way so I had to get a PID to get me to any temp under 300*.
 
dr k, you nailed it. Dry tested just by plugging in, and sure enough, the heating element kicked on w/o using the default controller.

Plugged in the Auber, and am running it through it's paces now to test the evenness of temperature.


Thanks so much!
In other threads I mentiond that the controller default parameters P=7, I=600 and D=150 for the WS-1510ELPM came out of full power way too soon before my set point and starts flashing as well as the auto tune since I have the open air flow of the mailbox mod/Amnps so I went to P mode in the instructions. I do P=1, D=0 and I=0 so it's full power to one degree below set temp and flashes equally for 50% at 1/2* below set point and off at set point to hold the temp to within a degree. It will over shoot a few degrees on preheat but rock steady the whole smoke. The instructions used P=7 as an example so 7* below set point is full power (7/7), then flashes at 6* below (6/7), at 5* it flashes for 71% (5/7) etc till set point is off (0/7). I and D have to be at 0 for this to work. The display is in 1* resolution but when P=1 it'll flash before the display changes the full degree. P=2 is 50% at 1* below set point but the quicker response at P=1 is my go to setting.
 
  • Like
Reactions: Nutshell
I forgot to mention I hang the sensor from the top rack so it's next to my food on the middle two racks and my Gen 1 40 has an exposed heating element from removing the chip tray/housing. I raised the water pan to the bottom rack with perf stainless steel grill topper under it that butts up against the back wall for even heating that your Hybrid Gen 1 30 should not need, being smaller. I have heard people mention putting in the two tier water pan 180* so it pushes air to the left side of the smoker.
 
run an autotune cycle on the Auber. That tunes the PID to your pit instead of using general settings.
Nothing wrong with doing all three. Now you have choices. If it wasn't for Auber sending me their parameter chart it wouldn't work well for a sou vide controller. I did all three. Out of the box, auto tune and recommendations. It just so happens recommendations works best for me to get me to the set point the fastest and holds it to the degree with sou vide and within one for the smoker.
 
SmokingMeatForums.com is reader supported and as an Amazon Associate, we may earn commissions from qualifying purchases.

Latest posts

Hot Threads

Clicky