Jammed meat grinder

  • Some of the links on this forum allow SMF, at no cost to you, to earn a small commission when you click through and make a purchase. Let me know if you have any questions about this.
SMF is reader-supported. When you buy through links on our site, we may earn an affiliate commission.

gaengshadow

Newbie
Original poster
Sep 20, 2018
5
2
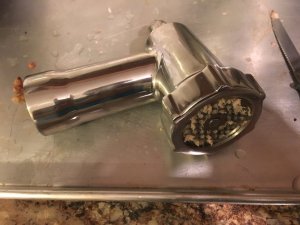
Recently purchased the stainless steel grinder from smokehouse chef for my KitchenAid. First grind (burgers) went like a dream

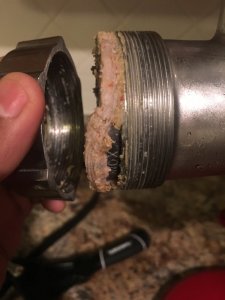
Ran into some issues grinding pork for sausage however. Maybe five minutes into the grind meat/fat started spitting out from the space between the locking ring and grinder plate. Now I can’t unscrew the ring to take the grinder apart (and getting a good grip on it has been a helluva challenge)

Anyone have any tips on how to fix this?
 

Attachments

  • 6894EA83-4FE5-4883-A85F-3EE5D634E04A.jpeg
    6894EA83-4FE5-4883-A85F-3EE5D634E04A.jpeg
    102.7 KB · Views: 192
I would use a big pair of pliers but wrap a towel around it then grip with the pliers and go from there.
 
I agree with Brian, wrap a towel around it first. It pliers don't work then you can do the same with a vice.

Chris
 
I have found when I was doing commercial grinding, that if the ring was not tight enough, it would cause that, as it is no longer cutting the sinew, and it has to go somewhere.

Did you notice the meat/fat looked smeared and pasty?

We used a big bar to tighten ours.

For smaller ones, "hand tight" may not be tight enough, and once sinew gets between the blade and plate, it will no longer work.
 
  • Like
Reactions: crazzycajun
Refrigerate the assembly then place just the nut portion in some hot water to expand the threads. works great on canning jars with stuck rings so worth a shot.

Barry.
 
A rubber strap wrench will back that right off without damaging any finish and get a much better bite all the way around just make sure the arrow is pointing in the right direction when you apply force to turn it.

Think I’m gonna see if lady love can grab a strap wrench while I’m at work so I can get this handled when I get home
 
I have found when I was doing commercial grinding, that if the ring was not tight enough, it would cause that, as it is no longer cutting the sinew, and it has to go somewhere.

Did you notice the meat/fat looked smeared and pasty?

We used a big bar to tighten ours.

For smaller ones, "hand tight" may not be tight enough, and once sinew gets between the blade and plate, it will no longer work.

So I’m curious about this. Someone on another forum suggested I tightened it too much (but I’m more inclined to believe folks here)

The meat did look smeared and pasty
 
The kitchenaid grinder I had came with a spanner wrench designed for that ring. The same tool is the plunger. This one you show is a different model, but just asking if maybe you are overlooking that you may already have a spanner wrench that came with it?

Another option to try is to reverse rotate the direction of the grinder with a wrench on the shaft. Might unload the pressure at the ring and blade.

Unfortunately this grinder only came with a thick plastic pestle shaped stamper
 
A rubber strap wrench will back that right off without damaging any finish and get a much better bite all the way around just make sure the arrow is pointing in the right direction when you apply force to turn it.

Yup - winner if the refrigerator hot water trick doesn't work.
 
Check the flatness of both your grinder plate and knife. A lot of them are not flat from the factory. If either, or even worse both surfaces are not flat, you will end up not actually cutting the meat and fat and end up smearing it.

You need a hard stable and very flat surface. A granite or similar counter top is good, and a small piece of 3/8" or thicker plate glass is perfect. Use a Sharpie pen to color in the cutting surface of both the grinder plate and the knife. Then you want some wet/dry "sandpaper" in a extra fine grit. The 1000 grit automotive wet dry silicone carbide type (black grit side) works well. Gently move the marked side of the plate in a circular motion on the cutting side of the silicone carbide paper using your stable and very flat surface as a backer for the sandpaper. The Sharpie ink should be sanded away evenly. If it is and the entire surface is bright and shiny, it's flat. Do the same for your grinder knife. The knife only needs the thin cutting edges trued.

If the two surfaces are both flat, you get the best "grinding" (actually it is a cutting) action and minimal smearing.
 
  • Like
Reactions: nanuk
You need a hard stable and very flat surface. A granite or similar counter top is good, and a small piece of 3/8" or thicker plate glass is perfect. Use a Sharpie pen to color in the cutting surface of both the grinder plate and the knife. Then you want some wet/dry "sandpaper" in a extra fine grit. The 1000 grit automotive wet dry silicone carbide type (black grit side) works well. Gently move the marked side of the plate in a circular motion on the cutting side of the silicone carbide paper using your stable and very flat surface as a backer for the sandpaper. The Sharpie ink should be sanded away evenly. If it is and the entire surface is bright and shiny, it's flat. Do the same for your grinder knife. The knife only needs the thin cutting edges trued.

If the two surfaces are both flat, you get the best "grinding" (actually it is a cutting) action and minimal smearing.

This!

Just one thing I was told, was to use a "Figure 8" motion so the torque you inadvertently apply to the metal is reversed for a more even polish, and try to apply even pressure.

if you are just going to check for flatness, you may want to just use a finger gently in the center hole to move the metal, and after just a few orbits, check with a magnifying glass to see where the marker is removed and where it isn't.
 
SmokingMeatForums.com is reader supported and as an Amazon Associate, we may earn commissions from qualifying purchases.

Latest posts

Hot Threads

Clicky