Big Chief Element to Hot Plate Element - in progress - QUESTION

  • Some of the links on this forum allow SMF, at no cost to you, to earn a small commission when you click through and make a purchase. Let me know if you have any questions about this.
SMF is reader-supported. When you buy through links on our site, we may earn an affiliate commission.

SherryT

Smoking Fanatic
Original poster
Dec 23, 2017
792
984
Crawford AL
BC-Element-Plug.jpg


BC-Presto-Elements.jpg


As I'll be controlling this using only the Auber PID, is there any reason I SHOULDN'T simply wire the hot plate to the BC cord and be done with it (in other words, eliminating the hot plate control knob/light)?

It looks like it'll work, but I don't know if changing the cord from a 2-prong to a 3-prong (which is essentially the end result if done the way I'm asking about) is an issue.

The "legs" of the hotplate element do fit through the holes in the box.

I have a box-full of the connectors (not sure what they're called...crimp-on spade connectors?) so that's covered.

Will this work?

Awaiting a reply...THANKS!
 
it Will work can’t see by the pictures the old style controller may be a infinity switch or if it’s a reostat style either way I don’t see any limit switch in the old set up
 
  • Like
Reactions: SherryT
View attachment 653694

View attachment 653695

As I'll be controlling this using only the Auber PID, is there any reason I SHOULDN'T simply wire the hot plate to the BC cord and be done with it (in other words, eliminating the hot plate control knob/light)?

It looks like it'll work, but I don't know if changing the cord from a 2-prong to a 3-prong (which is essentially the end result if done the way I'm asking about) is an issue.

The "legs" of the hotplate element do fit through the holes in the box.

I have a box-full of the connectors (not sure what they're called...crimp-on spade connectors?) so that's covered.

Will this work?

Awaiting a reply...THANKS!

You are on the right track !

You simply remove the Big Chief element and replace with the the hot plate element and that's all the installation needed!

You use the 14-16 AWG female spade connects on the 2 wires of the hot plate element in your pic and you just plug it up like the BC element was plugged up and you are done!

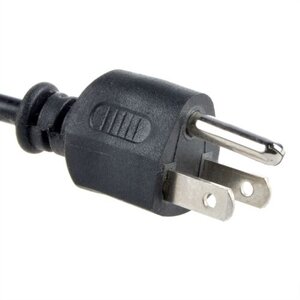
Don't worry about the ground. The BC plug has 3 prongs. The round one is the ground is that green wire with the Red end that you are NOT disconnecting. You just leave that wire in place. Here is a 3 plug prong for a full explanation for anyone reading this:
s-l500.jpg

The top round prong is the ground. In the 1st pic you have that prong will run the green wire to attach to your BC case so ground is handled.

The flat prongs are your Hot/Load wire and then your Neutral wire.
The order shouldn't matter in this case so if you swap your hot plate element exactly as-is for the BC element you are done :)

Plug it in without the PID and it should heat up UNCONTROLLED so don't leave it that way, just test it and unplug once you see it is heating up :)

Next you hook up your PID and set a temp and test it and see if it is hitting and holding temp. All should work and you are Done!

I would suggest you clip your PID temp probe on the underside of the lowest rack dead center. This will give you the fastest read and response time for your PID.

Yes the upper racks may be lower in temp but you will get the fastest and an always consistent read on the temp from the heating element because there is no food or racks or anything obstructing the heat flow like would happen if you move the PID temp probe up to another level.

I hope this info helps :)
 
So...

Skin the wires on the hot plate (blue and black wires) back about 1/4" (so that bare wire doesn't extend "into" the "spade part" of the connector)

Attach the spade connectors (the blue ones...I think)

Plug new hot plate into BC

Re-attach the green ground wire to the cabinet

Test

Yes?
 
So...

Skin the wires on the hot plate (blue and black wires) back about 1/4" (so that bare wire doesn't extend "into" the "spade part" of the connector)

Attach the spade connectors (the blue ones...I think)

Plug new hot plate into BC

Re-attach the green ground wire to the cabinet

Test

Yes?
Yep that is exactly it :)
 
  • Like
Reactions: SherryT
Installing the hot plate controller was only because I originally had no plans to use a PID. It was/is still a big improvement over the original big chief set up.

But yes, if you are planning to always use a PID on the chief, you can simply disregard the controller.
 
  • Like
Reactions: SherryT
It's done...

BC-HP-Mod.jpg


Did the initial test w/o the PID...nothing exploded :emoji_astonished:

Hooked it up to the PID, set the temp at 100F...and it promptly shot up to 141F

141.jpg


HOWEVER...it settled down to 100F after about 10 - 15 minutes and has been holding that within 1 - 2 degrees for 45 minutes.

100.jpg


So I'm guessing the big spike at first was "initial" heat-up or something along those lines?

Anyway, I ended up having to go to the hdwe for a few short sheet metal screws to fasten down the hotplate drip pan (I spent more time looking to see if I had any in the shop than it took to go to the hdwe!).

The box that encases the connections was a BEAR to get back on...and that was AFTER I had to contort my hands/fingers into pretzel-like positions just to get the ground wire re-connected without pulling EVERYTHING apart. One of the spade connectors kept coming off while all this was going on, so I had to pull it back out and replace it TWICE (if I had to do this again, I'd spend a sinful amount of money for a better set of wiring pliers!)

BUT IT'S DONE AND IT'S WORKING!

Tomorrow, I'll add the smoke sticks and put my insulation back on...I'm ENTIRELY too fried to do anything else tonight except stuff my face and watch Star Trek. :emoji_grimacing:
 
It's done...

View attachment 653738

Did the initial test w/o the PID...nothing exploded :emoji_astonished:

Hooked it up to the PID, set the temp at 100F...and it promptly shot up to 141F

View attachment 653755

HOWEVER...it settled down to 100F after about 10 - 15 minutes and has been holding that within 1 - 2 degrees for 45 minutes.

View attachment 653756

So I'm guessing the big spike at first was "initial" heat-up or something along those lines?

Anyway, I ended up having to go to the hdwe for a few short sheet metal screws to fasten down the hotplate drip pan (I spent more time looking to see if I had any in the shop than it took to go to the hdwe!).

The box that encases the connections was a BEAR to get back on...and that was AFTER I had to contort my hands/fingers into pretzel-like positions just to get the ground wire re-connected without pulling EVERYTHING apart. One of the spade connectors kept coming off while all this was going on, so I had to pull it back out and replace it TWICE (if I had to do this again, I'd spend a sinful amount of money for a better set of wiring pliers!)

BUT IT'S DONE AND IT'S WORKING!

Tomorrow, I'll add the smoke sticks and put my insulation back on...I'm ENTIRELY too fried to do anything else tonight except stuff my face and watch Star Trek. :emoji_grimacing:
Great job, u nailed it!

If you need to tune the settings a bit thats possible but honestly once you have food in there I think the initial overshoot will drop quite a bit.

If its still bad and you want to go 100F but it always shoots to 140F, you can likely set initial temp to something like 75F and the overshoot may get closer to 100F. At that point just change the set temp to 100F and it will drop back down to 100F and maintain.

Just a little trick to manage initial overshoots that takes no magic at all :D
 
  • Like
Reactions: SherryT
COMPLETELY finished...got my sausage hanging sticks in, drilled a hole on the right side for the PID probe, and got the insulation back on.

Turns out, I didn't have to attach the stick support (so far, anyway) as the "seem" to sit securely on the rack supports. If there's an issue (I won't know until I get some weight on them), I'll bolt/screw them in place.

BC-Finished.jpg


smoke-sticks.jpg
 
  • Like
Reactions: normanaj
COMPLETELY finished...got my sausage hanging sticks in, drilled a hole on the right side for the PID probe, and got the insulation back on.

Turns out, I didn't have to attach the stick support (so far, anyway) as the "seem" to sit securely on the rack supports. If there's an issue (I won't know until I get some weight on them), I'll bolt/screw them in place.

View attachment 653862

View attachment 653863

Looks like you are well on your way and can make this happen no matter what. Great work, can't wait to see some sausage smoked! :D
 
  • Like
Reactions: SherryT
Looks like you are well on your way and can make this happen no matter what. Great work, can't wait to see some sausage smoked! :D

I was going to do either the pineapple sausage (indaswamp/eric) or another batch of kabanosy now that I have some sheep casings, but then I saw Doug's Jalapeno Cheddar and that was it!

THEN I'll do the pineapple and kabanosy!

Looks like kinfolk's gonna get some goodies!
 
I was going to do either the pineapple sausage (indaswamp/eric) or another batch of kabanosy now that I have some sheep casings, but then I saw Doug's Jalapeno Cheddar and that was it!

THEN I'll do the pineapple and kabanosy!

Looks like kinfolk's gonna get some goodies!
Nice!

Nothing too crazy about a Jalapeno Cheddar.

With a new run on a smoker with a bunch of new mods, a new sausage, AND sheep skin casings you will have your hands full for sure with everything/anything that may not go as planned lol.

The Jalapeno Cheddar shouldn't be too much of a hassle though. I hope your sheep casing fight isn't too bad. Know they area lot more delicate than hog casings on top of being a pain to feed for being so small. But wow do they make an excellent sausage!

Can't wait to see the post on how it all comes out! :)
 
  • Like
Reactions: SherryT
SmokingMeatForums.com is reader supported and as an Amazon Associate, we may earn commissions from qualifying purchases.

Latest posts

Hot Threads

Clicky