jted
Smoking Fanatic
Hi, I am Jted. Last spring my MES30 died. I thought it was the snap disc. It is a heat activated switch that is normally closed. Its function is to open and cut the current flow to the element. If the box gets too hot it opens. Sort of like a breaker. Except it cannot be switched back on you replace it. It is inexpensive (.90 cents). A lot of appliances use a thermal breakers Toaster ovens, Irons, probably blow dryers. You get my drift
I decided that it might be a good time to convert the smoker over to a Auber controller.
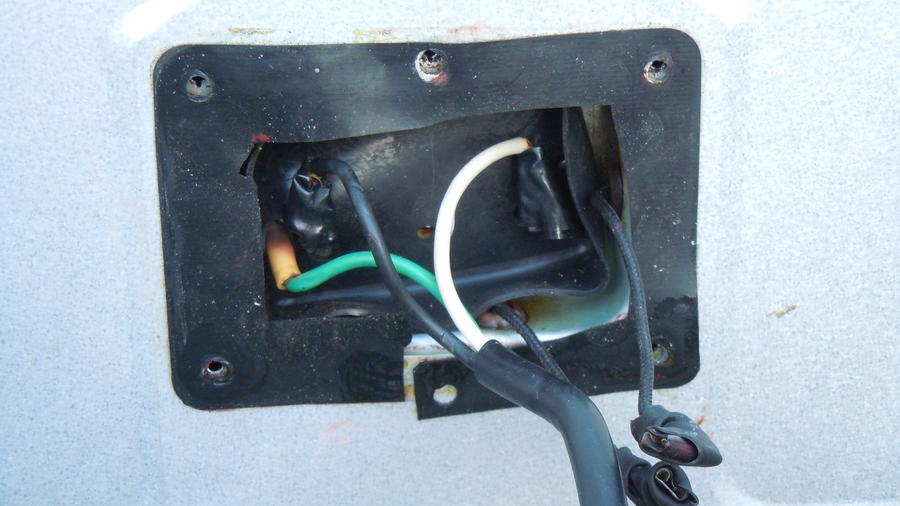
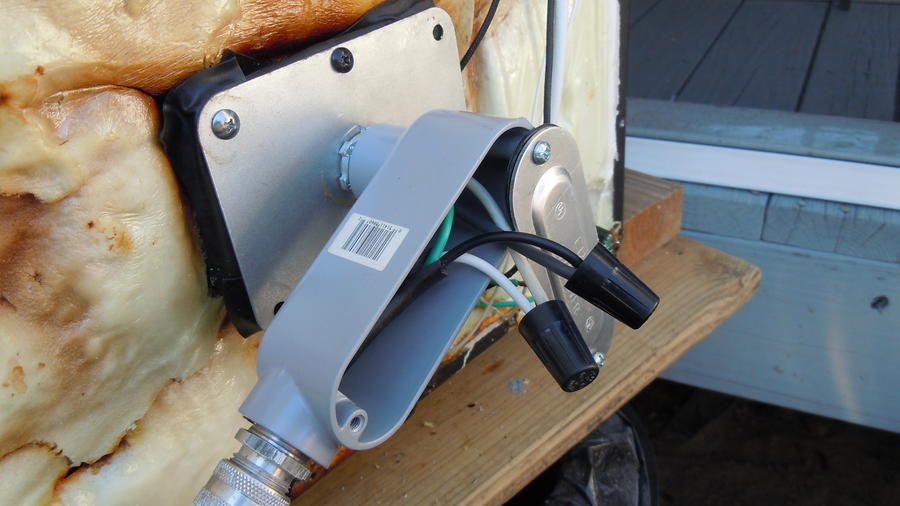
I am going to talk about the first phase of hooking up the Auber that Cue Biz explained. Basically I removed the element access plate disconnected the terminal connectors that most people have issues with. I taped them up with scotch #33 electrical tape. It's not special just good electrical tape. I tucked the wires out of the way.
I had a nice 14AGW cord that had a all weather molded male end on it. I found a strain relief. That’s a simple bushing with a rubber grommet that keeps any strain from occurring on the terminals .
I put the cord through the strain relief and slipped it through the access plate. The plate had a hole in it from where I used a hole saw to cut it open since I did not have a proper tool (knock out) The plate is thin so I attached it to a chunk of plywood to give it some strength. After running the cord through.
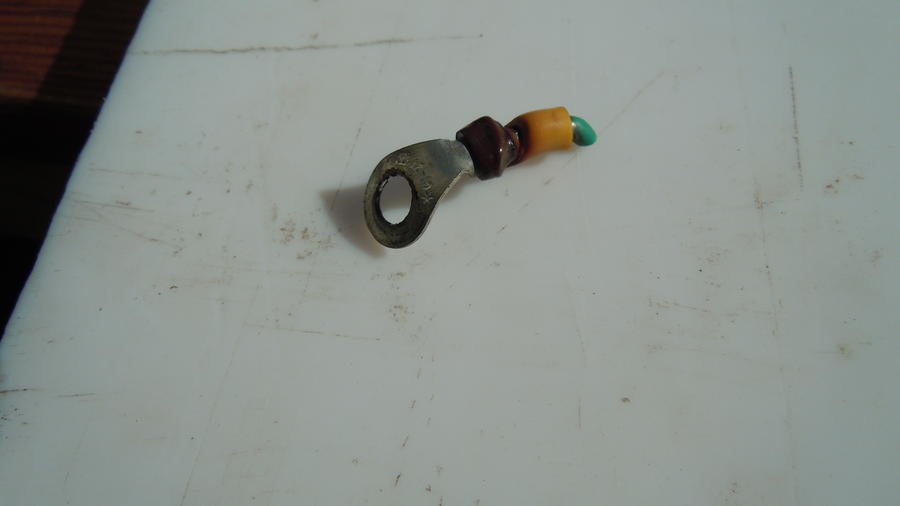
I put new High temp wire connectors on. I reattached the wires and hooked up the ground. I did not have a high temp wire ring for the ground and you can see the discoloring and melting from just one summers smoking.
Get a good high temp ground ring. Then I just put it all together and plugged it in and I was in business
.
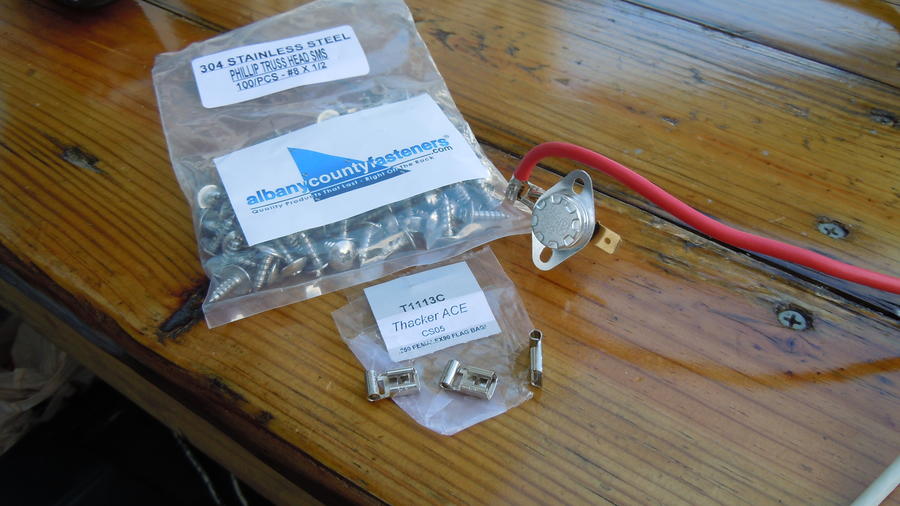
Being old and a ex electrician (I came from a what -if and why mentality) I decided I wanted a extra bit of a safety factor on the smoker in case of a malfunction of the controller. A runaway situation where the element does not shut off. The original had a Thermal safety switch on it that I thought was my original problem. I thought it would be prudent to replace the old one. I looked around for a aluminum or stainless box to install on the back but what I found were high price compared to a ¾ inch aluminum Lb. I used some reducer bushings to reduce the ends down to ½ inch. I already had my hole for the 1./2 inch bushing to attach it to the access plate and a strain relief. I wanted the size of the ¾ LB so I could make up the joints with high quality wire nuts.
I disconnected the wires and removed the back plate. Have at least 2- 1/8 bits when you start the rivet drilling process, I quickly gave up on the battery drill and dug out a good electric drill. After removing the back I could see that the over heat switch(snap disc) was hooked up to the element with one wire that I replaced the connector on. The other wire went to the control box under the smoker. I was not going to open it up so I cut the wire. I then did a continuity test to see if the switch was bad. It had resistance so that means it was still closed and good . I replaced the female connector
I made up some joints for the wire nuts and assembled the cord through the strain relief and cover.
I moved the ground away from the element area and decided to use a wire nut to attach the ground to the original ground. At about the ½ way point I lost light and My wife told me it was going to rain the next day So I could not leave any thing out. Cleanup was worse than the job.
It is drizzling out side so I will work on the post. I could not take all of the pictures because the battery needed to be charged. Just a word about wire nuts, There are several different types and I don't profess to know all of them. Besides the simple ones like you sometimes get in a package that needs to be wired. A ceiling fan comes to mind. Those you just screw on and they hold pretty good. The other uses a brass insert that allows the wires to be mechanically tighten with a screw then inserted into the plastic protector
I had several of the good ones laying around so I will use them.
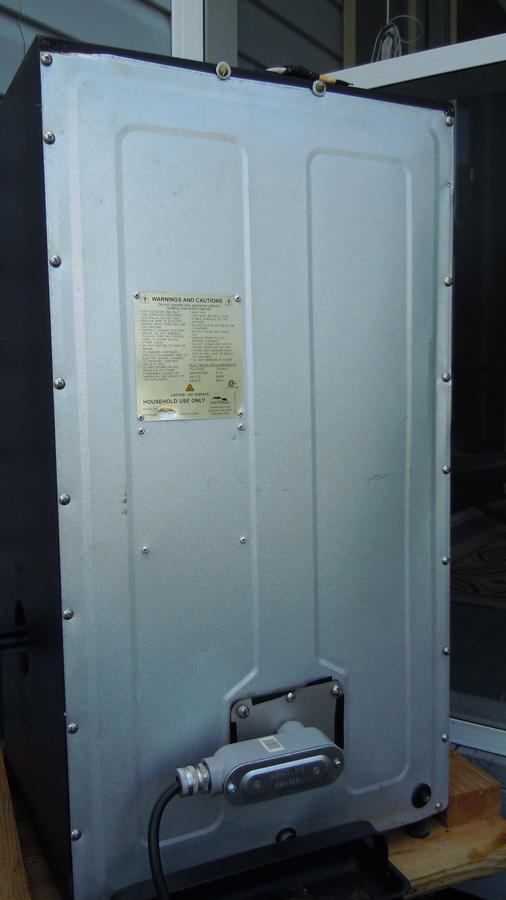
I am writing this prior to doing the work so this is what I will do. After assembling the cord in the proper order an re installing the rubber covers I will hook up the wires ground and make up any joints. The cord needs to be inserted into the back of the cover. I will install the back using the #8x1/2 inch stainless truss-head screws. (truss head screws have a slightly larger head. Sort of a built in washer).After I hooked up all of the wires, spliced the ground the final check of my work is to check the resistance.
Resistance tell you that your joints are good and that the electricity will flow through the element. First I want to check the ground . I will use a multi meter. Set it to ohms if it only has symbols it's the upside down horse shoe. Most will have a audible beep if there is resistance. Check between the Box and the ground prong on the cord. Now check between the other 2 prongs the flat ones, If it beeps you are good to go. That check checks the entire circuit from the small blade through the cord then the thermal breaker (safety switch) back to the element and all the way to the white neutral wire on the other side of the element back to the big flat blade on the cord end. If it beeps button every thing up.
You will see some black tape on the inspection box, The tape is just holding the rubber gasket in place.
Hooking it up in reverse order so to speak and the final test run it up to 275 for awhile. When I put the cover on I found I needed to put two screws and washers where the controller once was installed. That's the brass screws at the top center.
I hope this helps This and the other posts on wiring mods will help the weekend smoker keep his or her MES working well.
If by chance the worst thing happens and you have a fire then insurance inspectors show up it is important that your work is clean and done in a good manner. Jted
I decided that it might be a good time to convert the smoker over to a Auber controller.
I am going to talk about the first phase of hooking up the Auber that Cue Biz explained. Basically I removed the element access plate disconnected the terminal connectors that most people have issues with. I taped them up with scotch #33 electrical tape. It's not special just good electrical tape. I tucked the wires out of the way.
I had a nice 14AGW cord that had a all weather molded male end on it. I found a strain relief. That’s a simple bushing with a rubber grommet that keeps any strain from occurring on the terminals .
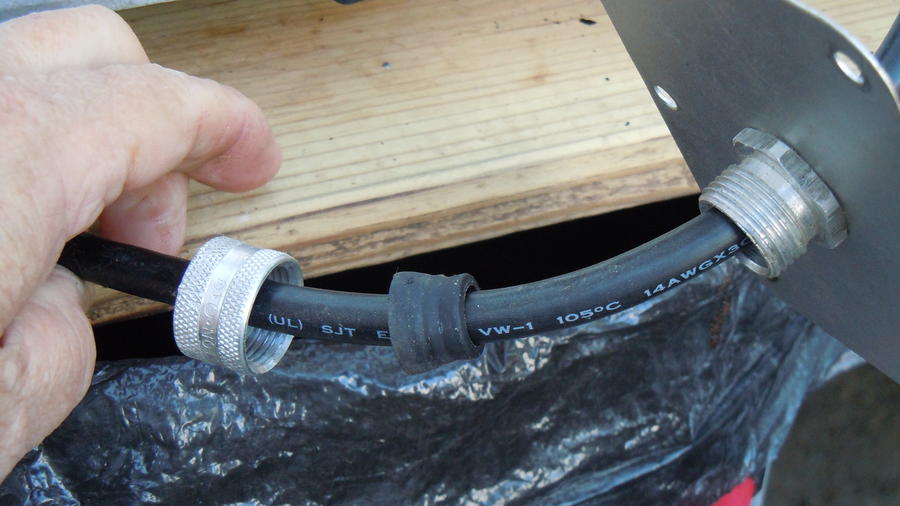
I put the cord through the strain relief and slipped it through the access plate. The plate had a hole in it from where I used a hole saw to cut it open since I did not have a proper tool (knock out) The plate is thin so I attached it to a chunk of plywood to give it some strength. After running the cord through.

I put new High temp wire connectors on. I reattached the wires and hooked up the ground. I did not have a high temp wire ring for the ground and you can see the discoloring and melting from just one summers smoking.
Get a good high temp ground ring. Then I just put it all together and plugged it in and I was in business
.
Being old and a ex electrician (I came from a what -if and why mentality) I decided I wanted a extra bit of a safety factor on the smoker in case of a malfunction of the controller. A runaway situation where the element does not shut off. The original had a Thermal safety switch on it that I thought was my original problem. I thought it would be prudent to replace the old one. I looked around for a aluminum or stainless box to install on the back but what I found were high price compared to a ¾ inch aluminum Lb. I used some reducer bushings to reduce the ends down to ½ inch. I already had my hole for the 1./2 inch bushing to attach it to the access plate and a strain relief. I wanted the size of the ¾ LB so I could make up the joints with high quality wire nuts.

I disconnected the wires and removed the back plate. Have at least 2- 1/8 bits when you start the rivet drilling process, I quickly gave up on the battery drill and dug out a good electric drill. After removing the back I could see that the over heat switch(snap disc) was hooked up to the element with one wire that I replaced the connector on. The other wire went to the control box under the smoker. I was not going to open it up so I cut the wire. I then did a continuity test to see if the switch was bad. It had resistance so that means it was still closed and good . I replaced the female connector
I made up some joints for the wire nuts and assembled the cord through the strain relief and cover.
I moved the ground away from the element area and decided to use a wire nut to attach the ground to the original ground. At about the ½ way point I lost light and My wife told me it was going to rain the next day So I could not leave any thing out. Cleanup was worse than the job.
It is drizzling out side so I will work on the post. I could not take all of the pictures because the battery needed to be charged. Just a word about wire nuts, There are several different types and I don't profess to know all of them. Besides the simple ones like you sometimes get in a package that needs to be wired. A ceiling fan comes to mind. Those you just screw on and they hold pretty good. The other uses a brass insert that allows the wires to be mechanically tighten with a screw then inserted into the plastic protector

I had several of the good ones laying around so I will use them.
I am writing this prior to doing the work so this is what I will do. After assembling the cord in the proper order an re installing the rubber covers I will hook up the wires ground and make up any joints. The cord needs to be inserted into the back of the cover. I will install the back using the #8x1/2 inch stainless truss-head screws. (truss head screws have a slightly larger head. Sort of a built in washer).After I hooked up all of the wires, spliced the ground the final check of my work is to check the resistance.
Resistance tell you that your joints are good and that the electricity will flow through the element. First I want to check the ground . I will use a multi meter. Set it to ohms if it only has symbols it's the upside down horse shoe. Most will have a audible beep if there is resistance. Check between the Box and the ground prong on the cord. Now check between the other 2 prongs the flat ones, If it beeps you are good to go. That check checks the entire circuit from the small blade through the cord then the thermal breaker (safety switch) back to the element and all the way to the white neutral wire on the other side of the element back to the big flat blade on the cord end. If it beeps button every thing up.

You will see some black tape on the inspection box, The tape is just holding the rubber gasket in place.
Hooking it up in reverse order so to speak and the final test run it up to 275 for awhile. When I put the cover on I found I needed to put two screws and washers where the controller once was installed. That's the brass screws at the top center.

I hope this helps This and the other posts on wiring mods will help the weekend smoker keep his or her MES working well.
If by chance the worst thing happens and you have a fire then insurance inspectors show up it is important that your work is clean and done in a good manner. Jted
Last edited:


