I was born and brought up in a grocery/meat store, and my dad specialized in cured and smoked hams, bacons, shoulders, corned beef, pastrami, cured and smoked chickens and turkeys, etc. in Northern New York. He developed his own brine he brought from his dad's curing and smoking on the farm. Dad used a special cure he formulated with an ingredient company with less than a ⅓, just shy of a ¼ of the curing compound used by big manufacturers and fought, and won, a battle with State/Federal Inspections to get his formulation approved and used it for over 40 years of commercial production of his cured and smoked store-made products. He used a lot less cure in his mix, giving his pork, beef, poultry, lamb, and veal products a longer time in his curing brine to tenderize the meats, yielding a mild, flavorful product not requiring soaking to remove excess salts, a blessing for the housewife! A milder cure with a longer cure time equals a mild, tender product! Whereas a commercial producer can make a ham from fresh hog leg to finished and wrapped fully cooked ham in 2-3 days, Dad's method took up to 4 weeks to produce a finished product.

The old wooden meat cooler (acceptable back in the day):

I adapted Dad's curing to common ingredients plus sodium nitrite (normally mail-order only) in two different levels - regular and lo-salt:
Pops6927's Curing Brines - Regular and Lo-Salt
By pops6927, Oct 27, 2014 | 1 Comments | 5K Views | Recipes
Tags: Add Tags

or equivalent.
Brine can become frothy (ropy). It has both salt and sugar in it. It also is inputting curing ingredients into the meat and oozing out blood and plasma. Just dump the brine and make up fresh and continue curing should that happen. Make sure you keep it at 38° - 40°.
Weigh down meat into curing brine with half-filled ziploc bags of water on top.
No further mixing or stirring required, let it cure until done. Meats will come out of the brine wish a distinct grayish look. This is normal.
Cure #1:
I use this as reference:
Computing equivalency, for 100 gallons of curing brine, you add 24 lbs. of curing salt to 100 gallons of water and mix.
That is .24 lbs, or 3.84 oz. of curing salt to 1 gallon of water maximum.
My recipe calls for 1 tablespoon of curing salt to 1 gallon of water. A level tablespoon is .88 of an ounce. Heaping is approx. 1 ounce. Either is fine. Neither comes close to the maximum amount allowed, but just enough to do the job. Curing at Maximum, plus with injection, requires 48 hours of cure time maximum. This process uses less than one third the curing salt and a longer curing time to tenderize and flavor the meat.
You must cover the product until it floats off the bottom of the container, then weight it down to stay submersed in the brine, leaving no area to be exposed to air. You must keep at 38° to 40° until curing time is over. Remove from brine, put or hang in smokehouse or smoker. I personally go from refrigeration to heat with no wait time myself. There is different thoughts, whether to allow a pellicle to form or not.
http://en.wikipedia.org/wiki/Pellicle_(cooking)
A pellicle is mainly, to my knowledge, allowed to form on fish prior to smoking. We were only 30 miles from Salmon River in Pulaski, NY, a very well known salmon run. We had many bring us their salmon to process and usually allowed a pellicle to form But, pork and beef are not tender like fish.
Today, I'm making Canadian bacon from the pork loin and buckboard bacon from the blade shoulder. I measured out my ingredients for Lo-Salt Curing Brine, 2 gallons, and stirred until clear, then I injected both the loins and the boneless shoulders so the curing brine can work from both the outside-in AND the inside-out! If the meat is 2" thick or thicker, the curing agent won't penetrate the meat before it spoils, so to be safe, I injected the curing brine before putting it down for a soak.
Once you dissolve the ingredients in water, the curing brine is thoroughly mixed and no other action is necessary. It cannot "un-dissolve" or "un-mix". No further action is necessary. Weigh down the top (half-full gallon ziploc bag of water) and place under refrigeration (to keep the meat in the curing brine) and just "Let The Magic Happen"!
Here is me bringing it out of the fridge, some photos:
With the ziploc bag on it:

Removed the ziploc bag. See how the meat floats?

The curing turns the meats a dullish gray, this is perfectly NORMAL. They will gain the pink color after smoking and heating to approved temperatures (135° minimum for partially-cooked; 145° for fully-cooked, internal).
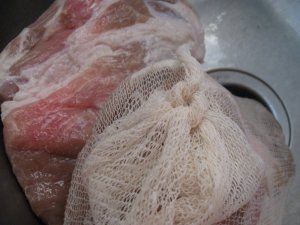
The pieces in a clean sink:

Notice the red spots on the meat? That is where the meats were touching in the curing barrel, not allowing oxygen to get to the meat. This, again, is perfectly normal and is explained in a separate thread, http://www.smokingmeatforums.com/t/...bacon-and-red-spots-on-cured-meat#post_771341, explaining the technical processes happening to the meat.
Here is the remainder of the curing brine after taking the meat out. I originally did 2 gallons of brine. The bucket shows I have 1½ gallons left, meaning the meat soaked up ½ gallon of brine, both by absorbing it through the outer surfaces and also through the injection into the meat.

Notice the curing brine is thicker. There has been an exchange done - blood and plasma from the meat is extruded into the curing brine while the curing brine is absorbed by the meat. There are bits of fat floating in the curing brine, but no adverse reactions going on. Thick brine is perfectly normal. Sometimes you may witness some bubbling going on; this is a sign that 'fermentation' is happening, usually caused by too warm a temperature during storage or unclean water or container. Always check your curing brine from time-to-time (every few days) to see what it's doing. Any bubbling, foaming, etc. going on? Just take out the meat, dump the old brine and make up new curing brine, making sure you clean the container thoroughly and use fresh, potable water. Curing brine should be kept from 36° - 38° for optimum storage while this interaction is happening.

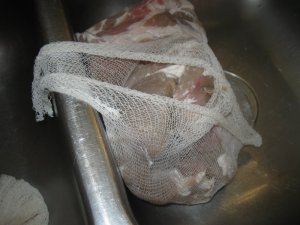
I 'sack' my product in what is called 'stockinette'. Loose, stretchy, gauzy cotton material sewn at one end and, open at the other, rolling it onto the product just like a woman puts on her nylons; gathering it up to the end, then working it up to the other end and snap it a couple times to make sure the stockinette is tight on the product. Then, cut it off with about 5" of 'tail':

Now, I'm using a smokehouse and the way the product hangs is important. You stretch the end of the stockinette 90° to the way you want the product to hang. I want it to hang so it is the skinny way:

Then, tie a SQUARE KNOT (so it won't come undone) and slip a ham hook through it!

Then, hang in the smokehouse!

I push in my multiple thermometer probes to keep watch of my temps:

This is a 6-probe therm; I use one in each of the 4 pieces and one through the door of the smokehouse to keep track of my smokehouse temp. It also communicates with my iPhone through the EasyBBQ app wirelessly, so I can see what's going on from my easy chair, too!

At 130°, 4 hours in, keeping smokehouse temp about 250° - 260°. Won't be long, another couple hours or so!
The old wooden meat cooler (acceptable back in the day):
I adapted Dad's curing to common ingredients plus sodium nitrite (normally mail-order only) in two different levels - regular and lo-salt:
Pops6927's Curing Brines - Regular and Lo-Salt
By pops6927, Oct 27, 2014 | 1 Comments | 5K Views | Recipes
Tags: Add Tags

or equivalent.
Brine can become frothy (ropy). It has both salt and sugar in it. It also is inputting curing ingredients into the meat and oozing out blood and plasma. Just dump the brine and make up fresh and continue curing should that happen. Make sure you keep it at 38° - 40°.
Weigh down meat into curing brine with half-filled ziploc bags of water on top.
No further mixing or stirring required, let it cure until done. Meats will come out of the brine wish a distinct grayish look. This is normal.
Cure #1:
I use this as reference:
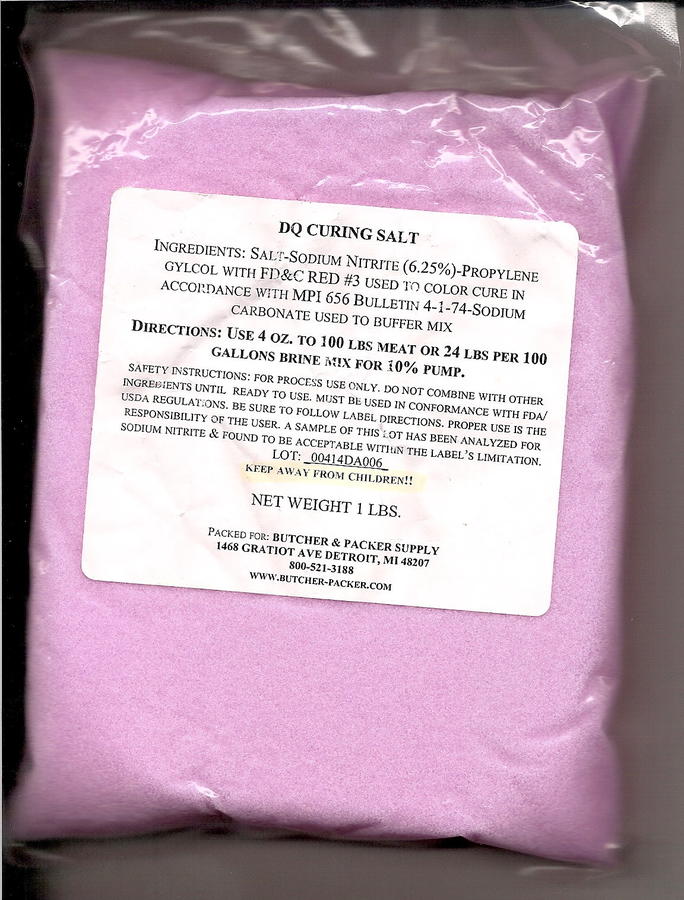
Computing equivalency, for 100 gallons of curing brine, you add 24 lbs. of curing salt to 100 gallons of water and mix.
That is .24 lbs, or 3.84 oz. of curing salt to 1 gallon of water maximum.
My recipe calls for 1 tablespoon of curing salt to 1 gallon of water. A level tablespoon is .88 of an ounce. Heaping is approx. 1 ounce. Either is fine. Neither comes close to the maximum amount allowed, but just enough to do the job. Curing at Maximum, plus with injection, requires 48 hours of cure time maximum. This process uses less than one third the curing salt and a longer curing time to tenderize and flavor the meat.
You must cover the product until it floats off the bottom of the container, then weight it down to stay submersed in the brine, leaving no area to be exposed to air. You must keep at 38° to 40° until curing time is over. Remove from brine, put or hang in smokehouse or smoker. I personally go from refrigeration to heat with no wait time myself. There is different thoughts, whether to allow a pellicle to form or not.
http://en.wikipedia.org/wiki/Pellicle_(cooking)
A pellicle is mainly, to my knowledge, allowed to form on fish prior to smoking. We were only 30 miles from Salmon River in Pulaski, NY, a very well known salmon run. We had many bring us their salmon to process and usually allowed a pellicle to form But, pork and beef are not tender like fish.
Today, I'm making Canadian bacon from the pork loin and buckboard bacon from the blade shoulder. I measured out my ingredients for Lo-Salt Curing Brine, 2 gallons, and stirred until clear, then I injected both the loins and the boneless shoulders so the curing brine can work from both the outside-in AND the inside-out! If the meat is 2" thick or thicker, the curing agent won't penetrate the meat before it spoils, so to be safe, I injected the curing brine before putting it down for a soak.
Once you dissolve the ingredients in water, the curing brine is thoroughly mixed and no other action is necessary. It cannot "un-dissolve" or "un-mix". No further action is necessary. Weigh down the top (half-full gallon ziploc bag of water) and place under refrigeration (to keep the meat in the curing brine) and just "Let The Magic Happen"!
Here is me bringing it out of the fridge, some photos:
With the ziploc bag on it:
Removed the ziploc bag. See how the meat floats?
The curing turns the meats a dullish gray, this is perfectly NORMAL. They will gain the pink color after smoking and heating to approved temperatures (135° minimum for partially-cooked; 145° for fully-cooked, internal).
The pieces in a clean sink:
Notice the red spots on the meat? That is where the meats were touching in the curing barrel, not allowing oxygen to get to the meat. This, again, is perfectly normal and is explained in a separate thread, http://www.smokingmeatforums.com/t/...bacon-and-red-spots-on-cured-meat#post_771341, explaining the technical processes happening to the meat.
Here is the remainder of the curing brine after taking the meat out. I originally did 2 gallons of brine. The bucket shows I have 1½ gallons left, meaning the meat soaked up ½ gallon of brine, both by absorbing it through the outer surfaces and also through the injection into the meat.
Notice the curing brine is thicker. There has been an exchange done - blood and plasma from the meat is extruded into the curing brine while the curing brine is absorbed by the meat. There are bits of fat floating in the curing brine, but no adverse reactions going on. Thick brine is perfectly normal. Sometimes you may witness some bubbling going on; this is a sign that 'fermentation' is happening, usually caused by too warm a temperature during storage or unclean water or container. Always check your curing brine from time-to-time (every few days) to see what it's doing. Any bubbling, foaming, etc. going on? Just take out the meat, dump the old brine and make up new curing brine, making sure you clean the container thoroughly and use fresh, potable water. Curing brine should be kept from 36° - 38° for optimum storage while this interaction is happening.
I 'sack' my product in what is called 'stockinette'. Loose, stretchy, gauzy cotton material sewn at one end and, open at the other, rolling it onto the product just like a woman puts on her nylons; gathering it up to the end, then working it up to the other end and snap it a couple times to make sure the stockinette is tight on the product. Then, cut it off with about 5" of 'tail':
Now, I'm using a smokehouse and the way the product hangs is important. You stretch the end of the stockinette 90° to the way you want the product to hang. I want it to hang so it is the skinny way:
Then, tie a SQUARE KNOT (so it won't come undone) and slip a ham hook through it!
Then, hang in the smokehouse!
I push in my multiple thermometer probes to keep watch of my temps:
This is a 6-probe therm; I use one in each of the 4 pieces and one through the door of the smokehouse to keep track of my smokehouse temp. It also communicates with my iPhone through the EasyBBQ app wirelessly, so I can see what's going on from my easy chair, too!
At 130°, 4 hours in, keeping smokehouse temp about 250° - 260°. Won't be long, another couple hours or so!