Featured Whole hog roast - 230 pound pig on homemade pit smoker

  • Some of the links on this forum allow SMF, at no cost to you, to earn a small commission when you click through and make a purchase. Let me know if you have any questions about this.
SMF is reader-supported. When you buy through links on our site, we may earn an affiliate commission.

Mizzou

Newbie
Original poster
Jul 6, 2020
4
14
I've lurked here for a while but finally decided to sign up to share my one-of-a-kind homemade pit smoker. My kids raise a few hogs each year to show at the county fair. We always get an extra pig or two in case one gets sick, dies, or doesn't put on weight fast enough to show at the fair. We always end up with more pork than we need at the end of the summer, so this year I decided I was going to do a whole hog roast with one of the extra pigs for the 4th of July. The big challenge going in was that the pig was going to be somewhere in the neighborhood of 220 to 240 pounds. I was definitely going to need a specialty smoker to handle the job.

I started this project back in early May by researching how to do a whole pig roast. There are lots of examples online of cinder block pit smokers for whole hog roasts. The general idea is that you build a box out of the concrete blocks. Charcoal goes onto the floor of the box. The pig gets suspended on a grate half way up the box, and you cover the box with plywood or tin. This seems to be the go-to method for whole hog roasts.

The problem I saw was that all of the examples I saw online were smaller pigs, typically 100 pounds or less. My concern was that with direct heat in the box with the pig, I'd get the thinner sections of the pig cooking and getting done way before the thicker hams. I decided I needed to design and build a specialty smoker with indirect heat to handle the larger pig.

EDIT: Apparently my post and photos were too long and broke the forum, so I'll add them as replies to this OP.
 
The Build:

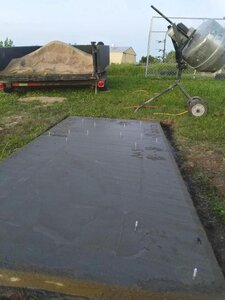
I started with a 4' X 8' slab as my base. The bolts are not structural. They're for holding the concrete forms for the walls in place. Once I got it built, I used a grinder to cut off the bolts.

OoxaKxr.jpg
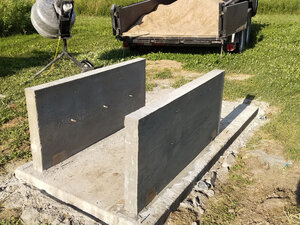
Some photos of the build in progress:
ZQT1KF9.jpg
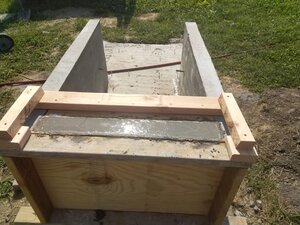
The 4 wooden blocks at the base of the side walls are to provide cleanouts of the box after I'm done smoking. I haven't removed them yet, but I will eventually when I go to clean out the smoker. I'll knock them out and hose out the smoker.
h609p2o.jpg
Starting on the firebox:
CnIUXh3.jpg
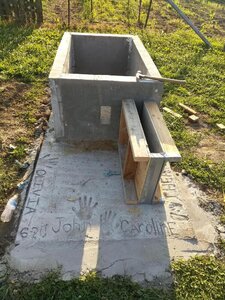
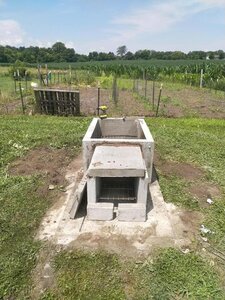
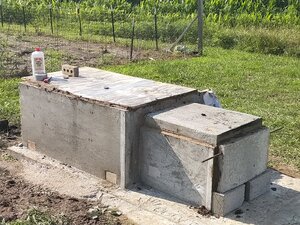
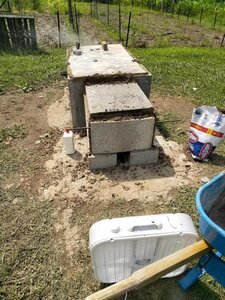
The completed project:
OeKverx.jpg
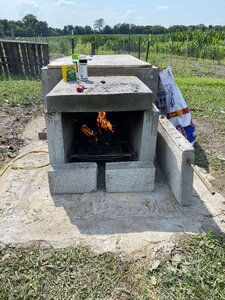
The lid to the firebox is just a slab of concrete that lays on top of the side walls. I wanted to make the smoker as efficient as possible, so I smeared mud on all the cracks to make it as airtight as possible. Fortunately we had 3" of rain the night before, and there was plenty of mud to be found. The two blocks on the ground in front of the firebox are my air intake controls. I can slide them sideways to widen the gap and give the fire more air. I started with about an inch and a half gap. 18 hours into the cook, my meat wasn't coming up to temperature fast enough, so I widened them for the last 8 hours of the smoke.
 
THE COOK:


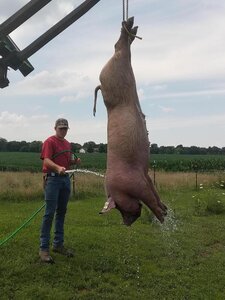
We ended up making plans for July 3 to take a family canoe/float trip. I knew I'd need 2 full days to butcher the hog and cook it, so we decided to use July 4 (Saturday) and July 5 (Sunday). Around 1:30 on Saturday we killed the pig and started to butcher it:
itKrPi1.jpg
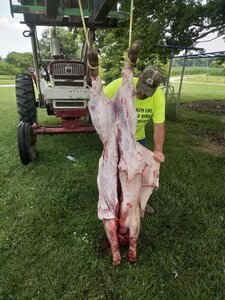
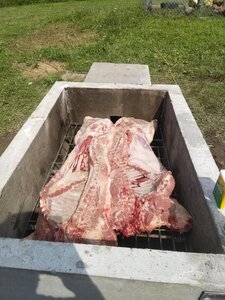
Most whole hog roasts take an approach of cooking the pig with the skin on and roasting the hog whole. I didn't want to bother with boiling and scraping the hair, so I skinned it and split it in half:
utKh0GD.jpg
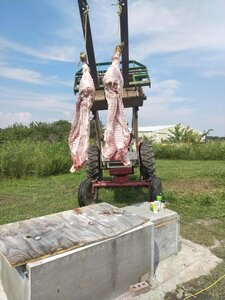
Each of the halves weighed around 80 pounds after skinning and cleaning:
ZsW4urS.jpg
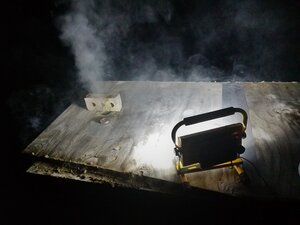
In the photo above, you can see I've got two thermometers in my plywood top to measure the temperature in the smoker. Throughout the smoke, the thermometer closer to the firebox was consistently 25 degrees warmer than the temperature at the left end farther away from the fire.

At this point we were ready to put the pig on the smoker and start cooking when I realized I hadn't prepared a rub. It was on my list of things to do, but I had completely forgotten to take care of it with everything going on. I ran into the kitchen and grabbed some salt and pepper, some garlic salt, and some season salt. It was going to have to do.
Got the pig on the smoker and the back feet cut off:
rWEsw3A.jpg
Now it's time to build a fire and start the 24 hour cook. I normally use hardwood lump charcoal for smoking. Because I was starting the charcoal in a wheelbarrow and shoveling the lit charcoal into the firebox, I went with briquettes to make the job easier. I used a total of 4 1/2 large bags of charcoal. I also had a peach tree that lost a major limb in a storm a few months ago. I threw in some chunks of peach wood with the charcoal to give it some flavor.
5mPAKGS.jpg
Once the charcoal was ready, I put the firebox door in place and sealed up all the cracks (including around the plywood) with more mud.
40Gb40U.jpg
I was worried that my homemade contraption would work. It came up to what is generally considered to be perfect smoking temperatures and held there. The thermometer at the firebox end ran at 255 degrees. The other thermometer near the vent/exhaust hole ran at 230 degrees. It held these temperatures for the first 18 hours of the cook. I had to take the firebox door block off and add more charcoal and then re-mud the door every 3 hours.

3:00 a.m. charcoal maintenance:
i5tZORI.jpg
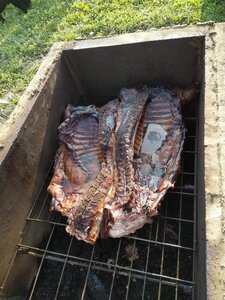
Around noon on Sunday (18 hours into the smoke), I pulled the plywood and started checking meat temperatures. At this point the hams near the firebox were at 135 degrees, and the shoulders at the cooler end of the of the smoker were at 127 degrees. Our plan was to eat at 6:00 pm, and there was no way the pig was going to be ready. I left temperature probes in the meat (one at each end), reinstalled the lid, and tried to figure out how to quickly raise the temperature. I decided to widen the air intake into the firebox and added a box fan to blow air (on low speed) into the firebox. This kicked up the temperatures inside the smoker to 350/325, and the meat started to gain 5 degrees per hour.
eSf8Tsf.jpg
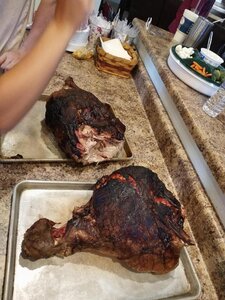
At 5:30 (25 1/2 hours into the cook), the hams near the firebox were at 180 degrees, so I cut the hams off, and we ate dinner. I was worried that they'd be dry and not have a ton of flavor. I was VERY wrong about about both concerns. The pig was dripping with juices and had great flavor. People were pulling off chunks of meat with their hands to taste constantly before we lined things up for dinner.
07NUDvx.jpg
We fed 35 people with the two hams. There was left over parts and pieces that I shredded for pulled pork (enough to fill up a gallon ziplock bag). I left the shoulder/ribs/loin portions on the smoker to cook while we ate:
i6ueOps.jpg

After we got done eating (around 9:00 pm on Sunday), I went back out to check the remaining meat. The shoulders were up to 180 degrees, and the loins were at 190. At this point I didn't have anyone else to feed and still had a lot of meat, so I went to work shredding and pulling the left over pork. I ended up with 6 gallon ziplock bags of pulled pork (maybe 50-60 pounds of shredded meat).

I learned a lot about smoking a whole pig. The next time I do this, I'll widen the air intake gaps at the beginning and get the smoker temperatures up closer to 300 degrees for the full smoke. This will probably cut the cook time down to about 18 hours.
 
Wow, what a great build and story! I almost felt as tho I were there but for the fact that I'm still hungry after looking. Big Like, I'll be looking forward to your next whole hog post! RAY
 
  • Like
Reactions: Mizzou
That is a great smoker and write up! You did not mention injection or mopping during the cook, did you do either?

I agree with you about skinning, and that in a vault pit like this halves are easier to handle than a whole hog. And actually removing all 4 legs whole is not a bad way to go either. It's so hard to control the inside loins (tenderloins) I generally remove them. The outside loins are almost always done first, so they make good snacks if your guests are there for most of the day. My grandfather would add 5 or 6 marinated chickens or some rings of sausage so there would be snacks earlier in the day... and because a handful of guys stayed up all night drinking.... uh, I mean watching the fire.

Looking at the design, am I correct in that your exhaust is in the lid and not out the rear of the box? If that's the case, consider a removable partition so you could have a smaller cooking space.... say to smoke 6 or 8 butts, or several hams or turkeys for the holidays. This would be way more efficient on charcoal. And.... Since the cost of the charcoal is sort of fixed you could give your friends a heads up on what day you are firing up the pit and do a community cook of sorts. They would drop off their meat the day before in a cooler, then pick it up the next afternoon wrapped in foil in the same cooler. A few of my friends with large smokers do this a couple of times a year. If they kick in a couple of bucks for charcoal everybody wins.
 
  • Like
Reactions: Mizzou
Awesome smoker and awesome cook! You put alot of time and work into it. Great explanation of it all too!

Awesome job!
Ryan
 
  • Like
Reactions: Mizzou
That is a great smoker and write up! You did not mention injection or mopping during the cook, did you do either?

I agree with you about skinning, and that in a vault pit like this halves are easier to handle than a whole hog. And actually removing all 4 legs whole is not a bad way to go either. It's so hard to control the inside loins (tenderloins) I generally remove them. The outside loins are almost always done first, so they make good snacks if your guests are there for most of the day. My grandfather would add 5 or 6 marinated chickens or some rings of sausage so there would be snacks earlier in the day... and because a handful of guys stayed up all night drinking.... uh, I mean watching the fire.

Looking at the design, am I correct in that your exhaust is in the lid and not out the rear of the box? If that's the case, consider a removable partition so you could have a smaller cooking space.... say to smoke 6 or 8 butts, or several hams or turkeys for the holidays. This would be way more efficient on charcoal. And.... Since the cost of the charcoal is sort of fixed you could give your friends a heads up on what day you are firing up the pit and do a community cook of sorts. They would drop off their meat the day before in a cooler, then pick it up the next afternoon wrapped in foil in the same cooler. A few of my friends with large smokers do this a couple of times a year. If they kick in a couple of bucks for charcoal everybody wins.
I didn't do any injecting or any mopping. If I do another pig and run the smoker at a higher temperature, I'll probably do injections first. With the long and low temperatures, it didn't need it.
The exhaust is in the lid. It's just a hole cut into the plywood with a hole saw. I thought I had a full sheet of thick plywood that would cover the entire smoker to use as a lid. It turned out I was wrong, so the lid I used was actually two pieces of 3/4 plywood that I pieced together. Before I do another smoke, I'll get a full sheet large enough to cover the whole smoker. The seam between the two smaller sheets leaked a lot of heat/smoke. I improvised with duct tape, but it would be definitely better to have a one-piece lid. Your idea of putting in a partition for smaller cuts of meat is a good idea. WIth the exhaust in the plywood, I could easily put additional vent holes anywhere I wanted them.
 
A great read about a great experience. Points for "going for it"!

I see that your helpers signed the slab.

Have you caught up on sleep yet?
 
SmokingMeatForums.com is reader supported and as an Amazon Associate, we may earn commissions from qualifying purchases.

Latest posts

Hot Threads

Clicky