Vintage Hobart Slicer Restoration

  • Some of the links on this forum allow SMF, at no cost to you, to earn a small commission when you click through and make a purchase. Let me know if you have any questions about this.
SMF is reader-supported. When you buy through links on our site, we may earn an affiliate commission.
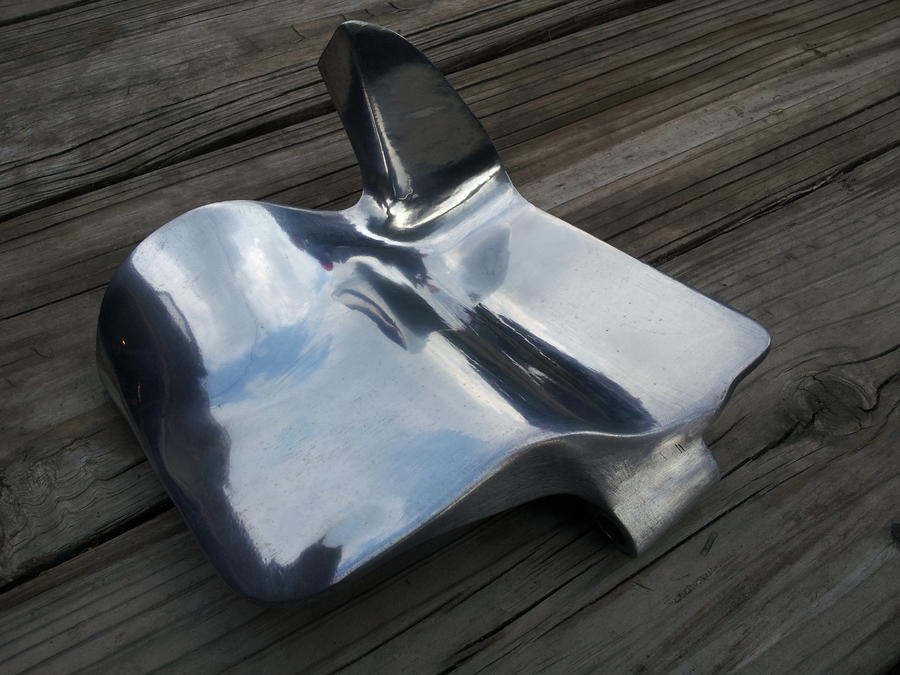
Hi Bubbonehead -I  am trying to restore a Hobart 411 as well.  Just like yours, mine is missing the piece you made so the slicer blade width can be adjusted.  I was wondering if you could send me the dimensions so I can try to copy your design - would be much appreciated.  Mine is also missing the rear blade guard -I discovered this the hard way when I grabbed the blade to move it an got a nasty cut -OUCH.  I'd like to try to fabricate one but again I got no dimensions - any help would be much appreciated - best regards dmark .   
 
That is just too cool. I've found a few modern slicers on line but they just seem too cheap and flimsy. That has Art Deco and good old American Workmanship all in one. Well done.
 
The weld around the arm is due to it having been too long originally. I had to cut a section out and weld it back together. Trial and error! 
 
I know it's been a while since you posted this but here's a belated THANKS! The breakdown helps a lot with my resto project.

Not to steal the thread but I recently bought two of these in excellent running (and aesthetic) shape, one grey and one orange, complete with sharpeners. The sharpeners are gummed up but otherwise in excellent shape. The gearboxes need fresh lube. They have only two critical issues. One slicer is missing one of the large thumbscrews that secures the sharpener. The other has the typical broken adjuster lever, as you've shown above. Someone already made a crude/ failed attempt to weld mine together and it did not hold. It's a ral mess and I'm not sure I can salvage the remaining pieces. I was thinking of making a mold and then recasting it, or 3-D modeling it an CNC'ing one, but that's a lot of work and/or expense.

If anybody that has either of these parts lying around (Ha! Ha!) I'd be interested in hearing from you. Thanks.
 
I also appreciate this thread on restoring the Hobart 411.  I have never had a slicer, but I am into vintage tool restoaration, and of course, only a vintage slicer will do!  I just got a 411 on ebay, and plan to bring it back like this unit shown here.  All seems well with the unit I received last night........but I think I have the broken indexer scenaro too, I need to check.  I am planning to bring her back in Cobalt Blue, like the color on the current Kitchen Aid mixers.  Maybe gold lettering  on the Hobart wording on the sharpener cover.  I am planning to try powder coat, I have done that in the past on restorations of other items.  I would bake the parts first to avoid any air cavity powder pop ups in the finish. I may still go the paint route, but I love the durability of powder and the fast cure with no dry time.

Thanks again for this great article. I have poured over it too.  I may try and make a mold of the part and get some cast at cattail foundary.  I am into tool restoration and our group has worked with several foudaries that do small batch parts.

Thanks again for the information here, it is invaluable...........Craig
 
OK Friends, it's been a long weekend. So many things to get done in two days.

First I started building this retaining wall so that I can get the level part of my yard closer to the woods. Now I need dirt! Some day I'll build a proper work shop out there, in the mean time no more chasing balls out into the woods.

Loaded up my 2010 Ultra Limited so I could take her to the dealership in the morning. Something weird happening with the radio speakers cutting out.
A month and a half left on the warranty, might as well let them figure it out.
Also took my eldest grandson for a bicycle ride through our little town.
He thinks I'm being cool spending time alone with him.
Truth is I really need the exercise. We have fun, wind blowing his hair (I have none), girls calling his name and waving, me sweating profusely and panting.

I did get to spend some (a bunch) of time polishing this piece. Not there yet, Man this thing has seen some use?
The bolt that it pivots on, I actually had to press out after cutting it off!
Dang! Forgot to repair the two year old's bed! He broke using it as a trampoline!

I've got a question about this piece you were working on. I'm in the middle of a complete breakdown of my recently acquired 411 and I can't seem to remove my pivot post either and I'm afraid I'm going to destroy it trying. You had to cut yours off completely? If I'm understanding that correctly, what did you replace it with?

Next question I have is, was your motor housing difficult to separate from the base? I was thinking that pivot screw must go all the way through to the base but it doesn't appear so in your other breakdown pictures. There's just the 4 bolts on the underneath side, right?

I know it's been a while since you were at this point, but any insight would be appreciated!

Also, I'll take pictures of the piece you had to fabricate once I have that all taken a part.
 
I can't tell looking at it and honestly don't remember. When I get home from work tonight I'll remove the bolt I used and see if that helps me answer your question.
 

The pivot bolt does not go all the way through into the base. I don't really remember but based on my having said that I pressed it out after cutting the head off I'd assume that it did not have threads and was pressed in originally, something not evident until it was so far apart. I suspect that I tapped the hole to accommodate this bolt. Being a long time Harley rider I have SS and chrome hardware lying around the shop and just grabbed what was handy. I do remember making this sleeve for the bolt to pass through to make up the difference in diameter between the bolt and the hole through the guard. I hope this info helps you out, Good luck!
 
Thanks for the great restoration article.  I have a 411 also I plan to restore.  I checked mine, and the pin you are describing is a shouldered and threaded specialty bolt with a screwhead, a larger smooth shaft section, and a smaller end with threads to go into the base. So basically you must have just replaced the shouldered specialty bolt with an sleeve and standard bolt to create a means to tighten and allow the deflector to pivot.

Craig
 
Ah yes, I remember now! On mine the bolt you're describing was seized in the deflector so that each time you opened it you actually threaded the bolt in and out of the body. I had to cut it off just below the deflector and then press it out of the deflector itself. Thanks for the memory jog!
 
I have a Hobart 410. My wife and I run her families guest ranch which was built in 1935. I think this unit was built in 1939. Can you give me more info on the paint you used and how it was applied. Do I need to remove all old paint?  Thanks, Bennett
 
Thanks Dave. My unit is a 411 not a 410... typo. What would be the best way to remove the old paint? Would there be any issues with leaving the aluminum bare? Especially from a  sanitary and cleaning point of view. I am more concerned about sanitation and toxicity rather then appearance as I plan to use the slicer. Thanks for your thoughts. Bennett
 
Rustoleum paint stripper...  


If you paint the slicer,  a zinc chromate or etching primer is a must on aluminum...   regular paint / primer will not work...  


Then I would use a quality automotive high gloss or marine high gloss for a top coat..    Maybe an appliance enamel...    any quality top coat would be food safe for the slicer...

If you leave the aluminum bare, when you touch it, it will leave a black residue on your hands or foods that is "aluminum oxidized"..   it oxidizes instantly upon air contact... 
 
icon14.gif
 
SmokingMeatForums.com is reader supported and as an Amazon Associate, we may earn commissions from qualifying purchases.

Latest posts

Hot Threads

Clicky