Starting my first Reverse Flow Build

  • Some of the links on this forum allow SMF, at no cost to you, to earn a small commission when you click through and make a purchase. Let me know if you have any questions about this.
SmokingMeatForums.com is reader supported and as an Amazon Associate, we may earn commissions from qualifying purchases.
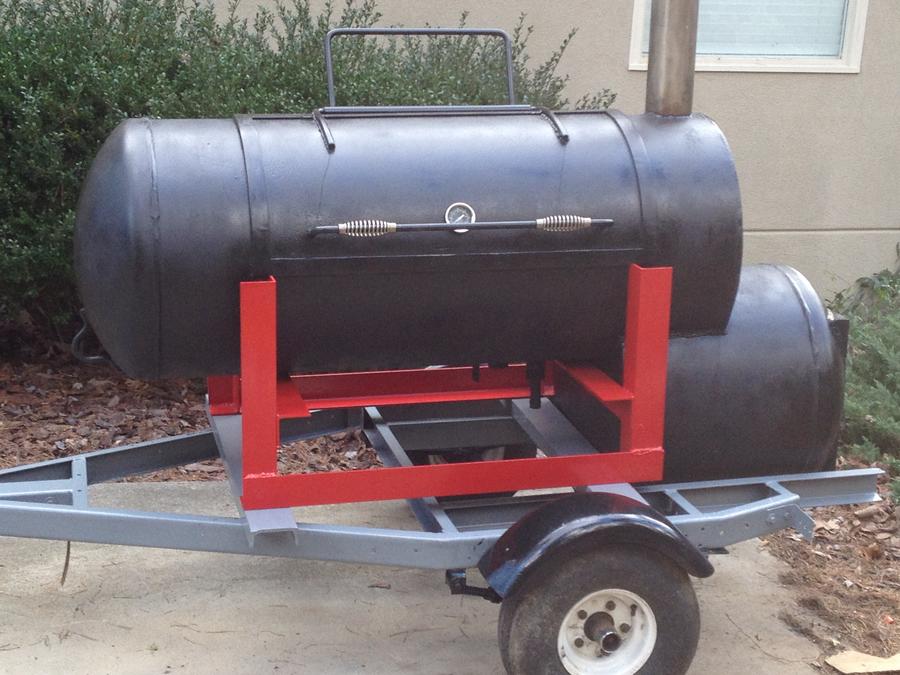
I think it probably would help to even it out if you cut a hole or two at the top grate level. Also would probably work to put the bottom of the stack closer to between the two grates. For now I am going to leave it like it is. Like I said before, I am not sure but what I might like it this way. A hot spot is not necessarily a bad thing as long as you remember it is there.
 
Had a little time yesterday and could not wait in any longer to try this new smoker out. It was really a little early in the process since I don't have all the final handles and air flow control levers installed but I have been waiting a long time and the need for Q out weighed the added difficulties of dealing with hot handles or no handles in some places.  I found that a hammer will knock a sliding vent open without a handle and the claw end will work to pull it back to close down some if needed.  I ended up cooking 2 - 8 pound Boston Butts and 3 racks of Baby Back ribs.  Q-Views follow:

Here we are all loaded up on the lower rack.  Took the top rack out for this

cook but could have loaded up a lot more on the single rack if need be.


Heres a q-view or two of one of the Boston Butts.  It was really

good and there will be some for days ahead.  I love how the bone

just falls out.


Did not really get a good pic of the ribs for some reason.  It

could be because they were gone in about 2 minutes from the

time they hit the table.  I must say they were probably the best

ribs I have ever had.  They were literally "fall of the bone and Melt

in your mouth tender".


This is what the ribs looked like literally just a few minutes later.


All in all it was a very sucessful smoke.  The smoker performed well.  It was very easy to control heat wise and was not the fuel hog that I know many big units can be.  I really think the firebox tucked up under the cook chamber is the way to go.  Oh! One more hugh thing.  The Maverick ET-732 wireless Thermometer is the best thing since sliced bread.  To be able to set alarms for low or high heat levels in the cook chamber and walk off and leave it for a little while was wonderful.  Not that I don't want to stay out there with it but it was nice to be able to come inside and mix up some baked beans and other stuff knowing that all was well with a quick glance at the remote.  The weather looks good for the next few days so hopefully I will finish up those handles and get some paint on this thing finally. 
 
Looks Great.

Hey I done the same thing, I had quite a few break in smokes on my Reverse Flow before finishing the smoker. It's all part of the fun
 
Thanks Michael and SQWIB for the kind words.  I got my handles all fabricated and attached today.  Got that ugly rust all brushed down and a coat of OSPHO on this afternoon.  Plan on getting a coat of paint on tomorrow afternoon.  Second coat will have to wait til later in the week since the weather man says around 2 inches of rain on Wednesday.  Got to start working on the trailer now.  Have some minor mods to make to it and a little rust to deal with before it gets a coat of paint.   Joe
 
Nice looking Q. Can't wait to start turning that out with mine. Make sure you post pics of the new paint job. I'm sure you will be glad to see the rust color gone.
 
Last edited:
SmokinBuckeye, From looking at your build it looks like you could cook anytime now just to see how she works.  Go ahead and scratch the itch. Joe
 
The rust is finally gone on this smoker.  I was beginning to think there was not going to be any metal left on it by the time I was able to get a coat of paint on it. 

Here we are yesterday with a coat of Ospho on it. 


Here are a few pics after the first coat of paint.  Sure looks a lot better than what I have been looking at.  A few more details to work on such as shelves, a stop for the cook chamber door, etc.


Now I will have to start work on the trailer for this bad boy.
 
It's amazing how much dirrerence a coat of paint makes. That looks good. I like the stack unpainted too. I have used one of those polishing balls that goes in a drill and some liquid polish to shine up some aluminum. You might be able to do the same for that stainless if you want to make it stand out more.

It may have been posted and I missed it, but what paint did you go with?
 
Last edited:
Rasimmo,
I ended up going with the 2000 degree Rustoleum in the rattle cans. Could not find it locally in quarts. Used the flat rather than the gloss primarily because of the roughness of the tank and I didn't think the gloss would look good on that rough surface. Fired it up for a little last night to cure out the paint. Will have to wait on another coat for awhile as the weather is turning nasty today. Currently under Tornado watch expecting a couple inches of rain today.
 
Been working on the trailer for this bad boy and finishing up a few other details. 


Had to make a few little changes to the trailer.


Added the sled I built for it to sit on so I can slide it forward or

backward to get the tongue weight right.


The problem now is how do I get the tank lifted and set on the

trailer in position.


Neighbors are a great thing to have.  Especially ones that have

every toy  and tool known to exist in both the modern and old

world.  Thanks Don.


And here she sits at the end of the day.  Still got some more

stuff to add to the trailer but I am really close now.  Going to

add some shelves, storage, fryer, wood box, etc.
 
Joe, evening.... that looks great.... nice job..... I like the sled idea for adjusting the weight on the trailer....  

Dave
 
Joe, evening.... that looks great.... nice job..... I like the sled idea for adjusting the weight on the trailer....  

Dave
Thanks Dave for all your help and advice.  I think the sled idea really came from your comments I read in another post where you suggested something similar to another member to help get the weight distribution right.  Right now it is all just sitting on the trailer.  Going to finish up adding the other stuff I want in front of the axle before I decide on the final position.  Joe
 
Starting an all nighter. Fired up the RF smoker at 9:30pm. Brisket was put on at 10:45pm. Temp in NW Georgia was at 35 degrees and snow flurries. Smoker at 230 degrees and holding steady.

Here is the 12 lb Brisket ready to go in the smoker.


The fire is hot and ready!


Those are a few snow flurries in the lights not bugs.


We will keep you up to date as the smoke continues. Will be adding

6 racks of ribs to the mix in the morning.
 
Ribs went on about 8:00am this morning.  forgot to take a pic early.  They were foiled about 10:20am and should come out of the foil around 12:30 or so.  I will try to remember to take a pic then.  the Briskit is coming out in the next few minutes for a rest.  Looks like it will finish up in about 13 and 1/2 hours.  Here is a pick of it before getting foiled up and put in the cooler for a nap.

 
SmokingMeatForums.com is reader supported and as an Amazon Associate, we may earn commissions from qualifying purchases.
Great deal on LEM Grinders!

Latest posts

Hot Threads

Clicky