tucson bbq fan
Smoking Fanatic
I was asked by some folks to put together a post on an above-ground box oven I have built many times to cook whole pigs - here goes!
A friend of mine taught me this way to cook whole critters back in Pittsburgh, PA over 20 years ago. I’ve cooked dozens since then and built (and re-built) this oven several times. The oven is an above-ground pit, essentially a giant box oven, with a wood frame and uses the aluminum-sided house insulation sheets to contain the heat. The insulation sheets last for one use and then are discarded and replaced for the next use. The one danger is if you get open flames on the siding – it will catch fire and your box oven will burn to the ground (it happened to me once), so you have to keep the heat as coals and be prepared to douse any fat flare-ups.
I've cooked pigs up to 140 lbs. dressed weight on this. Much larger than that requires a longer box, and heaver duty spit. I have cooked whole lambs as well as pigs in this.
The beauty of it is that it is simple to make, relatively cheap, and easy to store and put together.
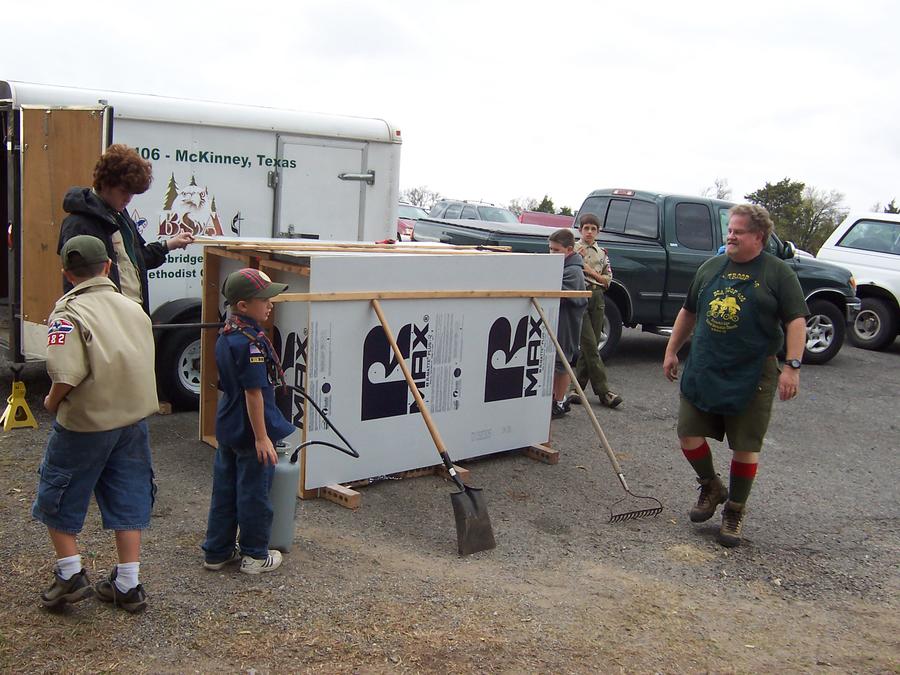
Here is the oven, fully assembled and in operation
I use an 8-9 foot, 1-inch diameter, iron gas pipe for the spit – that was strong enough to hold up to a 140 lb pig without bending. I would drill several quarter inch holes (burr them out slightly bigger than ¼ inch) through the pipe every foot or so in the middle 5 feet of the pole. I get some ¼ inch threaded rod and cut it into 12 inch to 14 inch segments. These are to hold the pig on the spit. I make a small cut in the skin, feed the rod through the pig, through the hole in the spit, and then out the other side. I use some reasonably heavy duty steel wire to hold the pig to the cross pieces. This all allows you to rotate the spit and not have the pig just slip around on the spit.
Side Frame construction there are two sides.
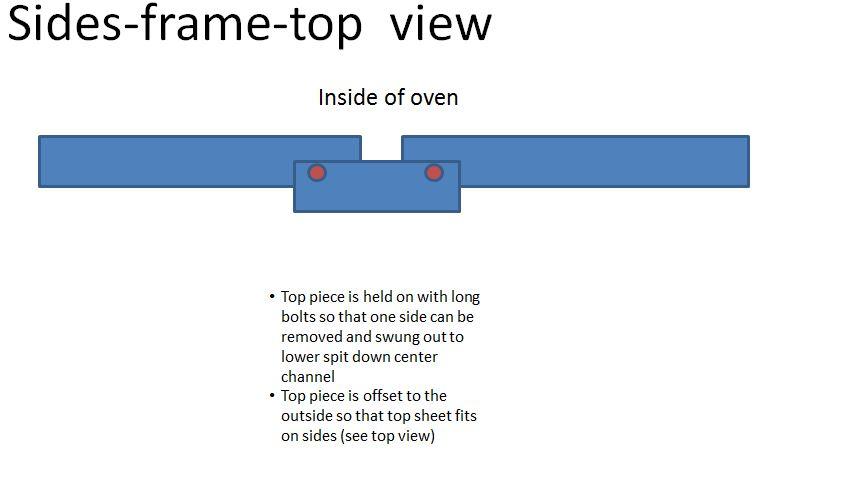
The holes in the center are for a large 12-inch spike. One on either side to hold the spit up. Having multiple holes allows me to raise and lower the spit as needed.
top view of the sides
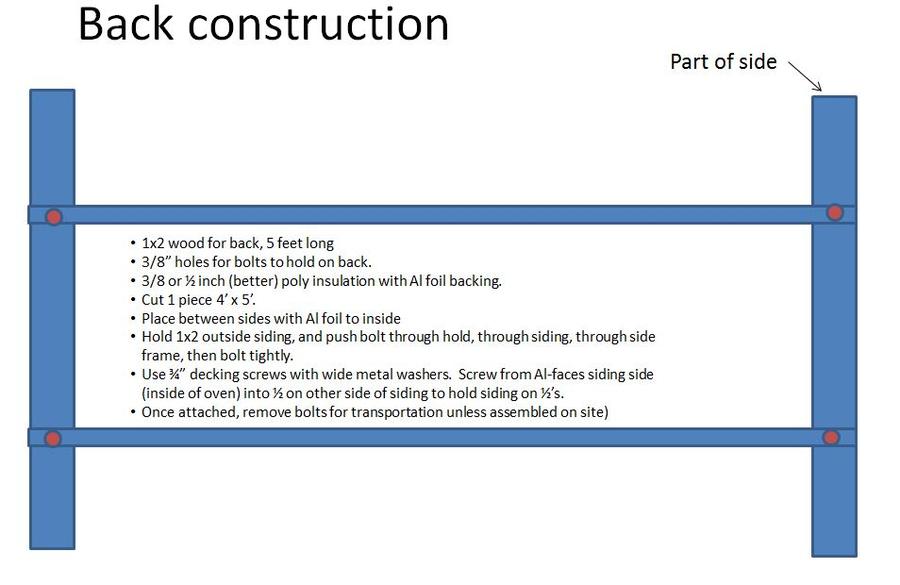
Back construction
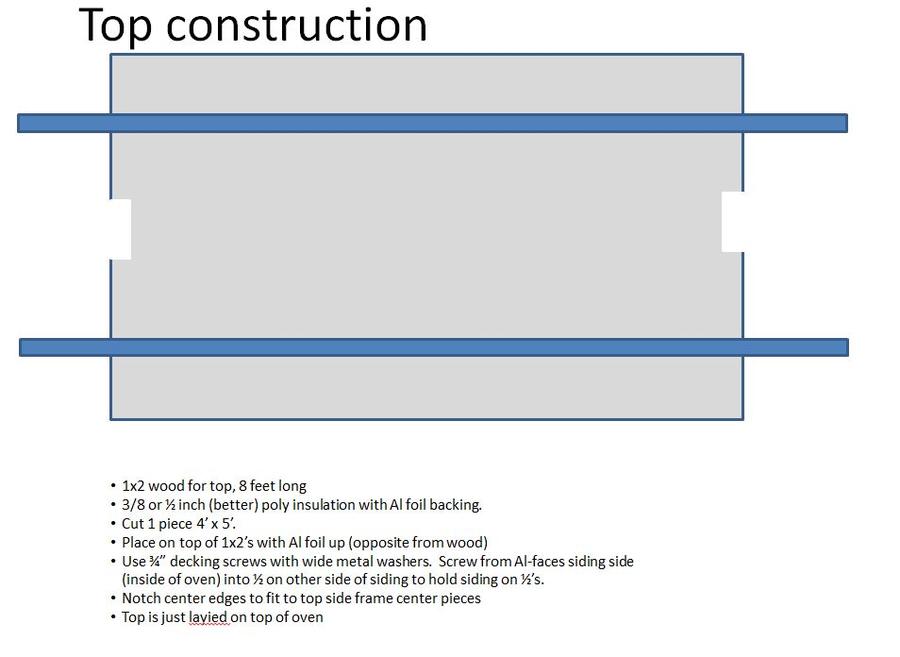
top - the top is just a sheet of insulation with a couple of 1x2's to hold it
Front - the front is very similar to the top - slightly different dimensions
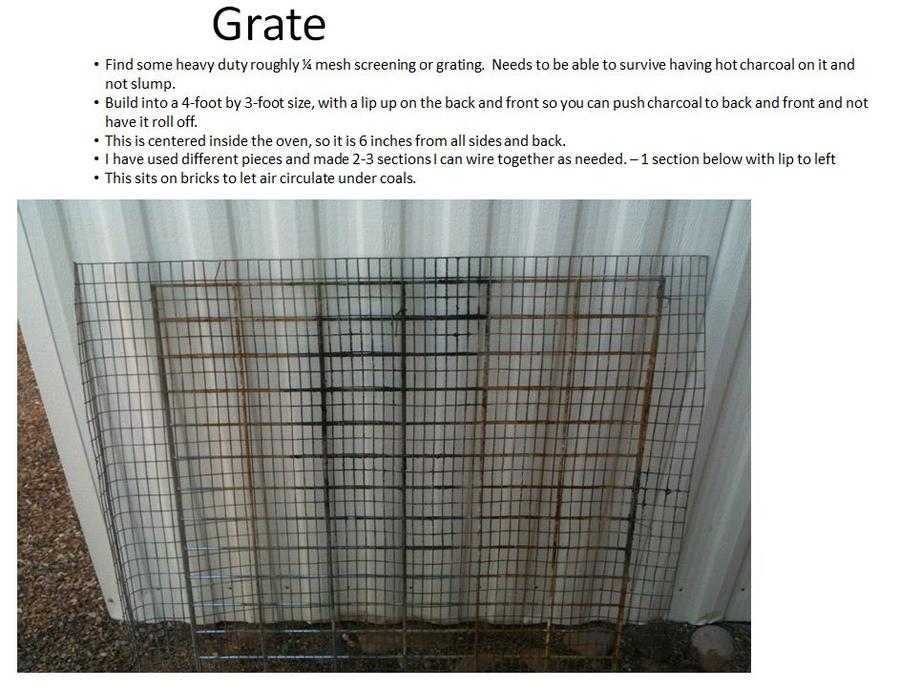
Last - the grate
Open assembled view
You can see the rods holding the pig on the spit and the wire if you look closely. This is a 100 lb. dressed weight pig.
The bricks in front are for the front section. If I wanted a hotter fire, I would put the bottom of the front on top of the bricks - to get air flowing in. To cool the fire, pull the bricks out and drop the front to the ground - cutting off the air.
I don't have a good photo of the turning mechanism. I used a 12-14 inch plumbers monkey wrench. I would slide a long nail through the end of the handle, get a grip on the spit, rotate to the right position, and use the nail against the vertical pieces of wood on the sides to hold the spit at the right position. The pig is heavier on one side of the spit, and always wants to rotate that side down.
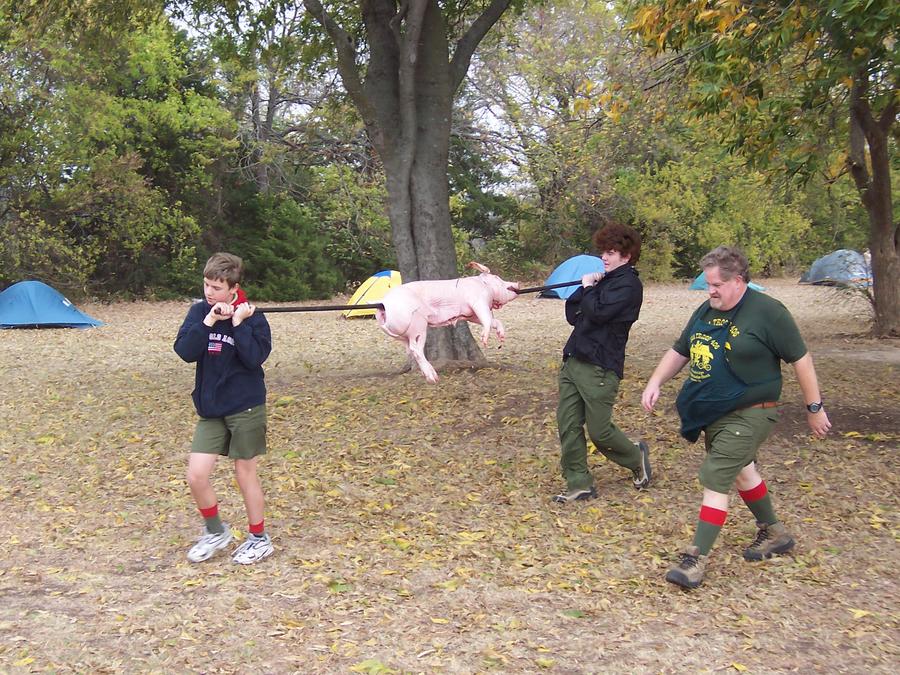
spitting the pig - our scouts always loved this when I cooked a whole pig.
off to the oven - I tied the legs up after I got it to the oven in this case.
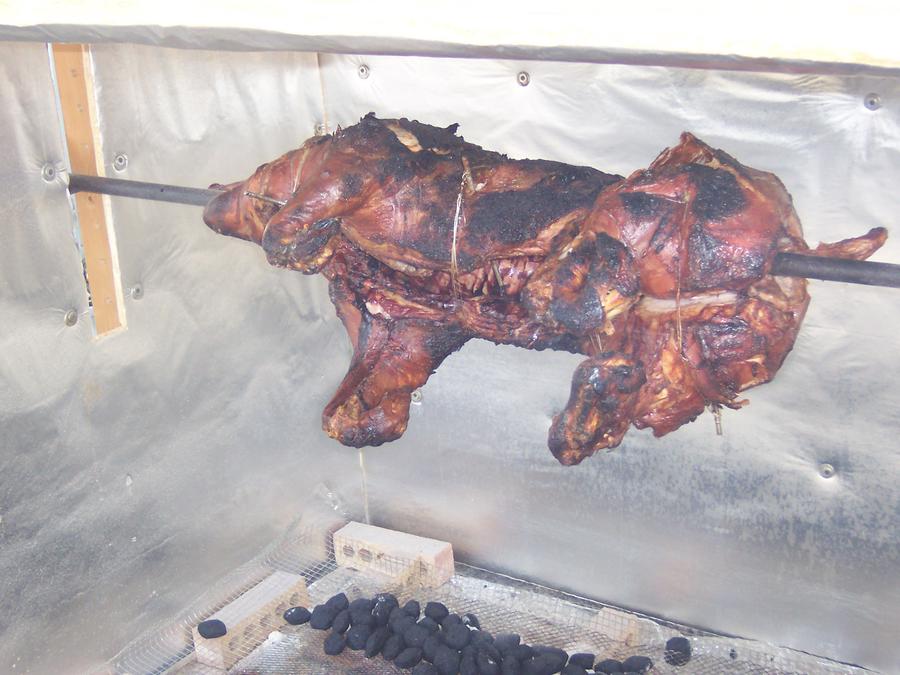
The finished product
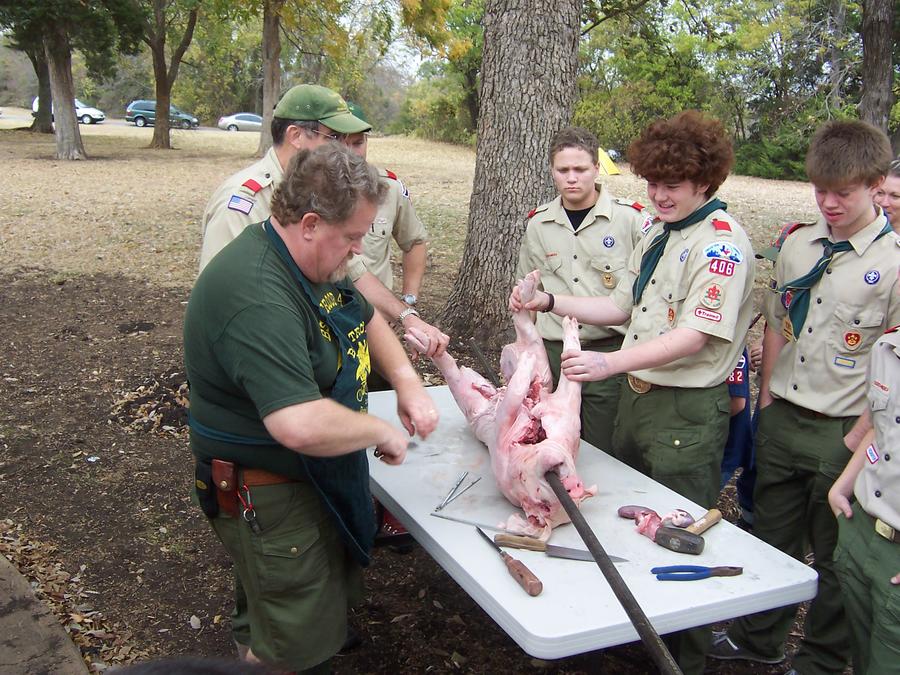
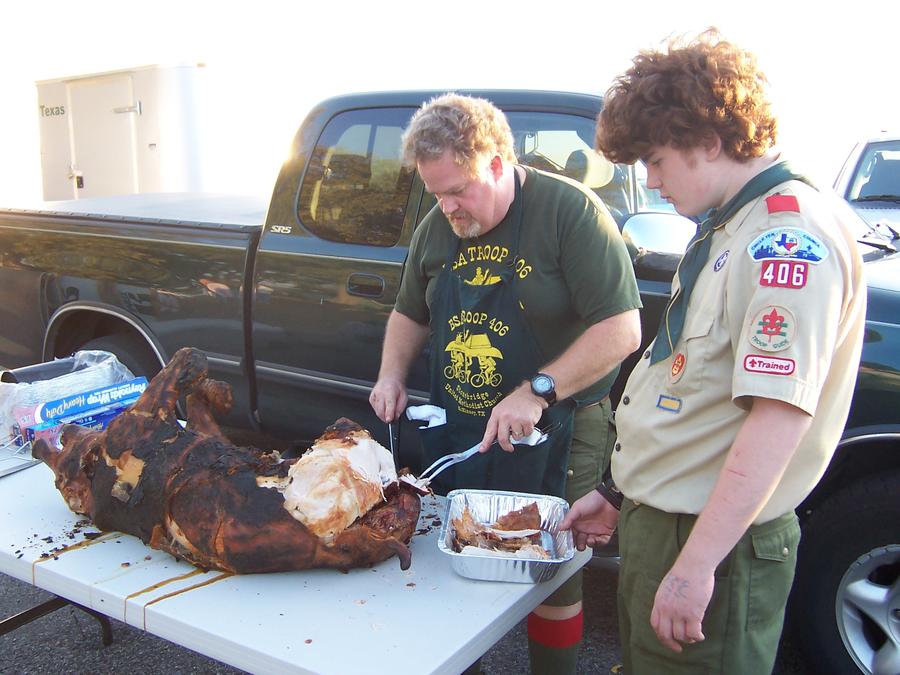
Remove and pull the spit out and start carving
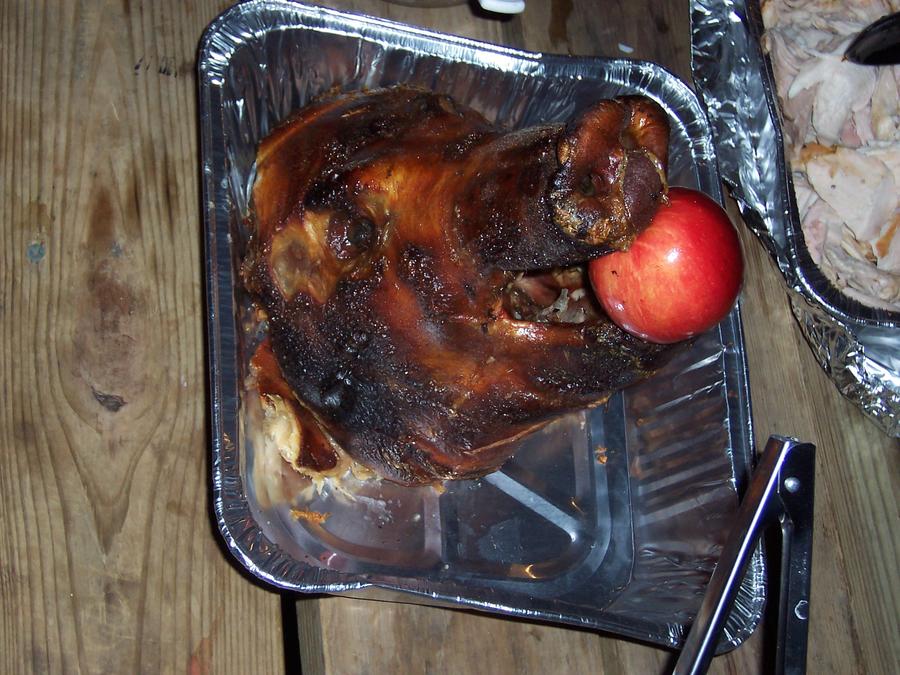
The scouts always like the head as a table ornament - boys will be boys!
Instructions
Pig Prep
1. Pull the pig out of the cooler 2 hours ahead of when you want to start it – more if it is cold. You want the pig to warm up a bit before you put it on the oven – or it takes longer and may cook unevenly. Cover it with foil or a tarp if there are flies, or station a few young scouts to fan it to keep the flies off.
2. Insert the spit from the rear end and align the throat to get it heading up the throat and out the mouth.
3. Use a large heavy screwdriver or other pry bar to get the mouth open and push the tongue down so the spit comes over the tongue and out the mouth. It helps to have a small hand sledge to pound the spit through the throat and mouth.
4. Rotate the pipe so that your holes are pointing to the sides of the pig. Use a knife to cut a small slit in the skin on one side, insert the cross brace and hammer down to the spit. Line up with the holes, and push through the spit, and hammer down till you see the cross brace pushing the skin up on the other side. Use a knife to make another slit in the skin to let the cross brace come through.
5. Get even amounts of the cross brace showing on either side of the pig. Tightly wrap one end of wire around one end of the cross brace (pliers help), then tightly wrap wire around pig to other side of the cross brace, wrap 2 loops around the cross brace, then around the rest of the pig to the first side and wrap the wire to the cross brace again. Usually I used two complete loops around the pig.
6. I try to put a cross brace through the shoulder area, the middle, and the hind quarters to firmly hold the pig on the spit.
7. I sometimes do a few wraps of wire around the middle open cavity to hold it together as well.
Cooking Prep
1. Start your charcoal on the grate with the oven removed. (note – I usually start the fire, then spit the pig while it is getting going)
2. Once the charcoal is showing enough grey, use a rake or shovel to split the pile so that one side is to the back of the grate and one to the front – leaving the middle with no charcoal – the pig will be over the middle.
3. Don’t use too much charcoal – each side should be roughly an 8inch spread that is 2-3 inches high.
4. Move the oven back around the grate when there are no more flames.
Cooking
1. ¼ turn every 15 minutes.
2. Keep an eye on the charcoal. When it gets very low – but you still have coals, add some charcoal from the front and spread it to the front and back.
3. Watch for fat flare-ups. Open flame on the oven sides will ignite the oven. I keep a hand pump yard sprayer that has a metal tip wand full of water and tighten the nozzle to a stream, not a mist. When I see flames getting big from fat drippings, I squirt them through the sides of the oven to knock them down. Be careful you don’t drown your fire!
4. 80 lb pig takes 4-5 hrs 5. 100 lb pig takes 5-6 hours
6. Use a meat thermometer into the hams and shoulders to check temperature for when to pull it out. 160 s a good temp to pull up from the heat. If you spread out the coals at that time and reduce them to a small amount ( use spray bottle to kill some coals if you have too many), you can keep it warm if you finish early.
7. The middle gets done sooner than the shoulders and hams. You can try angling the spit – head down or tail down for an hour each to accelerate cooking of the ends, or just let the middle get over cooked.
8. Adjust the height as needed – keep it at least 12-18 inches above the coals, higher if it starts to burn the skin too much. Ideally the skin is a dark brown with some black. If it gets too black the meat right under the skin is going to get too dried out.
9. If the fire is too cold, lift the front of the oven on top of the two bricks in front of the oven to feed air to the fire. If too hot, drop the front to the ground and the bricks hold it tight to the oven.
Carving
1. I use a heavy cleaver and plastic hand sledge to section the pig. You put the cleaver where you want to cut, and pound the back of the cleaver with the plastic hammer till it is all the way through the bones.
2. Cut the heat off and get it out of the way – it can be a centerpiece.
3. Pull skin off as you go – put that in a separate foil tray and guard it from marauding snackers who will steal it all while your back is turned. Remember, you are the one holding the big knives…
4. Take out the loins along both sides of the spine – those are special and really tasty – the best meat in the animal.
5. Cut the hind quarters from the middle, then split the hindquarters along the spine.
6. Cut the shoulders from the spine and split them along the spine.
7. Slice and chop – discarding really fatty sections.
8. The steam trays, covered with Al foil can be put back in the oven to keep warm till serving time.
9. Plan on a minimum of 30 minutes to butcher the pig – probably more the first time you do it.
Pig sizes: - rough estimates
75 lbs. dressed - 30 lbs. cooked pork
100 lbs. dressed - 40 lbs. cooked pork
125 lbs. dressed - 50 lbs cooked pork
Usually we did these as part of a family feast - lots of side dishes and some other meats (fried turkeys, you name it). I usually planned on 1/3 lb. to 1/2 lb. of cooked meat per person on average.
Supplies
1. Pig Oven
2. Spit
3. Cross braces – 3-4
4. wire
5. Grate
6. Enough bricks to keep grate off ground – I use 24 –5 rows of 4 bricks, plus three for the front of the oven.
7. Long handled flat end shovel
8. Long handled metal rake (short tine)
9. Plumbers monkey wrench
10. 8-in threaded bolt that fits through the handle of the plumbers wrench
11. 1 lb of charcoal per lb of pig.
12. Two big nails to hold the spit up in the oven
13. Linesman pliers for wire wrapping and unwrapping.
14. Hammer
15. Hand sledge
16. Landscape sprayer full of water.
17. Scoutmaster magic elixir to start fire
18. Table for prep & butchering
19. Heavy duty Al foil
20. Al foil ½ steam trays to put cut meat in
21. Heavy cleaver and plastic hand sledge
22. Good sharp knife and carving fork.
23. Latex gloves
24. Large trash can with heavy duty plastic liners for carcass and scraps.
A friend of mine taught me this way to cook whole critters back in Pittsburgh, PA over 20 years ago. I’ve cooked dozens since then and built (and re-built) this oven several times. The oven is an above-ground pit, essentially a giant box oven, with a wood frame and uses the aluminum-sided house insulation sheets to contain the heat. The insulation sheets last for one use and then are discarded and replaced for the next use. The one danger is if you get open flames on the siding – it will catch fire and your box oven will burn to the ground (it happened to me once), so you have to keep the heat as coals and be prepared to douse any fat flare-ups.
I've cooked pigs up to 140 lbs. dressed weight on this. Much larger than that requires a longer box, and heaver duty spit. I have cooked whole lambs as well as pigs in this.
The beauty of it is that it is simple to make, relatively cheap, and easy to store and put together.
Here is the oven, fully assembled and in operation
I use an 8-9 foot, 1-inch diameter, iron gas pipe for the spit – that was strong enough to hold up to a 140 lb pig without bending. I would drill several quarter inch holes (burr them out slightly bigger than ¼ inch) through the pipe every foot or so in the middle 5 feet of the pole. I get some ¼ inch threaded rod and cut it into 12 inch to 14 inch segments. These are to hold the pig on the spit. I make a small cut in the skin, feed the rod through the pig, through the hole in the spit, and then out the other side. I use some reasonably heavy duty steel wire to hold the pig to the cross pieces. This all allows you to rotate the spit and not have the pig just slip around on the spit.
Side Frame construction there are two sides.

The holes in the center are for a large 12-inch spike. One on either side to hold the spit up. Having multiple holes allows me to raise and lower the spit as needed.
top view of the sides
Back construction
top - the top is just a sheet of insulation with a couple of 1x2's to hold it
Front - the front is very similar to the top - slightly different dimensions

Last - the grate
Open assembled view
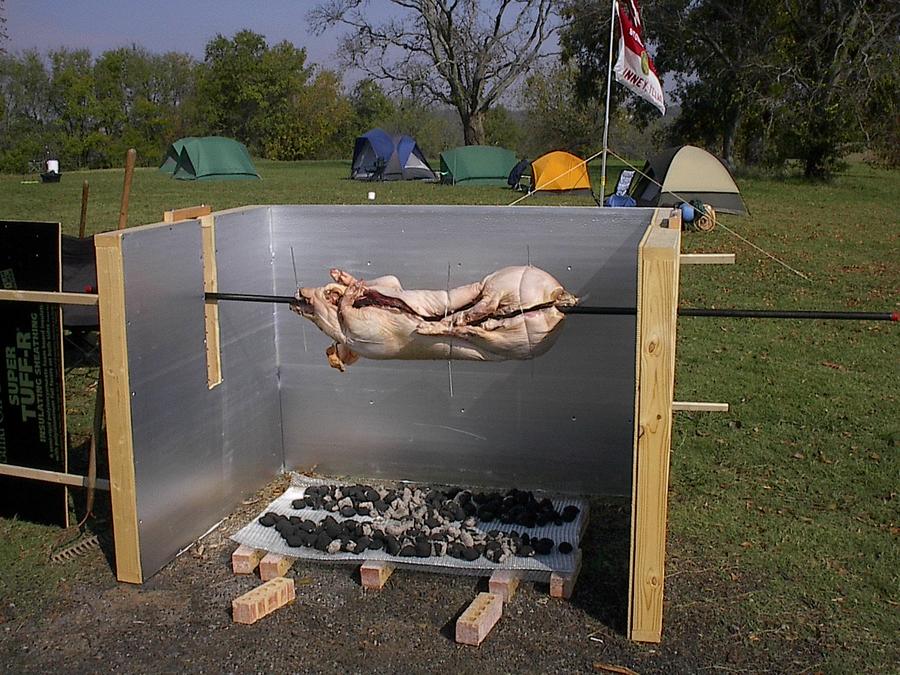
You can see the rods holding the pig on the spit and the wire if you look closely. This is a 100 lb. dressed weight pig.
The bricks in front are for the front section. If I wanted a hotter fire, I would put the bottom of the front on top of the bricks - to get air flowing in. To cool the fire, pull the bricks out and drop the front to the ground - cutting off the air.
I don't have a good photo of the turning mechanism. I used a 12-14 inch plumbers monkey wrench. I would slide a long nail through the end of the handle, get a grip on the spit, rotate to the right position, and use the nail against the vertical pieces of wood on the sides to hold the spit at the right position. The pig is heavier on one side of the spit, and always wants to rotate that side down.
spitting the pig - our scouts always loved this when I cooked a whole pig.
off to the oven - I tied the legs up after I got it to the oven in this case.
The finished product
Remove and pull the spit out and start carving
The scouts always like the head as a table ornament - boys will be boys!
Instructions
Pig Prep
1. Pull the pig out of the cooler 2 hours ahead of when you want to start it – more if it is cold. You want the pig to warm up a bit before you put it on the oven – or it takes longer and may cook unevenly. Cover it with foil or a tarp if there are flies, or station a few young scouts to fan it to keep the flies off.
2. Insert the spit from the rear end and align the throat to get it heading up the throat and out the mouth.
3. Use a large heavy screwdriver or other pry bar to get the mouth open and push the tongue down so the spit comes over the tongue and out the mouth. It helps to have a small hand sledge to pound the spit through the throat and mouth.
4. Rotate the pipe so that your holes are pointing to the sides of the pig. Use a knife to cut a small slit in the skin on one side, insert the cross brace and hammer down to the spit. Line up with the holes, and push through the spit, and hammer down till you see the cross brace pushing the skin up on the other side. Use a knife to make another slit in the skin to let the cross brace come through.
5. Get even amounts of the cross brace showing on either side of the pig. Tightly wrap one end of wire around one end of the cross brace (pliers help), then tightly wrap wire around pig to other side of the cross brace, wrap 2 loops around the cross brace, then around the rest of the pig to the first side and wrap the wire to the cross brace again. Usually I used two complete loops around the pig.
6. I try to put a cross brace through the shoulder area, the middle, and the hind quarters to firmly hold the pig on the spit.
7. I sometimes do a few wraps of wire around the middle open cavity to hold it together as well.
Cooking Prep
1. Start your charcoal on the grate with the oven removed. (note – I usually start the fire, then spit the pig while it is getting going)
2. Once the charcoal is showing enough grey, use a rake or shovel to split the pile so that one side is to the back of the grate and one to the front – leaving the middle with no charcoal – the pig will be over the middle.
3. Don’t use too much charcoal – each side should be roughly an 8inch spread that is 2-3 inches high.
4. Move the oven back around the grate when there are no more flames.
Cooking
1. ¼ turn every 15 minutes.
2. Keep an eye on the charcoal. When it gets very low – but you still have coals, add some charcoal from the front and spread it to the front and back.
3. Watch for fat flare-ups. Open flame on the oven sides will ignite the oven. I keep a hand pump yard sprayer that has a metal tip wand full of water and tighten the nozzle to a stream, not a mist. When I see flames getting big from fat drippings, I squirt them through the sides of the oven to knock them down. Be careful you don’t drown your fire!
4. 80 lb pig takes 4-5 hrs 5. 100 lb pig takes 5-6 hours
6. Use a meat thermometer into the hams and shoulders to check temperature for when to pull it out. 160 s a good temp to pull up from the heat. If you spread out the coals at that time and reduce them to a small amount ( use spray bottle to kill some coals if you have too many), you can keep it warm if you finish early.
7. The middle gets done sooner than the shoulders and hams. You can try angling the spit – head down or tail down for an hour each to accelerate cooking of the ends, or just let the middle get over cooked.
8. Adjust the height as needed – keep it at least 12-18 inches above the coals, higher if it starts to burn the skin too much. Ideally the skin is a dark brown with some black. If it gets too black the meat right under the skin is going to get too dried out.
9. If the fire is too cold, lift the front of the oven on top of the two bricks in front of the oven to feed air to the fire. If too hot, drop the front to the ground and the bricks hold it tight to the oven.
Carving
1. I use a heavy cleaver and plastic hand sledge to section the pig. You put the cleaver where you want to cut, and pound the back of the cleaver with the plastic hammer till it is all the way through the bones.
2. Cut the heat off and get it out of the way – it can be a centerpiece.
3. Pull skin off as you go – put that in a separate foil tray and guard it from marauding snackers who will steal it all while your back is turned. Remember, you are the one holding the big knives…
4. Take out the loins along both sides of the spine – those are special and really tasty – the best meat in the animal.
5. Cut the hind quarters from the middle, then split the hindquarters along the spine.
6. Cut the shoulders from the spine and split them along the spine.
7. Slice and chop – discarding really fatty sections.
8. The steam trays, covered with Al foil can be put back in the oven to keep warm till serving time.
9. Plan on a minimum of 30 minutes to butcher the pig – probably more the first time you do it.
Pig sizes: - rough estimates
75 lbs. dressed - 30 lbs. cooked pork
100 lbs. dressed - 40 lbs. cooked pork
125 lbs. dressed - 50 lbs cooked pork
Usually we did these as part of a family feast - lots of side dishes and some other meats (fried turkeys, you name it). I usually planned on 1/3 lb. to 1/2 lb. of cooked meat per person on average.
Supplies
1. Pig Oven
2. Spit
3. Cross braces – 3-4
4. wire
5. Grate
6. Enough bricks to keep grate off ground – I use 24 –5 rows of 4 bricks, plus three for the front of the oven.
7. Long handled flat end shovel
8. Long handled metal rake (short tine)
9. Plumbers monkey wrench
10. 8-in threaded bolt that fits through the handle of the plumbers wrench
11. 1 lb of charcoal per lb of pig.
12. Two big nails to hold the spit up in the oven
13. Linesman pliers for wire wrapping and unwrapping.
14. Hammer
15. Hand sledge
16. Landscape sprayer full of water.
17. Scoutmaster magic elixir to start fire
18. Table for prep & butchering
19. Heavy duty Al foil
20. Al foil ½ steam trays to put cut meat in
21. Heavy cleaver and plastic hand sledge
22. Good sharp knife and carving fork.
23. Latex gloves
24. Large trash can with heavy duty plastic liners for carcass and scraps.

