Rewiring...Does this look, right?

  • Some of the links on this forum allow SMF, at no cost to you, to earn a small commission when you click through and make a purchase. Let me know if you have any questions about this.
SmokingMeatForums.com is reader supported and as an Amazon Associate, we may earn commissions from qualifying purchases.

Atl1530

Smoke Blower
Original poster
Jun 6, 2019
104
20
Atlanta
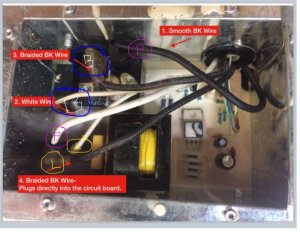
I have an older model Masterbuilt smoker then the one tallbm made the very thorough rewiring tutorial for. I just want to make sure this is correct before I plug it into the wall.

I connected the #1 and #3 wires and the #4 and #2 (see attachment) wires together. Does this look correct?

Thanks
Screen Shot 2019-06-27 at 8.31.01 AM.png
 
I'm not sure you want to connect 2 and 4 together.

Does this unit have a incandescent bulb inside?
 
yes, it does have an incandescent bulb inside.

From what I can tell from the other rewiring diagrams #4 is the braided neutral and can be connected to the white wire. The confusing part is, there are two BK braided wires, and on my smoker, they come into the box from the same hole.
 
I'd just about bet 2 and 4 are already connected via the circuit board. Pulling them off will just completely divorce the circuit board from either side of the power cord.
 
yes, it does have an incandescent bulb inside.

From what I can tell from the other rewiring diagrams #4 is the braided neutral and can be connected to the white wire. The confusing part is, there are two BK braided wires, and on my smoker, they come into the box from the same hole.

You should test and validate the image. B is burner. L is light. P is plug (cord).

Does your light work?
 

Attachments

  • mes.JPG
    mes.JPG
    64.8 KB · Views: 45
The black braided wire is the element circuit. One goes to the element, the other goes to the safety switch. Under the back cover there is a short piece of the same wire that runs from the other side of the element to the other side of the safety switch, completing the circuit.
 
Yes. As long as one braided blk wire goes to the smooth wire neural power cord wire and the other braided black to the smooth black hot power cord wire The two sticking in the black cube relay wire nutted together and some leave the other two where they are because they terminate together at the board. I do four cuts two wire nuts to eliminate the Chinese alum female spade connectors. It doesn't matter as long as the two braided aren't togetther. Sonny put a switch at the relay to bypass to use a PID or switch to use the relaty for the Mes controller and left the other two terminated at the board. I like the four cuts two nuts. I also made an access on the back where the limit switch is so I can quickly bypass it when it fails with a wire nut.
 
Then ohm the plug for continity between the blades and no continuity to the ground prong and eack blade. Then continuity to the chassis back panel to the ground plug prong.
 
So when the limit switch fails it defaults to off? Can I just bypass it now or is that not a good idea.
 
So when the limit switch fails it defaults to off? Can I just bypass it now or is that not a good idea.
I used a dremel cut off wheel to make an access and inspected the terminals. I'd let it go till the lugs or switch fails. It may open the circuit at a low temp when it fails so if the heating light is on and no/low heat compared to your set point then it's the elementi failing, not reading 12 ohms for the Mes 40 or the snap disc switch is failing/failed. You can always make a power cord with two high heat spade connectors on the hot and neutral and a circle lug on the ground. If something fails disconnect the element, hook up the power cord to the element and ground to one of the six access plate screws. Plug into the Auber and keep smokin.
 
You don't have a photo, do you?
Not for making the access to the limit switch or the power cord. The power cord is Aubers solution to connect to their PID someone else put up that Auber showed on their website or emaiedl. I am going to install an element in my daughter's .Mes 40 and make an access to the limit switch tomorrow I believe and can take pics of that.
 
The black braided wire is the element circuit. One goes to the element, the other goes to the safety switch. Under the back cover there is a short piece of the same wire that runs from the other side of the element to the other side of the safety switch, completing the circuit.

I'd just make sure anyone tests this to be true. On my MES the roll-off (safety switch) was not connected to the control board. I did not have two hot insulated black wires from my control board.
 
I'd just make sure anyone tests this to be true. On my MES the roll-off (safety switch) was not connected to the control board. I did not have two hot insulated black wires from my control board.
Tallbm ohmed the smooth black going to the black cube relay to the small plug blade for hot continuity and the smooth white that is teminated to the board next to the other braided black for continuity to the wide plug neutral blade. The braided in the cube relay or the braided next to the white smooth goes to the limit switch then a wire going from the limit switch to the element. The other braided goes straight to the element. Different smokers have differently colored braided going to the element in the element access area. It makes it easier to look there before the board access to find braided wires. Unless they change colors from the limit switch to the element. Mine are all black braided with the Gen 1 40.and no visible yellow green grounding wire in the element access.
 
Not for making the access to the limit switch or the power cord. The power cord is Aubers solution to connect to their PID someone else put up that Auber showed on their website or emaiedl. I am going to install an element in my daughter's .Mes 40 and make an access to the limit switch tomorrow I believe and can take pics of that.

I have seen that but I don't have that panel
 
I have seen that but I don't have that panel
With the Gen 1 40, boxy element housing/chip burner with rail supports and top right vent has no limit switch access lin the middle right back panel ike the newer many models. MB says not serviceable/replaceable components so buy a new body. Hell no, just because there's no access. I'll make one. The original all stainless steel inside and out windowed door and box is all I need other than the element.
 
SmokingMeatForums.com is reader supported and as an Amazon Associate, we may earn commissions from qualifying purchases.

Latest posts

Hot Threads

Clicky