PJ's Red Barn Bologna

  • Some of the links on this forum allow SMF, at no cost to you, to earn a small commission when you click through and make a purchase. Let me know if you have any questions about this.
SmokingMeatForums.com is reader supported and as an Amazon Associate, we may earn commissions from qualifying purchases.

poacherjoe

Smoking Fanatic
Original poster
Nov 7, 2019
611
736
Central Ca
IMG_2827 (3).JPG

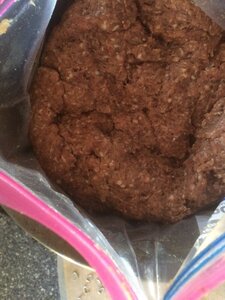
This is PS seasoning's Red Barn Bologna all mixed with 10 pounds of ground venison and 2 1/2 pounds of ground pork butt that I ran through the grinder twice using a 3/16 plate. I then placed it in a 2 gallon ziplock and put it in my enterprise stuffer with the corner of the bag pulled out at the nozzle. This way makes it easier for cleanup.
IMG_2826 (1).JPG

Here you can see the bag sticking out of the nozzle. Now I cut the bag and place the spout on the stuffer and start pressing the mixture into my collagen ring casing's
IMG_2828 (1).JPG

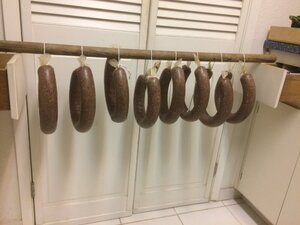
Here are the casings all stuffed. This is my first time using these rounded collagen casing's. They stuffed quite easy and didn't burst. I was impressed. I let these sit in the fridge overnight
IMG_2831 (1).JPG

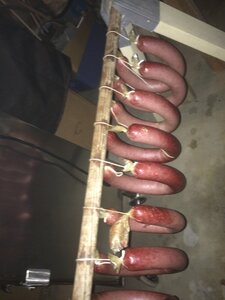
Here the ring bologna is drying in the smoker for a few hours before I start the smoking process
IMG_2832 (1).JPG

This is my SmokinTex 1460 smoker with an Auber PID controller and an Inkbird remote thermometer. I am using the step method where I start with 120 degrees and no smoke for the first hour and then I add the Mountain Mahogany wood chunk and start the smoke process. The PID controller is pre programed to add 10 degrees every hour until it reaches 170 and then it will stay at 170 until the probe that is in the bologna reaches an IT of 153. Then it will sound an alarm
IMG_2833 (1).JPG

Here the ring bologna is done and ready to toss in my ice chest that is full of chopped ice and water to bring the temp down and stop the cooking process so it won't dry out. This takes about 20 minutes
IMG_2835 (1).JPG

Now that they have cooled down I place them on a wooden dowel and let them Blossom . It was nice and cool so I just left them in the garage overnight.
IMG_2837 (1).JPG

Here is the finished product sliced for you to see. Sorry you can't taste it . It turned out great .
 

Attachments

  • IMG_2827 (2).JPG
    IMG_2827 (2).JPG
    135.2 KB · Views: 20
  • IMG_2830 (1).JPG
    IMG_2830 (1).JPG
    94.4 KB · Views: 16
  • IMG_2835 (2).JPG
    IMG_2835 (2).JPG
    92.5 KB · Views: 19
You certainly have a great set-up. Did you do a cold shower or ice bath before blooming? I've never used the collagen casings other than summer sausage.... how does the smoke penetration and flavor compare to regular gut casings, and does the casing come off easily? Also, can you grill sausage in collagen casings?
 
  • Like
Reactions: poacherjoe
Looks good. Nice bind. Is it just the pics or is the color not all the same?
 
  • Like
Reactions: poacherjoe
That looks fantastic!
I will have to try the zip lock trick!
Do you get all the mix out of the bag?
Al
Thanks Al . No there is leftover in the bag and the nozzle that I hand stuff into the casing. Spray some cooking oil on the inside of the stuffer so the bag will slide freely.
 
You certainly have a great set-up. Did you do a cold shower or ice bath before blooming? I've never used the collagen casings other than summer sausage.... how does the smoke penetration and flavor compare to regular gut casings, and does the casing come off easily? Also, can you grill sausage in collagen casings?
Thanks Thirdeye , I did give it a 20 minute ice bath and the smoke didn't seem to penetrate as well as the fibrous casings that I normally use. I peeled them off the next day with little problem and vacuum packed them. These were the non edible collagen casings and no you can't toss them on the grill. The rings also take up more space in this smoker vs hanging chubs off the rack.
 
SmokingMeatForums.com is reader supported and as an Amazon Associate, we may earn commissions from qualifying purchases.

Latest posts

Hot Threads

Clicky