Pid wiring question

  • Some of the links on this forum allow SMF, at no cost to you, to earn a small commission when you click through and make a purchase. Let me know if you have any questions about this.
SMF is reader-supported. When you buy through links on our site, we may earn an affiliate commission.

ctryboy88

Newbie
Original poster
Sep 18, 2013
12
10
I'm planning a smokehouse build and have most of it figured out I guess but have a wiring question. I'll be building my own controller using Auber components and a 220v heat coil. The schematics I've looked at show hooking the ground wire in the main power cord to the shell of the PID enclosure box, but since it it plastic should I ground it to the aluminum lining of my smokehouse instead?
 
Stumbled across your post, and it doesn't show that anyone has responded.

The schematic looks good. One thing that you may want to think about if you didn't do it, would be putting a fuse on either L1 or L2, just to protect your hardware in case of a surge or something like that.

Hope that you got your build done successfully, and you are enjoying some tasty smoked meats!
 
88,

Install a fuse in both hot leads. Make them the same value, determined by total load.
Attach ground from power cord to a common metallic surface on your smoker. I also like to bond metal surfaces together so all are grounded.
From the schematic I take it controller is 220v? no neutral ? If that's the case then don't connect any neutral at all.
At least that's the way I would do it.

Have fun, no sparks ☇
RG
 
How did I miss this back in March? Oh well, better late than never....

The schematic is mine and it was made to answer the questions of another forum member.

As to the plastic housing and ground question, yes if the housing is plastic and there are no metal components you could possibly touch (don't forget about the aluminum heat sink), then the ground should be run to the metal smoker body. Grounding is a safety feature in AC circuits. Should a wire chafe or come disconnected and otherwise energize the metal you might be able to touch, as soon as that current flows unrestricted to ground, it "should" trip the breaker or blow a fuse preventing you from receiving a shock. And with 120 and 240v circuits, that shock could be fatal.

Most PID units are perfectly happy to run on 110-120 or 220-240v AC and it is possible to build a purely 240v smoker under PID control. In that example the neutral is unused in a purely 240v smoker. Just make sure all the components are 240v rated and that your heating element is in fact a 240v element. You cannot just run a 120v element on 240v as you will burn it out quickly and a 240v element run on 120v will only have 1/4 the wattage output (simple ohms law). Heating elements are rated for a specific wattage at a specific voltage.

It is also possible to have a mixed 120v and 240v cabinet and in that instance you would need the neutral leg. Either leg of the 240v circuit (L1 or L2) will be 120v to neutral. So L1 to L2 gives 240v and L1 to neutral OR L2 to neutral will both give 120v. So if you have a need for 120v in your build, just use the neutral and either of the hot legs of the 240v (L1 or L2).

Does this make sense?

Sorry to bring up an old thread but I am building a smoker now.
If using 4 wire the neutral is not used? The SSR is only turning off 1 leg so is the element still under power?

If I wanted to add a 120v outlet on the smoker for an air pump for a smoke daddy could I just tie that into 1 leg and the neutral?
 
So what exactly are you trying to accomplish? I'm getting a mixed message from the above.

1) Are you wanting to build a 110v or a 220v electric smoker? It will work for either on low to medium wattage elements (1,500 to 1,750 watts max), but if you start going to 2,000 watts and up, you must run a 220v unit. The PID and SSR can be wired for either.

2) You asked about 4 wire. Which makes me think you are wanting to build a 220v smoker. The illustration I posted was in response to a question about a 220v smoker so it is 4 wire, and in that particular setup the neutral was not necessary as the PID and SSR were 220v capable units.

3) If you are looking at a 110v smoker, then you need a totally different drawing/schematic.

4) all that being said, all a 220v circuit is two 110v legs (L1 and L2) along with a neutral and ground. Both L1 and L2 each have a 110v potential to neutral, or a 220v potential from L1 to L2, so in fact you can get both 220v and 110v power for components from that single power delivery setup. So yes, you can split off a 110v side circuit to power a 110v device like a smoke generator, etc... But again, the drawing/schematics are different that the one above.

5) It depends on what wattage heating element you have, and at what voltage that element is rated for that wattage. An example is a 2,000watt 220v element can be run at either 220v or at 110v. At 220v it should deliver approximately the rated 2,000 watts, but at 110v it will deliver only 1/4 the rated wattage or 500 watts. You cannot run a 110v element on the higher 220v power as it will toast the element. But 220v elements can be run on lower voltages, but the wattage output is much lower due to Ohms law of power (it's not as cool as that name sounds though). So if you have that 2,000 watt element and really need that amount of heat output, you must build a 220v smoker. With that comes a dedicated 220v outlet as most areas people place smokers are not pre-wired for 220v power. Most porches and garages have 110v 15amp (some have 20 amp) outlets already installed, so most smokers tend to be 110v.

So tell us exactly what you are wanting to do. Be specific especially about the heating element.
 
Sorry, I will try to clear that up LOL

My warmer is 27"x20"x56" My calculations are about 17 cubic feet.
I have a carport that I will be putting the smoker in and I can run 220v to it no problem, just have to bury the wire. I do have 2 open spots in my breaker box.
I do already have 110v out there.

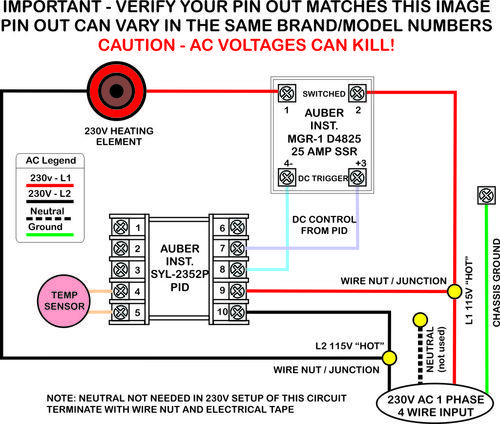
My idea is to run it 220v and run an oven element. This is the one I am thinking about getting. It is 3000 watt.
https://www.walmart.com/ip/Exact-Re...hguid=d5adcaa6-c22-16c4026a553b59&athena=true

So I would drill a couple holes and run the element connections out the side, connect the wires and cover everything up with a metal shield that is siliconed to keep water out. A little higher on each side I would run 2 smoke daddy smoke generators (I have 2 already) and will need 110 power for those air pumps.

Thinking about running this pid
https://www.auberins.com/index.php?main_page=product_info&cPath=1&products_id=3

This SSR with external heat sink
https://www.auberins.com/index.php?main_page=product_info&cPath=2_30&products_id=30

This Thermocouple
https://www.auberins.com/index.php?main_page=product_info&cPath=20_3&products_id=101

Thinking I will need a switch to turn it all on but dont know what one I would need
https://www.auberins.com/index.php?main_page=index&cPath=69_73

And I think I would need 1 or 2 fuses, also not sure on this style and what amp to use.
https://www.auberins.com/index.php?main_page=product_info&cPath=7_83&products_id=593

I read somewhere that 4 wire is the best, Not sure if that is really the case.
Everything I am seeing says if 4 wire is used that I would not use the neutral.
I have never dealt with 4 wire, not even sure how to hook it up in the breaker box. After seeing your post above I got to thinking if I tied into 1 leg of the power could I use the neutral along with the tie and and create an outlet on the smoker for the 110 air pumps? Its not necessary since I have 110 in the carport but it would be self contained and not need to run a second cord.
Thats basically what I was asking above. If not oh well.

I am thinking about getting 14/3 Type UF-B Cable with ground for running out there and for the wire to go from an outlet to the smoker.

I am not sure what wire to use for all the connections inside the control panel nor do I know what gauge heat resistant wire to get for running to the element.

Hope that helps clarify things. If you can help I would greatly appreciate it.
You can PM me if you need more specifics or I can post them here for others also.

Here are a couple pics of it now. The previous owner used a turkey fryer and cast iron skillet inside for smoke.
67692798_10217219429690783_2361579813426167808_n.jpg
67270891_10217219429810786_6462354496759529472_n.jpg
 
Ok, that helps a lot. You have the right components. You can run 3 wire, but if you ever have it inspected or go to sell the house, they may balk at it not being 4 wire. I would just go ahead and run the 4 wire and be done with it. That gives you other options for that outlet in the garage - ie, welder, compressor on 220v, etc...

As to the fuse, where do you intend on placing it in the circuit? I would put a 2 amp fast blow in the power line that runs to the PID. Remember the fuse is to protect wiring and delicate components. You can use much smaller wire to power the PID and for the DC out trigger signal to the trigger side of the SSR. But all your other wiring that is going to carry the 220v should be rated for the breaker size you put in the panel to feed the 220v. Otherwise you will need a 220v breaker inside the cabinet at a lower amperage. For example you could run a 30 or 50 amp 4 wire 220v circuit to an outlet in the garage. Then you would put a 20 amp 220v (double pole) breaker inside the smoker as the first thing on the power cord. You could then use 12 gauge wire inside the cabinet because 12 gauge wire is rated for 20amps. That would still let you use higher amperage device on that same outlet if you needed to.

Does that make sense?

If you don't add a built in 110v section of the smoker cabinet for a smoke generator, you don't need to use the neutral leg in the smoker as all the components are capable of using 220v as the power source. If you had a PID that could not run on 220 but needed 110v you would need to use the neutral as a return for one of the L1/L2 legs to get that 110v potential to neutral. If you have 110 close by, you can keep the build simpler if you use it for any 110v needs like the smoke generator, but either way would work.

So other than the potential of a 110v smoke generator being added (where the neutral will be used) that drawing does apply.
 
Let me throw one caveat out there. If you are not 200% certain of what you are doing, ask someone local who does for help. We are talking about AC line voltages which can kill you if this is not done properly. Done properly, it's safe, but one mistake can be fatal.
 
So running 220v, adding in a fuse and a 110 outlet just for the air pump would this be right? I just updated your drawing.
I was told to fuse it, Not even sure if its needed. I thought a fuse on 1 or both of the hot legs going to the element. But as you say a fuse for PID only makes sense.
500x1000px-LL-9fc55318_230vdiagram2.jpeg
 
Yes, you can fuse any point in the circuit. The purpose of a fuse is mainly to kill the power in the event of a abnormal condtion to prevent a fire. In the absence of fusing (or an appropriately sized breaker which does the same thing), any wire that is not protected can overheat, melt the insulation and start a fire.

Prime example is the wiring to the PID for power. This wiring is normally not the large gauge as the wiring to the heating element. So if you use a smaller gauge to the PID which is only drawing 1 amp or less normally and that wire is not fused and shorts out, it is now carrying the full amperage of the outlet the cabinet is plugged into. If that's a 20 or 30 amp circuit you will quickly melt and likely set the insulation for that smaller PID wire on fire, starting what could be a larger fire. With a fast blow fuse protecting that wire, the fuse pops and the circuit is interrupted so no melting and no fire. Same thing if there is a component failure inside the PID which causes it to suddenly draw more than the normal operating amperage. The 1 or 2 amp fast blow fuse pops and prevents the PID from starting a fire.

Same is true for the heating element, just with a larger amperage fuse (or breaker, even the outlet breaker). You always want the fusing to be matched to the item and wire it's protecting. Also if the PID fuse blows, the entire cabinet is shut down as that is what triggers the SSR to allow power to flow to the element.

The other protection is the ground to the chassis. If any of the wires fray and touch the cabinet, or come loose and touch the cabinet, it's a dead short to ground and the master breaker in your electrical panel at the house should trip immediately.

You can add as many fuses or breakers as you want inside the cabinet, but if the outlet is properly protected and the wiring for the 220v portions of the cabinet are matched to the outlet (proper wire gauge for that amperage), then only portions with smaller gauge wiring are what really need a separate fusing. The other argument for a traditional fuse vs a breaker is in an over amperage situation, a breaker does not trip immediately like it does in a dead short to ground. It may take 30 seconds or a few minutes depending on how much over the amperage is for the breaker before it trips. The higher the over amperage, the faster it trips with a dead short to ground being the ultimate over amperage (basically the full amperage of your house service - 150, 200 amps are typical). There are charts with the time/amperage relationship for all breakers available from the manufacturer of the breaker, but I don't think smoker cabinet builders delve that deep into it. Just match the breaker in the home main panel to the wire in the home, to the outlet rating, etc.... and you will be fine.

Does this make sense?

And anyone else is welcome to chime in here with other points or comments.
 
That makes sense.
So If I run power in to a 25a breaker to use as a switch and run a 30a in the house breaker box I should not have to fuse the legs going to the element?
I was going to get this panel mount from Auberins
https://www.auberins.com/index.php?main_page=product_info&cPath=69_77&products_id=586
Smallest 2 pole is 25a.

So was I correct with how I would wire the 110v outlet by using 1 leg and the neutral?

I think I have most all this figured out now LOL.
I know basic wiring but want to be safe as I can.
I am ready to order all the parts once I am certain on what I need. Then I just have to figure out wiring sizes. I know for the 110 outlet I will want solid wire so if I am using say 12g stranded can i just wire nut them?
 
Yes

If you run a 30 amp house breaker, make sure to use 10 gauge (orange) 10/3/with ground to the outlet in the garage. Remember you can always plug in a lower amperage load into a outlet. The breaker is designed to protect the wire and house. The load/device may or may not have internal fusing, etc... (and example is a clock radio that draws 1 amp plugged into a 15 or 20 amp outlet).

If you run that 3,000 watt element, it only draws 13.6 amps at 220v, so you could use a more common 20 amp breaker in the cabinet (make sure it's double pole for 220v - L1 to one side and L2 to the other - aka, red to one side and black wire to the other). That still gives you a 30 amp 220v outlet in the garage which should power most stuff other than the smoker such as a decent welder, a good sized air compressor (with motor wired for 220v which is more efficient, etc...).

Either L1 or L2 (the red or black) will have a 110v potential to the neutral (white) wire. So yes, you can get 110v for an outlet by taping either of them. You do want to keep in mind that whatever you are plugging in on that 110v outlet will also be drawing power from one side of the power to the heating element. So I would keep it a low power draw. Something like the air pump for a smoke generator should not be a problem. Don't forget to ground the metal cabinet for safety! Your chassis ground wire should be unbroken all the way back to the plug at the wall.

So a 30 amp breaker in the house (220v double pole breaker), a 20 amp in the cabinet (again double pole 220v) and then fuse the smaller wire items like the PID where it taps into the 220v (the PID can run on 220v without modification). Go probably a 2 amp fast blow fuse for the PID power wire (one side only is enough for that).

You can also put a switch in the 220v power to the PID and it will turn the cabinet on and off. I would go that route instead of using that 220v 20 amp breaker as a switch. Breakers are really made to do just that, not act as a switch. Remember it's fused at 2 amps so pretty any AC switch should do the job to turn the PID on/off which in turn will turn everything else on/off as the element will not run without the SSR being triggered, and the PID will not trigger the SSR if there is no power to the PID (switch off). Then you would only need to unplug or flip the breaker if you wanted to work on the wiring as there are still energized wires (their potential is energized, but the circuit is incomplete).
 
Awesome thanks for all the help. I think I got the jist of it now.
One last question if you know the answer. Cover the element or not? I am worried if I cover it the heat won’t go up even enough but not sure if leaving it uncovered would hurt it.
 
Cover? With what?

The actual heating element is inside what you see as the element. What you see is a cover. Make sure those little feet on the end opposite of the wire connections have something to rest on as those elements do get hot enough they can bend under their own weight. Those feet are enough support to keep that from happening. Most elements like that have them.

Here is a image from the Watlow website (they make heating elements) This is a cut-a-way of what one typically looks like:

image_upload_55.jpg
 
Was told to cover with a metal shield. I dont know if its worth it as it would be harder to regulate temps with a steel shield being hot also.
 
How does this look for wiring? I am a little confused on the ON off switch and indicator lights. I have asked Auber for help.
It looks like the switch needs 2 wires.

rsger.jpeg
 
You need to move/change the element on indicator light location. As in your schematic, you have the full amperage for the element flowing through the LED or Neon indicator, which is a high resistance load (currently wired "in series" with the element). That will not work. You want the leg of the indicator that currently goes to the element to go to either neutral or to the other leg on the other side of the element (if the LED/neon is 110v it needs to go to neutral, if it can handle 220v, then other leg is fine, but I would prefer it going to neutral if it was me). The indicator light and element need to be distinct different paths, not in series as you currently have them.

I would do the same with the Main power indicator (the one you have going to the PID). The PID is probably a low enough draw that it will not matter, but it would be more correct if the indicator was in parallel to neutral or other leg. Again it depends on the voltage the indicator is rated for as to if you run the return to neutral or the other hot leg. Right now it is also in series. Also move the main indicator light connection to the switched power for the PID to the other side of the main power switch. As is if you move one leg to neutral and then turn the switch "off" the power will still flow through the indicator all the time. If you put it on the other side of the switch and to neutral, it will show the state of the switch and PID/smoker (on or off).

Also you have a run for each outlet in the duplex outlet drawing. The left side, right side, and ground should be bonded inside the duplex outlet. In other words you only need to run one "hot", one neutral, and one ground wire to the outlet unless you break the side terminal tab that joins them (I can't see why you would want to break that).

Now if you are putting 2 of the duplex outlets for a total of 4 - 110v outlet plugins, then yes, each will need a hot, neutral, and ground run.


Just make sure the components are rated for the amperage and voltage they will carry when you buy the parts. The temp sensor wiring depends on the type of sensor you buy. Some are 2 wire, and others are 3 wire, but the PID can be configured many ways in the software setup so it will match the sensor type. Also the SSR and SSR heat sink need to "at least" be rated for the amperage of the element. You can always use a higher rated amperage component though (say a 30 or amp SSR for a circuit that only needs a 15amp) Bigger is better in that respect if all things are equal (like price).
 
Last edited:
SmokingMeatForums.com is reader supported and as an Amazon Associate, we may earn commissions from qualifying purchases.

Latest posts

Clicky