- May 3, 2026
- 74
- 313
I am not sure who it was that recently mentioned making pastrami-style beef ribs, but the idea sounded amazing. Since then, I have been watching for some thick, meaty beef short ribs that looked like they could handle the process.
I finally found about seven pounds of beef ribs that looked perfect for the experiment.

I used the same corned beef brine recipe I have relied on for years.
Because the ribs were thinner than the larger roasts I normally use for corned beef, I initially considered pulling them after three days instead of leaving them for the full five. In the end, they remained in the brine for five days before being rinsed, soaked, seasoned, and cooked.
After five days in the brine, I pulled the beef ribs out and gave them a thorough rinse. They also need to soak in fresh water to draw out the excess salt. I normally change the water and continue soaking until it runs clear.

After the ribs were rinsed and patted dry, they received a liberal coating of PyroDust Steak Seasoning.

It is not a traditional pastrami seasoning, but I have used it before on corned beef that I turned into pastrami-style barbecue. The pepper, garlic, salt, mustard, and celery flavors work well with the cured beef.
The ribs went onto the grill over indirect heat. From there, it was mostly a matter of letting the heat and smoke slowly build color, bark, and tenderness.

Bark and color starting to develop

Late in the cook

I pulled the ribs once they were probe-tender, then let them rest for a few minutes before cutting into them.

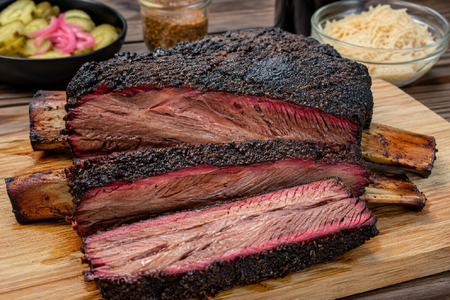
The ribs definitely developed the deep red cured color you expect from corned beef. The outside had a dark, peppery bark, while the inside remained moist and pulled apart easily.

They did turn out a little saltier than I wanted because I rushed the rinsing and soaking process. That is the step I would give more time next time
I finally found about seven pounds of beef ribs that looked perfect for the experiment.
The Corned Beef Brine
I used the same corned beef brine recipe I have relied on for years.
Brine Ingredients
- 1 gallon water
- 2 cups kosher salt
- 1/2 cup sugar
- 1 ounce pink curing salt, Insta-Cure or equivalent
- 2 tablespoons pickling spice
Brining Instructions
- Combine the water, kosher salt, sugar, curing salt, and pickling spice in a pot large enough to hold the beef ribs comfortably.
- Bring the mixture to a gentle simmer, stirring until the salt and sugar are completely dissolved.
- Remove the brine from the heat and allow it to cool.
- Refrigerate the brine until it is completely chilled.
- Place the beef ribs in the cold brine, making sure they remain fully submerged.
- Refrigerate while the ribs cure.
Because the ribs were thinner than the larger roasts I normally use for corned beef, I initially considered pulling them after three days instead of leaving them for the full five. In the end, they remained in the brine for five days before being rinsed, soaked, seasoned, and cooked.
From Brine to Grill
After five days in the brine, I pulled the beef ribs out and gave them a thorough rinse. They also need to soak in fresh water to draw out the excess salt. I normally change the water and continue soaking until it runs clear.
After the ribs were rinsed and patted dry, they received a liberal coating of PyroDust Steak Seasoning.
It is not a traditional pastrami seasoning, but I have used it before on corned beef that I turned into pastrami-style barbecue. The pepper, garlic, salt, mustard, and celery flavors work well with the cured beef.
Onto the Grill
The ribs went onto the grill over indirect heat. From there, it was mostly a matter of letting the heat and smoke slowly build color, bark, and tenderness.
Beginning of the cook
Bark and color starting to develop
Late in the cook
I pulled the ribs once they were probe-tender, then let them rest for a few minutes before cutting into them.
The Final Result
The ribs definitely developed the deep red cured color you expect from corned beef. The outside had a dark, peppery bark, while the inside remained moist and pulled apart easily.
They did turn out a little saltier than I wanted because I rushed the rinsing and soaking process. That is the step I would give more time next time