New offset smoker build by newbie - basic design Qs plus ...

  • Some of the links on this forum allow SMF, at no cost to you, to earn a small commission when you click through and make a purchase. Let me know if you have any questions about this.
SMF is reader-supported. When you buy through links on our site, we may earn an affiliate commission.

Ramblin2Day

Newbie
Original poster
★ Lifetime Premier ★
Aug 6, 2024
18
4
Brand new to this whole idea of building a smoker but have decided to jump in and build a small offset smoker using a 30 gallon (new; got from company going out of business) air compressor tank as the cooking chamber.

With encouragement of civilsmoker civilsmoker and JckDanls 07 JckDanls 07 , I will post here as I design and build the smoker. Any comments, suggestions, critiques welcome.

I have used the calculator from daveomak daveomak and have come up with the following:

30 Gallon Cooking Chamber (CC) = 6,930 cubic inches of volume with diameter around 20 inches

Therefore, as a MIMIMUM, I should have

Firebox (FB): 2,308 cubic inches
From what I have read, the connector from the FB to the CC should be as wide as the CC so that means my FB dimension needs to be at least 20" wide by 12" tall by 10" deep
That is too small to get much wood into so I was thinking of making it much larger, like 20" x 20" x 20" = 8,000 cubic inches
Is too large a firebox a problem? (3.5 times minimum)

The connector from the FB to the CC: 27.2 square inches
With a 20" width, this would mean an opening of about 20" wide by 1.36"
If I made it 20" x 3" (or even taller) would that create a problem? (2.2 times minimum)

From what I have read, the opening for the Collector feeding the exhaust stack should be the same size as the FB to CC connector so MIN 27.2 square inches

Exhaust Stack Volume (ESV): 153 cubic inches
I want a good draft so was going to make the stack (foldable) at least 40 inches above the top of the CC, and with a 10 inch CC radius, that means a 50 inch stack total
Stack internal diameter: 2.2 inches
I was going to use 4" pipe for the stack to give lots of draft and put a adjustable baffle plate on top to give full draft on startup and controlled draft on normal operation.
Will this much ESV cause a problem? (4 times minimum when wide open but adjustable)

As you cans see, I am newbie at this but wanted to start from a good base, hence all the sizing questions.

I have some ideas which I will post for thoughts on later but the above is my first checkpoint.

Any feedback welcome.
 
  • Like
Reactions: JC in GB
I realized after posting the initial post that it required someone to read a lot to figure out why I posted, so to net it out, the real question to be answered is:

Are the calculations developed by @daeveomak (and all that helped) supposed to serve as MINIMUM values for things like firebox size, throat opening, ... or are they supposed to be used as (reasonably) PRECISE values to be used?​

I have a small cooking chamber so the firebox size would be very small if I used the calculations as precise. But if the calculations can be used a minimums, I'll make the firebox (and other dimensions) larger.
 
Looking forward to your build, I would suggest the following:

Use a 4.5 inch cord height cord for the opening from the FB to CC.

18x18x20 high on the fire box.

4” stack 36”

Ie basically my copper pot dimensions minus the reverse flow plate
 
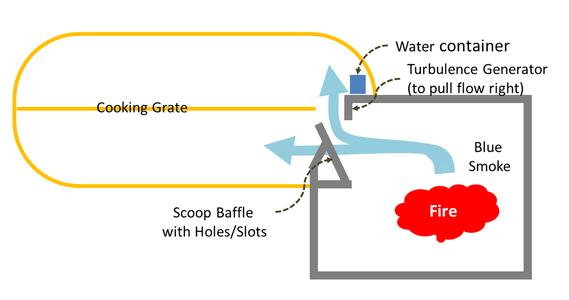
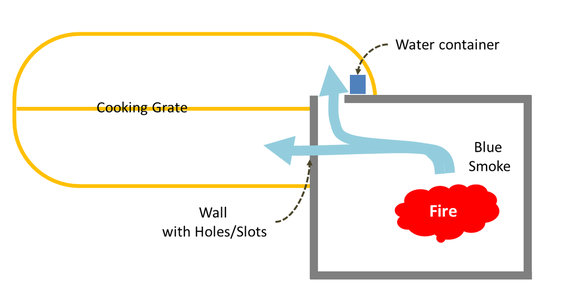
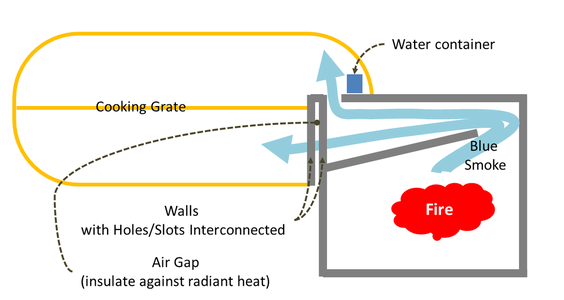
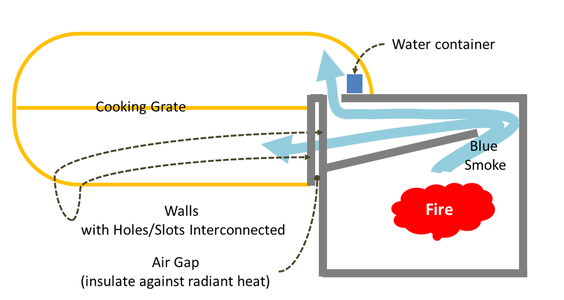
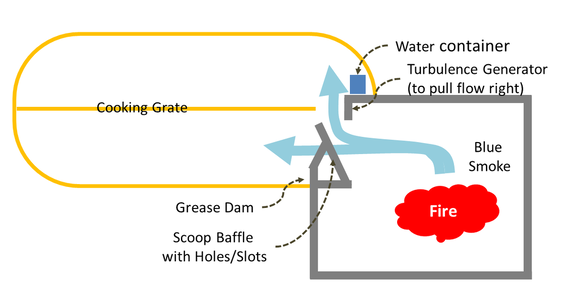
I am looking at some different configurations for the connection between the firebox and the cooking chamber (see diagrams and explanations below) and would appreciate any thoughts anyone might have.

I have a small cooking chamber, so cannot afford to leave much room on the cooking grate unused. I am trying to create a design that results in the most even temperatures across the cooking grate with a direct flow offset design.

I want to use a direct flow (not reverse flow) to keep the cooking times longer and the smoke effect stronger.

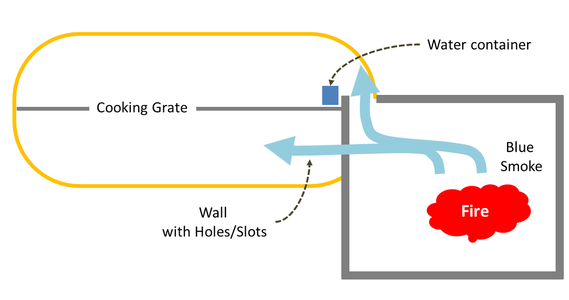
There are 3 designs below (labelled A,B,C) all of which incorporate design elements seen on this forum and others. Feedback on Pros and Cons and design recommendations of each would sure be appreciated.
  • A - The "Normal" design
  • B - The "Indirect" design (my label), pushing the air flow out of the firebox up and avoiding a direct air flow over the cooking grate
  • C - The "Diffuser" design (my label), extending the Indirect design, minimizing radiant heat into the cooking chamber and giving the air flow out of the firebox a more circuitous route to even out the flow going into the cooking chamber
Sizing and ratios are NOT to scale. The drawings are to review conceptual ideas only.

I have never built (or even used) an offset smoker before so am genuinely looking for others' thoughts.

Design A - Normal
Throat Design Option A.png


Design B - Indirect
Throat Design Option B.png


Design C - Diffuser
Throat Design Option C.png
 

Attachments

  • Throat Design Option A.png
    Throat Design Option A.png
    85.1 KB · Views: 8
  • Throat Design Option A.png
    Throat Design Option A.png
    87.6 KB · Views: 9
  • Throat Design Option B.png
    Throat Design Option B.png
    64.1 KB · Views: 11
  • Throat Design Option C.png
    Throat Design Option C.png
    108 KB · Views: 8
  • Throat Design Option C.png
    Throat Design Option C.png
    112.9 KB · Views: 12
  • Throat Design Option A.png
    Throat Design Option A.png
    95.4 KB · Views: 8
Last edited:
Looking forward to your build, I would suggest the following:

Use a 4.5 inch cord height cord for the opening from the FB to CC.

18x18x20 high on the fire box.

4” stack 36”

Ie basically my copper pot dimensions minus the reverse flow plate
Thank you. From what I read of your Copper Pot build, you are quite happy with the evenness of the temperatures across the grate.
 
Thank you. From what I read of your Copper Pot build, you are quite happy with the evenness of the temperatures across the grate.
Yes I am very happy with the performance of the copper pot.

Just know that expecting the same temp across a small offset is not realistic. Thermodynamics have rules and there will be a delta. The one way to reduce the delta it is to have air flow as the heat column will overcome the radiant or reduce the impact. It’s also why many offsets don’t have the FB inside the CC very far……

I think design B would be my preference and I would want a little hotter radiant spot to build bark or the help a stubborn items….ie that little hot spot is a very good thing…….

Thank you for your feedback; it is appreeciated.

So you think that if I moved the inlet to the CC to the end like so

Throat Design Option D.png


That would be better?
 

Attachments

  • Throat Design Option D.png
    Throat Design Option D.png
    61.3 KB · Views: 5
Thank you for your feedback; it is appreeciated.

So you think that if I moved the inlet to the CC to the end like so

View attachment 702048

That would be better?
I thinking changing the water pan location is an improvement. But I'd be curious how the draw will affect the heat (and smoke) that goes over the grate, and goes through the slotted wall. I'm guessing you would have to do some testing on the pattern of slots as well as their size?

Have you seen this video on the new Goldees Smoker? Jirby has some interesting ideas in their design. Especially when it comes to having more grate space for cooking. It might give you some ideas.
 
No help either, but wanna go along for the ride!

Ryan
 
I thinking changing the water pan location is an improvement. But I'd be curious how the draw will affect the heat (and smoke) that goes over the grate, and goes through the slotted wall. I'm guessing you would have to do some testing on the pattern of slots as well as their size?

Have you seen this video on the new Goldees Smoker? Jirby has some interesting ideas in their design. Especially when it comes to having more grate space for cooking. It might give you some ideas.

Thank you - for both videos. The "whiteboard" video supports Option B or C and the Goldee Video seems to be leaning toward C. Neither talk about an air gap to minimize radiation but instead keep the firebox positioned so very little of the firebox wall is visible to the Cooking Chamber. In the last three-pit-review, he mentioned that the flow in the Franklin had air go up and float across, something like B or C would do.

Great feedback, thank you.
 
Neither talk about an air gap to minimize radiation but instead keep the firebox positioned so very little of the firebox wall is visible to the Cooking Chamber.
Right, the top of the firebox is welded to the bottom of the cooking chamber, just to hold it in place. The infrared thermography in the one video really proves out using the 6" elbow over a traditional firebox outlet.

Well, I had a suspicion that someone would make some mods to the Goldee's design, and the gentleman in this last video got permission from Jirby (see part 1 of this 3-part series) to share his modifications. And some are noteworthy from a design and fabrication perspective (there is even a sketch at the end of the video with dimensions):
  • Adding a collector under the stack instead of a 90° is the best idea. Higher end offset cookers use a collector. A removable stack would be an option.
  • A long radius 6" 90° was used and for Sch 40 thickness... this might run around $100.
  • The door latch uses a notched bar for various settings.
  • The grease drip edge inside the door is way cool.
  • And I like his thoughts of using some sort of deflector on the hot spot. It could even be moveable... and/or have a bracket to hold a water pan.

Very helpful, thank you

I am thinking of using a full-width diffuser for the connection from the Firebox to the cooking chamber AND from the cooking chamber to the exhaust stack. That should really help reduce hot spots and for a small cooking chamber like mine, that could be valuable.

And I'll separate the firebox from the cooking chamber like the Goldee and the Video. Something like (NOT to scale, just for concept):
Throat Design Option E.png


Never would have thought of a grease drip bar on the inside of the door to the cooking chamber but that is now on the list for my smoker.

Thank you!
 
Very helpful, thank you

I am thinking of using a full-width diffuser for the connection from the Firebox to the cooking chamber AND from the cooking chamber to the exhaust stack. That should really help reduce hot spots and for a small cooking chamber like mine, that could be valuable.

And I'll separate the firebox from the cooking chamber like the Goldee and the Video. Something like (NOT to scale, just for concept):
View attachment 702166

Never would have thought of a grease drip bar on the inside of the door to the cooking chamber but that is now on the list for my smoker.

Thank you!
I'm thinking the stack will influence the draw more than the deflector plate will... kind of a path of least resistance kind of thing.

The opening for the collector is large, and maybe why it's more efficient than a 6" elbow-to-stack connection? On the firebox end, it looks like only about 1/2 of the 6" elbow empties heat into the heat chamber? Would a full width opening with diffuser get your cook chamber too hot?

Watch the part (on the modification video) where the gentleman mentions having more distance from the elbow to the firebox door (opposite of your sketch), and being able to build a fire that is not directly below the elbow. And if you were worried about excess heat of the elbow, you could opt for a Sch 80 elbow.
I thought the same about the Goldee opening from the firebox to the cooking chamber but the Mad Scientist video says there are a pair of diffusers with one going up and one going down. We cannot see the one going down in the Goldee video, but it does make some sense.
I thought that by having a wider (diffuser) opening for the FB -> CC throat and having the opening to the input diffuser be far away from the opening into the cooking chamber, the setup would enable the intense heat to spread out and potentially dissipate a bit through the increased wall space of the diffuser path. Does that make any sense or do you think the opening close to the fire is a bigger factor?
 
Yes I am very happy with the performance of the copper pot.

Just know that expecting the same temp across a small offset is not realistic. Thermodynamics have rules and there will be a delta. The one way to reduce the delta it is to have air flow as the heat column will overcome the radiant or reduce the impact. It’s also why many offsets don’t have the FB inside the CC very far……

I think design B would be my preference and I would want a little hotter radiant spot to build bark or the help a stubborn items….ie that little hot spot is a very good thing…….
Frank Cox pointed out something I had not thought of and he supports your preference for B. If the wall between the firebox and the cooking chamber is insulated, it creates a dead/cold spot near the wall for air returning underneath the cooking grate and leaves the underside of a brisket near the cooking grate very undercooked. So, on to refining option B ...
 
I thought that by having a wider (diffuser) opening for the FB -> CC throat and having the opening to the input diffuser be far away from the opening into the cooking chamber, the setup would enable the intense heat to spread out and potentially dissipate a bit through the increased wall space of the diffuser path. Does that make any sense or do you think the opening close to the fire is a bigger factor?
Okay, I see where you are headed by using a longer path for the heat. And honestly, I don't know if the longer path, or being able to build a fire closer to the door end of the fire box would be better.
uPg0oro.jpg

Fabrication wise, using an elbow is easy to layout and weld. The outside diameter of 6" pipe
is 6-5/8" so under sizing the hole could eliminate backwelding.
I thought the same about the Goldee opening from the firebox to the cooking chamber but the Mad Scientist video says there are a pair of diffusers with one going up and one going down. We cannot see the one going down in the Goldee video, but it does make some sense.
I was wrong when I mentioned a half-round opening from the fire box elbow to the cooking chamber. This thermal image clearly shows another half round opening below the grate, with a diffuser of sorts right at grate level.
zppu3Lc.jpg
 
Frank Cox pointed out something I had not thought of and he supports your preference for B. If the wall between the firebox and the cooking chamber is insulated, it creates a dead/cold spot near the wall for air returning underneath the cooking grate and leaves the underside of a brisket near the cooking grate very undercooked. So, on to refining option B ...
Option B has cooked more brisket and other things than one can imagine……it offers for very efficient air flow (ie including almost instant response to temp changes if you want). It has a nice mix of radiant heat with convection. Having a water pan just inside will temper the radiant when desired, but you have it when you want it…… let’s just say I’m a simplistic cooker

Just know your tank is just not that big to have huge issues one way or another, but adding restrictions into the system make it more temperamental…….the basic design is just a chimney of coals and the feed it 3 inch splits and needed…….

Another food for thought…… as a variation to “B” if you drop the FB lower and have a “stack” or chimney (rectangular) the same area the would be FB to CC opening so that the FB is lower, ie it will operate similar to the pipe design above but it will flow way better and turn it into a true convection cooker, but you loose the radiant…….its all personal preference in cooking……
 
SmokingMeatForums.com is reader supported and as an Amazon Associate, we may earn commissions from qualifying purchases.

Latest posts

Hot Threads

Clicky