pcjack
Smoke Blower
Hello all,
I wanted to thank each and every person that takes time time to look at my build. This is the culmination of my love for smoking food, the massive amount of time spent drooling over YOUR builds and the deep burning desire to build one from scratch on my own. It's a 120g propane tank I picked up for $50, delivered. I always had my eye set on a mid-sized Lang, but the price tag was always too big a pill to swallow, even for the used ones on CL. This was one of the initial driving factors for building my own. Recently, my daughter announced her engagement and she asked me to cook for the reception. That sparked the idea to get my smoker project going and the timing was right to get it done.
Here we go: One of the features I wanted was the ability to move the smoker around the property, but not necessarily take it anywhere else. I bought a used small 4x6 trailer for my build. I initially tried to go the round firebox route, but I wasted a lot of time chasing people on CL, only to find they cannot measure correctly. I was very specific on my FB needs because Feldons caluclator stated what I needed in capacity, every time I went an looked at a cylinder someone had, it was too small. This drove me to make the leap into buying new plate and building a square box. Initially, I went the cylinder idea to save on the cost of plate, but I kept wasting days searching for the right size tank and either getting no responses to emails/texts or finding out the owner was including stands and other welded on framing into the specs, making their tank a no-go. Back to the forums I went, and researched square FB's and priced the steel. For $350, I bought 1/4 plate to build the box and 3/16 plate for the RF plenum, made some final decisions on the sizes and ordered the steel. Because the 1/4 plate is so thick and was at the upper end of my MIG's capability, I contracted a welder friend and we got busy. While waiting on the plate to come in and get cut, I worked on the initial work to be done to the tank. Cleaning it out, flipping it, cutting the door, installing hinges, making a temp door handle, prepping the cook grate rails, mounting it to the trailer, installing the cook door seals and getting it to his house for the FB install. I towed it to his house on a Saturday morning, we assembled the fire box and within 2 days, we had the fire box hung and the chinmey cut to size and installed. Once that portion was finished, it was back to my house for completion. I spent the next 2 weeks building cook racks, installing the permanent door handles, RF plate, FB wood stand, temp gauges/shrouds and cleaning it up for paint.
Ideas from SMF that I incorporated:
Feldons calculator - can't say enough about this tool!
1/4 plate fire box, using many suggestions for how to measure and cut the openings . The cut and mate process was not as hard as I imagined for a box.
Weld hinges before completely cutting the door!
RF plate and grease tough to the ball valve below the smoker, love this idea
Making grates from box tubing - I repurposed old clothing racks from a dumpster, there was more than I could ever use there, I picked from the best steel and took what I needed
Damper locations
Fire box grating build
Flipping the axle to underneath the leaf springs, to raise the trailer without having to buy bigger tires, different leaf springs, etc.
My own ideas that worked:
Welded an eye hook to the FB, bought a used an electric warn winch and used it to hang and mount the FB to the tank
Bought 2x used chrome semi exhaust stacks from someone on Craigslist for $30
Repurposed king & queen sized bed frames for angle iron. Only drawback was the time spent removing the paint, but saved a chunk in steel
Using a small bottle jack to press on plates that had larger gaps than I wanted to fill weld, makes the gaps more managable and less costly in MIG wire.
Temp door handle with rebar until I had a firm solution for a door handle setup
Door stop tabs - kept the door from falling in once hinges were installed and door was cut, until the 1 1/8" outer seal straps were mounted.
Basic suggestions I felt could have been communicated on other builds that I missed seeing: (keep in mind, these are my personal opinions)
Steel wheel brush for grinder (highly recommend over flap disc when removing paint)
Full face protection - when using a grinder, small debris can get under your safety glasses and get in your eyes
Paint stripper is a waste of time and a bigger mess to clean up (my opinion)
Some people waste time on putting a pretty 45 angle on door seal straps. Save yourself the aggravation. You're going to grind them flat and paint it anyway. Never will see it. lol
Mistakes:
Because the reach to my open work space was limited to how far I could stretch my welder's power feed, I had to work in the sun a lot. I highly suggest using an EZ-UP for shade!
Hindsight is 20/20 - I should have bought a couple of those stick on style bubble levels and pasted them on my trailer. A few times I had to spin my trailer a tad to be able to reach areas
with the MIG gun.
I found myself putting my trailer out of level and finding out AFTER I made welds that I was off on my racks, etc. Quick eye reference for level, for just a couple bucks. DUH!
Don't carry extra steel stock and play with 3 or 4 ideas, cut steel and then accidentally mix them up with new stock. I accidentally welded wrong parts more than once and was off
on measurements because of simple mistakes like that. Again - DUH!
When going from heavy plate welds to small parts, don't forget to change the settings on the MIG. Holes in the thinner metals take more time to fill back in because you forget.
Don't take your gloves off so fast, can't tell you how many times I grabbed hot parts without a glove because I forgot they were going to be hot! DUH!
If you're building a cooker from a propane tank and plan to flip it over, plug holes and do surface prep BEFORE the flip. DUH!
Put on latex or other throw away gloves before painting, removing the mess from your hands sucks! LOL
Make sure you try and set your smoker on the trailer with the FB and all the goodies to make sure the tongue/tail weight is proper. I changed my FB design and threw this off, was tail heavy. DOH!
Wasted time chasing people on Craigslist, looking for a round firebox because I was mentally fighting the idea of a square firebox (was avoiding plate steel costs)
I do know I still have some extras I want to add soon, like a workspace in front of the cook door, but I am now sure how I want it yet. So in the meantime, I am just going to use the bumper from the trailer as a shelf, will put something together in the next few weeks when I can get my hands on more materials. Feedback is very much appreciated. I want to continually learn, so when my buddies want help, I feel better about decisions made during a build. :o)
I put together a video of my build pics instead of post a gazillion images here. Here's the video:
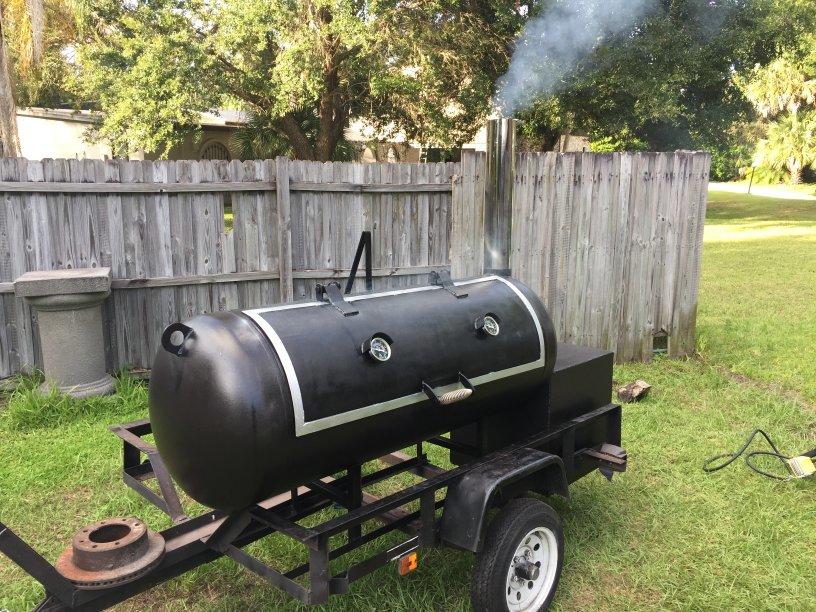
Image of fhe finished product:
I wanted to thank each and every person that takes time time to look at my build. This is the culmination of my love for smoking food, the massive amount of time spent drooling over YOUR builds and the deep burning desire to build one from scratch on my own. It's a 120g propane tank I picked up for $50, delivered. I always had my eye set on a mid-sized Lang, but the price tag was always too big a pill to swallow, even for the used ones on CL. This was one of the initial driving factors for building my own. Recently, my daughter announced her engagement and she asked me to cook for the reception. That sparked the idea to get my smoker project going and the timing was right to get it done.
Here we go: One of the features I wanted was the ability to move the smoker around the property, but not necessarily take it anywhere else. I bought a used small 4x6 trailer for my build. I initially tried to go the round firebox route, but I wasted a lot of time chasing people on CL, only to find they cannot measure correctly. I was very specific on my FB needs because Feldons caluclator stated what I needed in capacity, every time I went an looked at a cylinder someone had, it was too small. This drove me to make the leap into buying new plate and building a square box. Initially, I went the cylinder idea to save on the cost of plate, but I kept wasting days searching for the right size tank and either getting no responses to emails/texts or finding out the owner was including stands and other welded on framing into the specs, making their tank a no-go. Back to the forums I went, and researched square FB's and priced the steel. For $350, I bought 1/4 plate to build the box and 3/16 plate for the RF plenum, made some final decisions on the sizes and ordered the steel. Because the 1/4 plate is so thick and was at the upper end of my MIG's capability, I contracted a welder friend and we got busy. While waiting on the plate to come in and get cut, I worked on the initial work to be done to the tank. Cleaning it out, flipping it, cutting the door, installing hinges, making a temp door handle, prepping the cook grate rails, mounting it to the trailer, installing the cook door seals and getting it to his house for the FB install. I towed it to his house on a Saturday morning, we assembled the fire box and within 2 days, we had the fire box hung and the chinmey cut to size and installed. Once that portion was finished, it was back to my house for completion. I spent the next 2 weeks building cook racks, installing the permanent door handles, RF plate, FB wood stand, temp gauges/shrouds and cleaning it up for paint.
Ideas from SMF that I incorporated:
Feldons calculator - can't say enough about this tool!
1/4 plate fire box, using many suggestions for how to measure and cut the openings . The cut and mate process was not as hard as I imagined for a box.
Weld hinges before completely cutting the door!
RF plate and grease tough to the ball valve below the smoker, love this idea
Making grates from box tubing - I repurposed old clothing racks from a dumpster, there was more than I could ever use there, I picked from the best steel and took what I needed
Damper locations
Fire box grating build
Flipping the axle to underneath the leaf springs, to raise the trailer without having to buy bigger tires, different leaf springs, etc.
My own ideas that worked:
Welded an eye hook to the FB, bought a used an electric warn winch and used it to hang and mount the FB to the tank
Bought 2x used chrome semi exhaust stacks from someone on Craigslist for $30
Repurposed king & queen sized bed frames for angle iron. Only drawback was the time spent removing the paint, but saved a chunk in steel
Using a small bottle jack to press on plates that had larger gaps than I wanted to fill weld, makes the gaps more managable and less costly in MIG wire.
Temp door handle with rebar until I had a firm solution for a door handle setup
Door stop tabs - kept the door from falling in once hinges were installed and door was cut, until the 1 1/8" outer seal straps were mounted.
Basic suggestions I felt could have been communicated on other builds that I missed seeing: (keep in mind, these are my personal opinions)
Steel wheel brush for grinder (highly recommend over flap disc when removing paint)
Full face protection - when using a grinder, small debris can get under your safety glasses and get in your eyes
Paint stripper is a waste of time and a bigger mess to clean up (my opinion)
Some people waste time on putting a pretty 45 angle on door seal straps. Save yourself the aggravation. You're going to grind them flat and paint it anyway. Never will see it. lol
Mistakes:
Because the reach to my open work space was limited to how far I could stretch my welder's power feed, I had to work in the sun a lot. I highly suggest using an EZ-UP for shade!
Hindsight is 20/20 - I should have bought a couple of those stick on style bubble levels and pasted them on my trailer. A few times I had to spin my trailer a tad to be able to reach areas
with the MIG gun.
I found myself putting my trailer out of level and finding out AFTER I made welds that I was off on my racks, etc. Quick eye reference for level, for just a couple bucks. DUH!
Don't carry extra steel stock and play with 3 or 4 ideas, cut steel and then accidentally mix them up with new stock. I accidentally welded wrong parts more than once and was off
on measurements because of simple mistakes like that. Again - DUH!
When going from heavy plate welds to small parts, don't forget to change the settings on the MIG. Holes in the thinner metals take more time to fill back in because you forget.
Don't take your gloves off so fast, can't tell you how many times I grabbed hot parts without a glove because I forgot they were going to be hot! DUH!
If you're building a cooker from a propane tank and plan to flip it over, plug holes and do surface prep BEFORE the flip. DUH!
Put on latex or other throw away gloves before painting, removing the mess from your hands sucks! LOL
Make sure you try and set your smoker on the trailer with the FB and all the goodies to make sure the tongue/tail weight is proper. I changed my FB design and threw this off, was tail heavy. DOH!
Wasted time chasing people on Craigslist, looking for a round firebox because I was mentally fighting the idea of a square firebox (was avoiding plate steel costs)
I do know I still have some extras I want to add soon, like a workspace in front of the cook door, but I am now sure how I want it yet. So in the meantime, I am just going to use the bumper from the trailer as a shelf, will put something together in the next few weeks when I can get my hands on more materials. Feedback is very much appreciated. I want to continually learn, so when my buddies want help, I feel better about decisions made during a build. :o)
I put together a video of my build pics instead of post a gazillion images here. Here's the video:
Image of fhe finished product:
Last edited by a moderator: