Man... Replaced the safety switch just because it's cheap and easy. Went to remove the metal pieces around the heating element and took the back cover off. The connectors were corroded to hell. Guess I'm buying a new element too lol. At this point, the internals are 100% new. I haven't even tried to turn it on yet. I hope this is worth it!
Navigation
Install the app
How to install the app on iOS
Follow along with the video below to see how to install our site as a web app on your home screen.
Note: This feature may not be available in some browsers.
More options
Style variation
-
Some of the links on this forum allow SMF, at no cost to you, to earn a small commission when you click through and make a purchase. Let me know if you have any questions about this.
You are using an out of date browser. It may not display this or other websites correctly.
You should upgrade or use an alternative browser.
You should upgrade or use an alternative browser.
MES Rewire Simple Guide - No Back Removal Needed!!!
- Thread starter tallbm
- Start date
SmokingMeatForums.com is reader supported and as an Amazon Associate, we may earn commissions from qualifying purchases.
Keep the element and shine up the male spades on the legs of the element and ohm it for 12 ohms and save it for a back up element if there are no pits or burns through the outer metal jacket when you inspect both sides.Man... Replaced the safety switch just because it's cheap and easy. Went to remove the metal pieces around the heating element and took the back cover off. The connectors were corroded to hell. Guess I'm buying a new element too lol. At this point, the internals are 100% new. I haven't even tried to turn it on yet. I hope this is worth it!
The element is usually ok. Masterbuilt uses very crappy spade connectors on their wires so get some high temp ones 16 AWG 1/4 inch female spade connectors and you should be good to go. It helps to have a pack of good ones. I've never had to replace my own improved spade connectors, only the crappy Masterbuilt ones :DMan... Replaced the safety switch just because it's cheap and easy. Went to remove the metal pieces around the heating element and took the back cover off. The connectors were corroded to hell. Guess I'm buying a new element too lol. At this point, the internals are 100% new. I haven't even tried to turn it on yet. I hope this is worth it!
Ah I see. I hope that solves it allI did buy some new spades as well. But the male ends on the element itself were rusted to heck. New element kit was only $23 so not a big deal. It's already here and I'm throwing it in today.
Might not catch you in time , or this may or may not help .element kit was only $23 so not a big deal. It's already here and I'm throwing it in today.
This makes getting the ground on the mounting screw a little easier .
I used a seal pick pushed through from the back . Hang the eyelet over the pick .

Then slide the element bracket on the pick . Keeps the eyelet in place while you bolt it up .

I just attached it to a screw that was still in place from one of the metal pieces over the element that I didn't put back. I think it'll be fine?
Did a 1hr test with Auber and it seemed to be working and held at 200. My other thermometer had battery corrosion so I have to test the Auber probe another day. Now I need to figure out my smoke box/chimney situation. Thanks again to every one who has helped get me this far!
Did a 1hr test with Auber and it seemed to be working and held at 200. My other thermometer had battery corrosion so I have to test the Auber probe another day. Now I need to figure out my smoke box/chimney situation. Thanks again to every one who has helped get me this far!
Should be . As long as it's sandwiched in there and making contact .I think it'll be fine?
pi guy
Smoking Fanatic
Ok, I know I'm being a bit of a pain in the a**, but reading through these threads is making me more confused. I'm pretty comfortable with technical details, and I work in the electronics industry (I'm not an Engineer however) so I get the concepts for the most part. Please let me know if I have this correct:
- The instructions you give at the beginning of this thread are just to bypass the MES controller?
- I then need to get an Auber PID. Can I use this one from Amazon that has wifi: https://www.amazon.com/Wireless-WIFI-Temperature-Humidity-Controller/dp/B06XFV4JT1/
or do I have to use this one that I saw referenced: https://www.auberins.com/index.php?main_page=product_info&products_id=110
or another model?
- I then plug the MES power cord into the PID and use it to control on-off and temp setting?
- Where does the SSR come into play/why is it used?
Thanks. I'm almost sold on this idea!
Ok, I know I'm being a bit of a pain in the a**, but reading through these threads is making me more confused. I'm pretty comfortable with technical details, and I work in the electronics industry (I'm not an Engineer however) so I get the concepts for the most part. Please let me know if I have this correct:
- The instructions you give at the beginning of this thread are just to bypass the MES controller?
- I then need to get an Auber PID. Can I use this one from Amazon that has wifi: https://www.amazon.com/Wireless-WIFI-Temperature-Humidity-Controller/dp/B06XFV4JT1/
or do I have to use this one that I saw referenced: https://www.auberins.com/index.php?main_page=product_info&products_id=110
or another model?
- I then plug the MES power cord into the PID and use it to control on-off and temp setting?
- Where does the SSR come into play/why is it used?
Thanks. I'm almost sold on this idea!
No problem. Actually this will make everything nice and concise :D
1. Instructions to rewire will bypass the MES controller automatically. All the rewire is doing is connecting the MES plug wires to the wires that run to the MES heating element thereby making all the electronics in the MES useless because they no longer receive any power after the rewire.
2. That controller on Amazon only supports and controls up to 176F:
There is another version that supports 196F but any controllers like these I've seen simply aren't built to handle what an MES would need to do. These seem to be ok for homebrew and heating setups but not smoking meat.
The lowest model to use on an MES40 (and covers MES30) is the other link you posted (https://www.auberins.com/index.php?main_page=product_info&products_id=110) this is the WS-1510ELPM and choosing the multi-purpose probe is the way to go.
You can always go more powerful, more bells and whistles, and even the wifi (people love the ease of control and use with the phone app vs onboard buttons) but this one is the minimum level model that will go with no issue:
3. After the rewire, Yes.
- You plug the MES cord into the PID
- You plug the PID into the wall and drop the PID temp probe down the MES vent (I suggest clipping it to the bottom of the lowest smoker rack in the center)
- Finally, you punch in the temp you want into the PID
Now the PID will take power from the wall and feed it to the MES cord which is rewired to feed power to the MES heating element.
The PID will keep sending power to hit the temp you entered in and hold at that temp.
4. The SSR is inside the Auber PID controller already so you don't have to buy or use a separate one. The SSR's job is basically to act as an On/Off switch when the brain of the controller wants to cut power on/off to the MES. The SSR is made to be a workhorse and can handle all the switching versus other kinds of switches that may burn out due to the amount of switching that may happen to cut power on/off to hit and hold the temp.
Oh one final thing.
The cost of that Auber PID is like $160 which seems like a lot, BUT what you are getting is not measly little electrical device. With the rewire and the controller you are getting a whole new smoker that is nothing like it ever was before. A new smoker that performs like electric smokers that cost over $1,000.
I always say it's like turning a golf cart into a Ferrari.
It really is a whole completely different smoker so don't let the price tag make you think "for that price I could just buy a brand new MES or some other $200 smoker and have something brand new". This thought is completely off base once you convert your MES to run with a PID hahaha.
All us PID guys have been there so I figured I would throw this in, but don't take my word for it. Just ask and I'm positive you will get nothing but raving reviews and responses from all the guys who took the same journey :D
That's pretty much it. Keep asking any questions you have and we'll get them answered :D
Last edited:
pi guy
Smoking Fanatic
This is perfect, exactly the info and advice I needed, thank you.No problem. Actually this will make everything nice and concise :D
1. Instructions to rewire will bypass the MES controller automatically. All the rewire is doing is connecting the MES plug wires to the wires that run to the MES heating element thereby making all the electronics in the MES useless because they no longer receive any power after the rewire.
2. That controller on Amazon only supports and controls up to 176F:
View attachment 717617
There is another version that supports 196F but any controllers like these I've seen simply aren't built to handle what an MES would need to do. These seem to be ok for homebrew and heating setups but not smoking meat.
The lowest model to use on an MES40 (and covers MES30) is the other link you posted (https://www.auberins.com/index.php?main_page=product_info&products_id=110) this is the WS-1510ELPM and choosing the multi-purpose probe is the way to go.
You can always go more powerful, more bells and whistles, and even the wifi (people love the ease of control and use with the phone app vs onboard buttons) but this one is the minimum level model that will go with no issue:
View attachment 717618
3. After the rewire, Yes.
- You plug the MES cord into the PID
- You plug the PID into the wall and drop the PID temp probe down the MES vent (I suggest clipping it to the bottom of the lowest smoker rack in the center)
- Finally, you punch in the temp you want into the PID
Now the PID will take power from the wall and feed it to the MES cord which is rewired to feed power to the MES heating element.
The PID will keep sending power to hit the temp you entered in and hold at that temp.
4. The SSR is inside the Auber PID controller already so you don't have to buy or use a separate one. The SSR's job is basically to act as an On/Off switch when the brain of the controller wants to cut power on/off to the MES. The SSR is made to be a workhorse and can handle all the switching versus other kinds of switches that may burn out due to the amount of switching that may happen to cut power on/off to hit and hold the temp.
View attachment 717619
Oh one final thing.
The cost of that Auber PID is like $160 which seems like a lot, BUT what you are getting is not measly little electrical device. With the rewire and the controller you are getting a whole new smoker that is nothing like it ever was before. A new smoker that performs like electric smokers that cost over $1,000.
I always say it's like turning a golf cart into a Ferrari.
It really is a whole completely different smoker so don't let the price tag make you think "for that price I could just buy a brand new MES or some other $200 smoker and have something brand new". This thought is completely off base once you convert your MES to run with a PID hahaha.
All us PID guys have been there so I figured I would throw this in, but don't take my word for it. Just ask and I'm positive you will get nothing but raving reviews and responses from all the guys who took the same journey :D
That's pretty much it. Keep asking any questions you have and we'll get them answered :D
I'll keep you posted as to how it goes. I do like the Wi-Fi idea, but depending on the price adder I may not have the funds now to do that. Wife is not happy the MES is dead, and that we have to pay any money at all to get something new, or get this one up and running. But she does love BBQ, so there's that in my corner. We'll see. LOL
pi guy
Smoking Fanatic
Ok, I'm convinced. I'm about to pull the trigger on this PID. Is this good??
WIFI Electric Smoker Controller, 1800 Watts [AW-1520H] - $219.99 : Auber Instruments, Inc., Temperature control solutions for home and industry
Auber Instruments, Inc. WIFI Electric Smoker Controller, 1800 Watts [AW-1520H] - 4th of July sale ends on 7/5/2026!This plug-and-play PID controller regulates the temperature of electric smokers, such as Smokin-it®, Smokin Tex, and Masterbuilt Smoker. This controller uses a PID algorithm to...
www.auberins.com
Nice!!!!Ok, I'm convinced. I'm about to pull the trigger on this PID. Is this good??
WIFI Electric Smoker Controller, 1800 Watts [AW-1520H] - $219.99 : Auber Instruments, Inc., Temperature control solutions for home and industry
Auber Instruments, Inc. WIFI Electric Smoker Controller, 1800 Watts [AW-1520H] - 4th of July sale ends on 7/5/2026!This plug-and-play PID controller regulates the temperature of electric smokers, such as Smokin-it®, Smokin Tex, and Masterbuilt Smoker. This controller uses a PID algorithm to...www.auberins.com
Yeah that seems to be the favorite option of folks. It has all the bells and whistles AND is easy to use with the mobile app interface. Programming the base level one with the buttons is not intuitive. It's a 1 time act that isn't hard but their directions were written by a drunk 3rd grader standing on their head :P
That one will do fine. As for probes, I am NOT a fan of wall mount probes and prefer free hanging probe for your 1st probe option. This way you can clip it anywhere you lake and change location if ever needed. I've landed on underside, center of lowest rack for mine and I use a probe alligator clip to hold mine in place there.
Regular food probe for the 2nd probe and I personally would not pay for a 3rd probe but you may want it for completeness and it can still be useful. So your call. If getting it a regular food probe would be most flexible since they can do meat or air temp.
A 4 probe remote thermometer is still "needed" in my book.
I rock a bunch of probes and use PID probe 1 that senses heat for set temp at the underside center of lowest rack, PID Probe 2 for back left of the lowest rack.
I use my 4 probe remote thermometer and 1 of it's robes measures temp at the front right of the lowest rack. And the other 3 are for meat or if I need temps at other racks, etc. It's good to know what things are doing where you are cooking.
I always have the temps across the lowest rack (which will be different across the 3 probes in different spots) and I can see consistently the temps are different across the rack and which side is consistently hot and consistently cold. This helps in the few oddball scenarios where temp readings seem different BUT I know how different and how consistent they are.
My smoker is always hottest in back left, coldest at front right, and the center probe is just about right in the middle on the temps between the other 1 probes.
This lets me know to always put the thicker/bigger portions of meat to the back and left and the thinner ones to the right, like when smoking boneless skinless chicken breasts or making sure I put the FLAT muscle of a whole packer brisket towards the hotter side of the smoker since the Flat takes longer to get tender vs the Point.
Anyhow I'm rambling now. Let us know if you get the thing and when it's installed, or you need help installing :D
pi guy
Smoking Fanatic
Thanks, definitely good info. I'm planning on the 2 probes, and definitely the free hanging one.Nice!!!!
Yeah that seems to be the favorite option of folks. It has all the bells and whistles AND is easy to use with the mobile app interface. Programming the base level one with the buttons is not intuitive. It's a 1 time act that isn't hard but their directions were written by a drunk 3rd grader standing on their head :P
That one will do fine. As for probes, I am NOT a fan of wall mount probes and prefer free hanging probe for your 1st probe option. This way you can clip it anywhere you lake and change location if ever needed. I've landed on underside, center of lowest rack for mine and I use a probe alligator clip to hold mine in place there.
Regular food probe for the 2nd probe and I personally would not pay for a 3rd probe but you may want it for completeness and it can still be useful. So your call. If getting it a regular food probe would be most flexible since they can do meat or air temp.
A 4 probe remote thermometer is still "needed" in my book.
I rock a bunch of probes and use PID probe 1 that senses heat for set temp at the underside center of lowest rack, PID Probe 2 for back left of the lowest rack.
I use my 4 probe remote thermometer and 1 of it's robes measures temp at the front right of the lowest rack. And the other 3 are for meat or if I need temps at other racks, etc. It's good to know what things are doing where you are cooking.
I always have the temps across the lowest rack (which will be different across the 3 probes in different spots) and I can see consistently the temps are different across the rack and which side is consistently hot and consistently cold. This helps in the few oddball scenarios where temp readings seem different BUT I know how different and how consistent they are.
My smoker is always hottest in back left, coldest at front right, and the center probe is just about right in the middle on the temps between the other 1 probes.
This lets me know to always put the thicker/bigger portions of meat to the back and left and the thinner ones to the right, like when smoking boneless skinless chicken breasts or making sure I put the FLAT muscle of a whole packer brisket towards the hotter side of the smoker since the Flat takes longer to get tender vs the Point.
Anyhow I'm rambling now. Let us know if you get the thing and when it's installed, or you need help installing :D
One thing I am worried about now, and I just thought of it, but what if my MES heating element is bad, and that's actually the culprit; not the controller?? I need to see if Auber has a return policy. Or is there an easy way to confirm the element is good on the MES?
Sorry, just thought of this and so now I'm panicking.
Once you rewire you can plug in the MES cord and the heating element will simply heat up but don't leave it like that. It has no control. Basically plugging it in is ON and unplugging is off. If left plugged in it will heat until the safety switch stops for short time or it burns down lol.Thanks, definitely good info. I'm planning on the 2 probes, and definitely the free hanging one.
One thing I am worried about now, and I just thought of it, but what if my MES heating element is bad, and that's actually the culprit; not the controller?? I need to see if Auber has a return policy. Or is there an easy way to confirm the element is good on the MES?
Sorry, just thought of this and so now I'm panicking.
MES heating elements are readily available and are only like $20-$25, well used to be before prices got nuts. I don't think they are much off from that price.
pi guy
Smoking Fanatic
Ok thanks. It looks like Auber does have a return policy, but I will obviously lose the shipping money I spend ($12.70 for me) and have to pay for shipping back (probably the same) and a 10% restocking fee if it gets used (which it would have to). So that sucks ($50 lost).Once you rewire you can plug in the MES cord and the heating element will simply heat up but don't leave it like that. It has no control. Basically plugging it in is ON and unplugging is off. If left plugged in it will heat until the safety switch stops for short time or it burns down lol.
MES heating elements are readily available and are only like $20-$25, well used to be before prices got nuts. I don't think they are much off from that price.
But I will do the rewire (because why not, it's shot anyways) and see if it heats up. If not I'll check for a new element (thanks for the advice!). Then I'll invest the ~$250 in the Auber.
So I have work to do this weekend LOL.
Again, very appreciative for everything. Will keep you posted!
Last edited:
Well I'm a little late to this party but I wanted to say thanks to all that paved this trail. I ended up with a new mes and rewired with no problems(at least so far ). The first test matched my thermopro within a couple degrees. I've run the autotune on the auber and all ready to smoke some summer sausage. Thanks again
). The first test matched my thermopro within a couple degrees. I've run the autotune on the auber and all ready to smoke some summer sausage. Thanks againAttachments
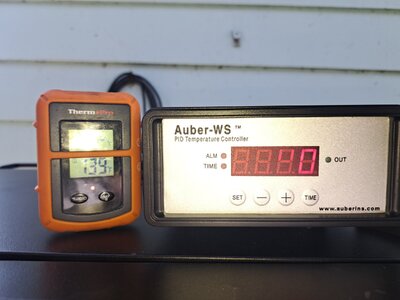
Lookin good, welcome to the PID club!!!Well I'm a little late to this party but I wanted to say thanks to all that paved this trail. I ended up with a new mes and rewired with no problems(at least so far
If you need any PID tuning numbers should the autotune not behave well, we can whip some up for you. Can't wait to see what you smoke :D
pi guy
Smoking Fanatic
Ok, thank you very much @tallbm
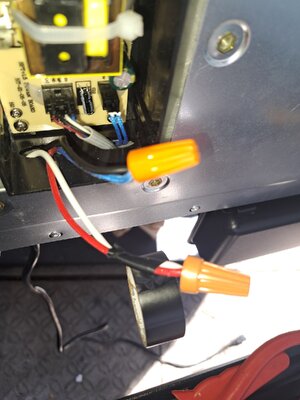
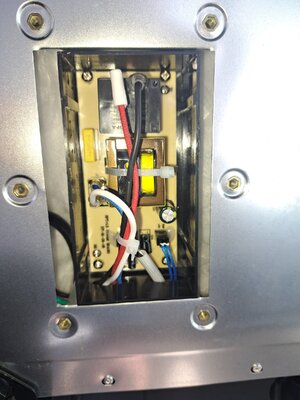
I did the rewire and tested that the element was heating up. It did (a little slower than I thought it would, but it did). My wiring was different but I figured it out (see pics). Now I'll order the Auber!!


I did the rewire and tested that the element was heating up. It did (a little slower than I thought it would, but it did). My wiring was different but I figured it out (see pics). Now I'll order the Auber!!

SmokingMeatForums.com is reader supported and as an Amazon Associate, we may earn commissions from qualifying purchases.
Similar threads
- Replies
- 2
- Views
- 230
- Replies
- 27
- Views
- 2K
- Replies
- 23
- Views
- 846
SmokingMeatForums.com is reader supported and as an Amazon Associate, we may earn commissions from qualifying purchases.

SmokingMeatForums.com is a community of barbecue and outdoor cooking enthusiasts dedicated to smoking meat.
© 2004-2026 SmokingMeatForums.com