scjohn
Newbie
I have made plenty of different kinds of cookers and have cooked some pretty good Q. All my friends say how good it always is but to me its jut not there. Something is missing and not sure what. So I decided to build a 250 gallon RF smoker. I got the tank cut the doors and cut off one bell end and had the RF plate cut and only needed the firebox metal to finish. So I thought....View media item 554375Then I started to really like the Aaron Franklin type of smoker so I changed plans and went to work.


I got another 250 Gallon tank, cut it in half and begun to marry the two together. Aaron Franklin uses a 24 inch pipe in the center of the firebox half so its a insulated firebox. I posted a ad on craigslist looking for a 24 inch pipe to use. I found one at a good deal so me and my daughter set out on a 7 hour round trip to pick up these.

So on our 3.5 hour ride back I was doing some thinking and yup, you guessed it. Changed my mind again. Now I'm building a 24" reverse flow smoker and till have enough pipe to finish the Aaron Franklin smoker. So I went to work...
Cut the flanges and the center thing off. I got lucky cause I was looking for 1/4" and this was 3/8"

Started to do my research and followed DaveOmak's direction "THANK YOU" and read everything I possibly can on this forum and got to work. Please don't pick on my welding skills. It sticks but its not pretty and paint will cover it up.
Little mockup of desired outcome.

Got the end pieces cut.

Starting to cut out the doors and left the corners until I put the hinges on.

Built the frame. One thing that really helped me with this project was that I marked the pipe at 12, 3, 6 and 9 o-clock positions so I had a reference point through the entire build.

Cut out the firebox door and dampener pinwheel. I know....vent at the top. Its coming.

Reverse flow plate in.

Hinges on and door cut out.

Door weight added

Got the firebox connected to the cook chamber. This was a exciting moment for me. As you can see from the pics, I have no shop and everything I have don has been by myself using blocks and leverage and some backbone.


Got a grate for the firebox.

Got the cook grate done.

Not sure if it helps but I added this piece in the end to help the flow. Well see.

Here is the firebox door with the upper vent added.

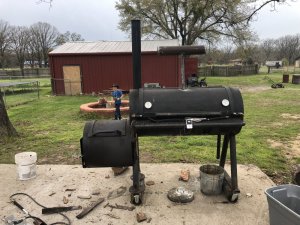
Added two thermometers and two ports and a handle to the front. Stack is in and ready for a test fire. I still need to add a shelf in the front, finish welding some spots, replace the broken therm on the right, some heavy duty tires (3/8 pipe weighs 94 lb. per foot) and some black paint. Im planning on cooking this Saturday for my birthday party. Ill let ya'll know how it goes and try to remember to get some pics.

I got another 250 Gallon tank, cut it in half and begun to marry the two together. Aaron Franklin uses a 24 inch pipe in the center of the firebox half so its a insulated firebox. I posted a ad on craigslist looking for a 24 inch pipe to use. I found one at a good deal so me and my daughter set out on a 7 hour round trip to pick up these.
So on our 3.5 hour ride back I was doing some thinking and yup, you guessed it. Changed my mind again. Now I'm building a 24" reverse flow smoker and till have enough pipe to finish the Aaron Franklin smoker. So I went to work...
Cut the flanges and the center thing off. I got lucky cause I was looking for 1/4" and this was 3/8"
Started to do my research and followed DaveOmak's direction "THANK YOU" and read everything I possibly can on this forum and got to work. Please don't pick on my welding skills. It sticks but its not pretty and paint will cover it up.
Little mockup of desired outcome.
Got the end pieces cut.
Starting to cut out the doors and left the corners until I put the hinges on.
Built the frame. One thing that really helped me with this project was that I marked the pipe at 12, 3, 6 and 9 o-clock positions so I had a reference point through the entire build.
Cut out the firebox door and dampener pinwheel. I know....vent at the top. Its coming.
Reverse flow plate in.
Hinges on and door cut out.
Door weight added
Got the firebox connected to the cook chamber. This was a exciting moment for me. As you can see from the pics, I have no shop and everything I have don has been by myself using blocks and leverage and some backbone.
Got a grate for the firebox.
Got the cook grate done.
Not sure if it helps but I added this piece in the end to help the flow. Well see.
Here is the firebox door with the upper vent added.
Added two thermometers and two ports and a handle to the front. Stack is in and ready for a test fire. I still need to add a shelf in the front, finish welding some spots, replace the broken therm on the right, some heavy duty tires (3/8 pipe weighs 94 lb. per foot) and some black paint. Im planning on cooking this Saturday for my birthday party. Ill let ya'll know how it goes and try to remember to get some pics.