GM Frigidaire Build

  • Some of the links on this forum allow SMF, at no cost to you, to earn a small commission when you click through and make a purchase. Let me know if you have any questions about this.
SMF is reader-supported. When you buy through links on our site, we may earn an affiliate commission.
So, plan is to put some finishing touches on Thursday (since it will be above 0 degrees lol) & do a seasoned burn on Fri/sat.
- Messed around with the auber, pretty fancy toy lol haven't totally figured it out yet, but someone o. Here post a PDF manual so I will mess with that more
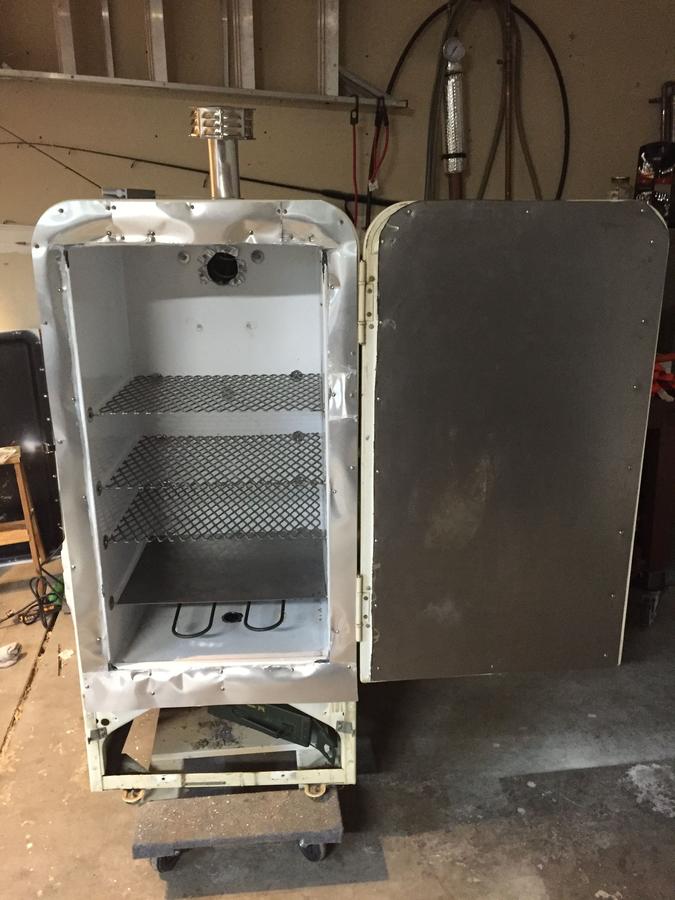
-heating element came in yesterday, will drill holes & install that Thursday
- install the AMPS ammo can thursday
- then finish exhaust & it should be good for a seasoning

Pics to come!
 
sounds like good progress, You can also get the Auberins PDF from the website. Its on all the product pages, they have 2 most of the time, 1 is a simple easy manual and the 2nd is a more indepth complex manual.

if you need any help let me know, ive used them lots in my builds.
 
My advice to everyone researching a build... be Patient!!!!
I now call my smoker "The Ugly Piglet", cause it is definitely the ugly duckling of smokers.
1. I wish I would've gone with the finned strip heater, but I tried to save some money.
So i drilled the hole for the 1500 watt element, pushed it into the liner so it was flush to the element's steel brace and realized that part of the element that gets red hot & not insulated would be touching the the insulation. Needless to say I was a bit PO'd.
So I made some braces from scrap aluminum I had laying around and patched the openings. I know someone on here made a custom steel box & everything, but I'm not that talented.
2. I am REALLY not proud of my skinning job. It is 100% sealed, but it LOOKS effin horrible! I wish I wouldn't have used aluminum flahsing because my liner's edge was not straight. It was bent ineards. So I tried to use rivets but they wouldn't reach. So I went to self taping screws but had to angle them to reach the bent lip of the liner so I had something to screw in to. So this in turn popped out the flashing and crinkles it and it looks crappy.
Like I said, it is sealed, but it ain't pretty lol
3. I did an ammo can AMPS mod. Worked out pretty well & fits perfectly under the fridge.
4. Picking up the steel tomorrow for a heat shield, door skin, & racks. Then a seasoning burn on Sunday/Monday.
Below is a pic, be nice in the comments lol
 
It's coming along! Couple of smokes in it and it won't be pretty anymore. As long as it cranks out good bbq nobody cares what it looks like.

Agree with you 100% on patience. I rushed my first build so I could get smoking, didn't turn out as I had hoped. The next build I spent a little more time on, but tried to take some short cuts with the insulation. And now it's sitting in pieces. Patience,planning,patience.
 
Yea, we live & learn I suppose.
I smoked my thumb with a hammer trying to widen the hole to fit the elements plug through & after that I was "I'm done, I'm skinning the fridge & I'm done" lol
Should've did pilot holes into the bent lip.
 
i cut the plug end off my element and then put a new end on it. Made it a hell of a lot easier to run the wiring through it.

On the current build I am helping a buddy with ill cut the plug end off, run the wire to an electrical junction box in the back and have a new electric cord coming out of it to the auberins controller.

live and learn., Im on #3 and finding ways to make it better still.
 
Yea, we live & learn I suppose.
I smoked my thumb with a hammer trying to widen the hole to fit the elements plug through & after that I was "I'm done, I'm skinning the fridge & I'm done" lol
Should've did pilot holes into the bent lip.

I was curious if you could have taken pliers and bent the bent lip out to a nice 90* angle that would have made it easier to work with? Not much difference between rivets and screws though. Either one works good
 
I should've cut the plug.
I literally thought of that after i made my hole bigger. I was like "What the h*** am I doing" haha
 
Last edited:
I was curious if you could have taken pliers and bent the bent lip out to a nice 90* angle that would have made it easier to work with? Not much difference between rivets and screws though. Either one works good

I don't think it would have mattered. The way the liner is shaped there is like an in set lip then the tabs. IdK if the liner would have fit back into the shell if ther were bent. I suppose I could've bent @ shaved them a but. Oh well.
 
I don't think I've ever done anything perfect the first time. First time is for learning. Heck, the same thing can be said for life, "If only I knew then, what I know now.". Thanks for posting.
 
I don't think I've ever done anything perfect the first time. First time is for learning. Heck, the same thing can be said for life, "If only I knew then, what I know now.". Thanks for posting.

Must be nice, don't think I've done anything perfect......well ever. Ha
 
If I wanted do put a buffer strip of wood around the door to make tbeasier to attach the metal skin, would that wok?
So it would go fridge door, 1/4" strip of wood all the way around door, then metal skin.
Would the wood get too hot?
 
Well here be the Ugly Piglet, in all her glory.

Got the door skinned and didn't need to use a wood strip as a filler, so that is a plus. I used the X method and posted a couple pictures because sometimes it is hard to visualize for newbs.

The only thing left to do is install the gasket. As there is about a 3/8" gap all the way around the door. I also unfortunately was not able to use the original latch due to mounting issues, cutting out the door skin, and other issues that were a general PITA. So I bought a latch off Amazon and if it works well I post a link here.

So I am going to stop by Menards tomorrow and pick up a gasket rope and install it. I'm not sure if I am going to just screw in the rope, or try the cement, or both. I know some have complained that the cement doesn't last very long and the gasket starts falling off... We shall see.

Also, just for Ghits and Siggles, I plugged in the element to make sure it works, and with an ambient temp of 20 F, the fridge went from 30 F to 105 F in 15 minutes; WITHOUT the door sealed. So I was pretty stoked about that.

I will post some seasoning pictures tomorrow, hopefully.


What do you think of the X method for aligning the door so it's in plane ??   Looks like it worked perfect for you.... 
 
I used the adhesive on mine and it seemed to work fine so far. I would definitely get a much wider gasket than what the gap is, they flatten out.
 
The X method worked great! I think I got a little lucky though as I had to do only a couple shims. Hardest part was maintaining the straight door while putting the screws in. I would suggest that whoever reads this looking to do a build drill pilot holes, even if you have "self tapping" screws.
For the gasket I think I'm gonna try just adhering it with the Rutlands silicone. If it doesn't work then I will use their cement that comws with it.

What do you guys think for temp probe placement? Just run it through the door? Seems easiest way.
Also i read on here people using "T" shaped exhaust fittings so condensation & drippings do not accumulate in the elbow of the exhaust. Is this a good idea? i already installed my 90 degree elbow but was contemplating drilling a small hole in the bottom of the elbow and attaching some sort of catch. Is it worth it?
 
The door works ok, I decided I'm going to put a nipple through the side wall of mine for running the probes through. Use a little piece of duct seal to seal around the wires.

As far as the exhaust you can always try it out and see what you think. If you are getting a lot of drippings or buildup you might want to add a t
 
SmokingMeatForums.com is reader supported and as an Amazon Associate, we may earn commissions from qualifying purchases.
Clicky