• Some of the links on this forum allow SMF, at no cost to you, to earn a small commission when you click through and make a purchase. Let me know if you have any questions about this.
SMF is reader-supported. When you buy through links on our site, we may earn an affiliate commission.

paticus

Newbie
Original poster
Jan 24, 2021
24
36
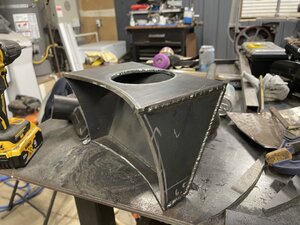
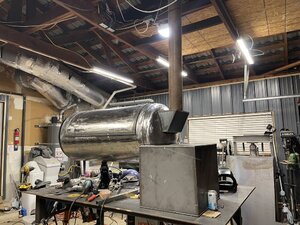
Hi all welcome to my 60 gallon build. I got this donor tank and I’m looking to build a simple RF smoker for my patio. I aspire to build a bigger cooker, and hoping to learn as much as I can with this build before investing into a bigger tank. I’ll be following the “how to build a reverse flow smoker ” thread for the majority of my build calculations.

I'll also be carting this around to local venues to support my smoked BBQ business https://www.instagram.com/stubbornbullbbq/

The tank came off of a decommissioned compressor. The steel is 1/8th thick… which I was hoping would be more once I cute the door off. Although the thinner gauge is not desirable, it should work, and at least is easy to cut 😊.

C62795CF-3B44-46EC-9962-5C7239899D48.jpeg


828F0F52-7C5B-4639-9F5C-11FEFA76795B.jpeg

7991B991-029D-4AED-BE4B-B35BAB024687.jpeg
 
Last edited:
I decided to knock off all of the paint. I haven’t decided if I’m going to use high temp paint or boiled linseed oil, but I figured a clean bare surface would be good either way. I tried wire wheels which only scuffed the surface. I then tried my oxy torch which did help loosen the paint, but I need to be careful getting this thin steel too hot. I had to torch it too much to make a difference. So I ended up going with these quick strip disks from Home Depot, which works fantastic. You cannot run these things anywhere near edges of metal, or they will break up really quickly. But if I stayed on the flat plane of the tank, I got through everything with 2 wheels, which I was happy with. I think this was about 2 hours for the door and full tank. I’m saving the caps for later.
9A24C6E0-E533-4785-9F48-390EB870BEFC.jpeg

41A989AC-90B4-48C7-85B6-A82533C92E13.jpeg
 
  • Like
Reactions: jaxgatorz
I completed the door strapping and hinges here. First time needing to use the slip roller that was handed down to me. I think I was stressing the machine with this steel, as it was quite the workout. But it did the job!

I was planning to stitch weld the straps, but there where gaps, so I decided to just run a bead along the whole perimeter. I thought for sure I was going to warp the door bad, and that was going to be the end of this build. TBH I would have been fine with that as my time/$ investment was pretty low up to this point. But to my surprise the steel held it’s shape very well.

I continue to incorrectly predict metal expansion.

I was planning to fabricate some elaborately cool hinges, but I decided I’ll save those for a bigger/thicker build. I found some leftover weldable hinges from McMaster Carr and called it a day. Out of luck, the hinges rotate and stop perfectly to hold the door open without a support behind it. The door opening has a nice stance and looks good.
1E06A295-3651-4892-AF24-BFD60FA040AF.jpeg
4E49FB68-F52B-422D-B607-C8D151C7AECD.jpeg
563405B3-85F8-4E84-9588-5832902777EE.jpeg
9CC9ECCD-6C44-4992-A67E-716444CAE15F.jpeg
7BFD4E70-27C8-4569-9544-170FDB9E793B.jpeg
 
The firebox is a proper 1/4” thick plate. I think it’s around 20x17x17 (need to double check). It’s a little big for this cook chamber, but more/less follows the formulas from the sticky thread. I cut out the half moon according to the RF FB/CC recommendations. I though the long radius cut was going to be a pain, but it was big enough to allow my band saw to follow the shape. After an unexpectedly long time fitting, clamping, and squaring, I got the box welded up.

BFB88CFA-E93E-4DCB-8BF6-A7F02CAF00A8.jpeg
0D584A02-05FE-4114-A216-D03DD52AF8D3.jpeg
00E36A50-FFB9-47DE-A4E6-6DAD9017B648.jpeg
039B2550-ACEC-4FF7-8869-98992CB574C4.jpeg
D9A7BE9A-F292-4B43-866A-4139803196C7.jpeg
 
Last edited:
Now this is a part I’ve been looking forward to. Joining the CC and firebox. Drawing and cutting straight lines on a round surface is hard for me. So I enlist the help of my laser level to make things easy (one of my favorite tools). Per daveomak daveomak ’s recommendation, I brought the FB in past the welded seam, so I could take advantage of the consist plane along the CC. I’m not sure what kind of notch you call this but I think it’s really cool how the round and square pieces join here. The FB is inset pretty far in the CC, which will make the RF plate easy to extend. I hope that inset will also add a little performance boost with the reduced travel to the CC.

No welding here, just doing a fit up. I need to strip the paint off of that cap on the FB side, and grind away some excess brackets from the previous compressor motors mounts.

08ADE226-3FC3-4101-90D1-CAC725C71A69.jpeg
AA81D856-B198-477E-A90E-E85CEDBB6E87.jpeg
11F20E0C-49FB-4620-92A9-0947DC189DC6.jpeg
178FA94E-7C1A-4CE9-98C3-299C70E92AC1.jpeg
B04B98AA-D5D9-4D05-95EE-969FA9C2F780.jpeg
 
Luv seeing the process! Keep sharing pics and keep telling the story. Looking forward to see what you come up with at the end.
 
  • Like
Reactions: paticus
Today I cleaned up the cap on the FB side of the tank, so I can prep it for welding. So that involved stripping paint, grinding previous compressor mounts smooth, and getting rid of an inlet port from a previous air hose fitting. I could have just left the port but it was in a weird spot, and might interfere with the exhaust collector, so I decided to clean it up. I’m not sure the right way to get rid of those ports, but I plug welded it and ground/polished it flush. Seems to work pretty well, and was easy. I got the FB fully welded to the CC. With that in its permanent place, I started lay out for the RF plate. More lasers of course! I think I have a plan for the RF plate and drain, but thinking through those details for the next time in the shop.
A52D2D25-36FE-4F0F-8C59-8F485E50703E.jpeg

9CF1B211-F8EC-4E2F-BDA2-82F2A84EDD64.jpeg

578824E2-A929-4B1D-A3E3-6C3E1FCE0651.jpeg

BE66BA27-F331-49C8-9D17-2461B58BA3DB.jpeg

D56C108D-DBE8-480D-A2F5-EDF0356C1D38.jpeg

72E7644A-FAA8-41F3-BBFA-837834883DDB.jpeg
 
Next up is the RF plate. I incorporated a drain, which runs down a pipe to the bottom of the smoker. The plate is level across the length of the cook chamber. However it is sloped to the center between the front to back. In the middle is an angle iron channel which is sloped towards the drain. On the inside of the smoker, where the top of the firebox is in the CC, I created a small channel to drain any grease that makes it into this corner area. I’m glad this step is done. Working with the slopes and drain with the heavy plate on the inside of the bbq was a major pain. Next smoker I’ll probably rethink this design.

Since I was planning to weld the plate in, I couldn’t put off the rust removal any longer. I slapped on the respirator, shop filter, and went to work. The stripping wheels once again where most effective and removed the rust easily.

C8BDECF6-62B2-41CB-BDDE-BF59E75E5401.jpeg

0039C1DE-BDBF-4C21-8DA8-F4D0A63F99CA.jpeg
2EFA9556-6C36-4887-B820-7DC4E8A6F6AB.jpeg

972C39FE-F4A1-479F-9C65-2BF2C6495F9C.jpeg
99E82A10-2C43-4E72-BCD1-D8930489CF35.jpeg
4AC7290D-A478-4CD6-84DA-201B881122F7.jpeg
A98C835F-0F74-4BAC-9A84-BC881FD7C220.jpeg
F2CD07F1-8626-44EB-8791-11646FD16514.jpeg
EA64BFBC-15F7-4BF4-ADF7-AE87F61BA81A.jpeg
 
The exhaust manifold is done. The 4.5” exhaust stack in the pictures is for a visual/fit up only.

C7DB93CA-FE7B-492E-8995-5FBDFDD1D278.jpeg
947690CA-68D6-4B03-8D6E-495DD56F2C4A.jpeg
52E91CAA-8927-4CFA-ABEC-5DAA84A40892.jpeg
CC4171F2-ED49-474B-91F5-52C2F000EB92.jpeg
14C528DA-5C6B-4AD3-B0A7-96AD54ADDC03.jpeg

163224A6-7D47-4E8B-915A-A7FEF21CD8B2.jpeg
618501A3-A7C4-4AFD-9B1F-074436F7959C.jpeg
97C36EF7-9CC5-4A1A-BB63-15F5D273088A.jpeg
 

Attachments

  • 655B3329-8183-4BDC-BB2F-C60A1B5C65CD.jpeg
    655B3329-8183-4BDC-BB2F-C60A1B5C65CD.jpeg
    149.9 KB · Views: 29
  • 38A31742-A9C3-4695-B14F-7462A8E4DF91.jpeg
    38A31742-A9C3-4695-B14F-7462A8E4DF91.jpeg
    196.8 KB · Views: 27
The firebox door is underway. I am planning to cut out horizontal sliding FB inlets, and place them on the top/bottom door. I warped the door a bit while welding, but fortunately it fit in my press to straighten things back out. I’ll probably re-enforce the inside of the door with a “X” strap to keep it straight,

6064814D-9DDE-4764-B4C1-9431155808CA.jpeg
8FCF2D48-AD19-405D-BAE3-5A5F7D75E03A.jpeg
DD8809FA-8463-4C77-A3BE-A05EBF03AA0C.jpeg
B9F60EF7-0234-4D12-AB34-B81DFF5F921F.jpeg
 
  • Like
Reactions: Brokenhandle
SmokingMeatForums.com is reader supported and as an Amazon Associate, we may earn commissions from qualifying purchases.

Hot Threads

Clicky