Converting old freezer in pellet smoker

  • Some of the links on this forum allow SMF, at no cost to you, to earn a small commission when you click through and make a purchase. Let me know if you have any questions about this.
SMF is reader-supported. When you buy through links on our site, we may earn an affiliate commission.

Mitch’s bitchin kitchen

Newbie
Original poster
Oct 3, 2018
22
9
North Dakota
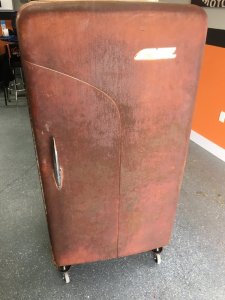
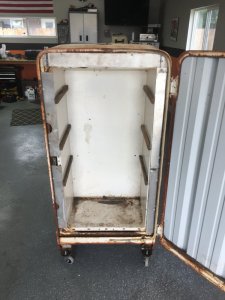
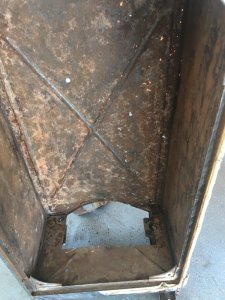
Hey guys/gals! I have been doing a lot of research on what my next smoker was going to be. I have been using a traeger tailgater and wsm for quite a few years. I have been getting some of my recipes dialed in on those but was always short on space to make enough for the bigger amounts of guests. I also smoked in a rib competition where we had to cook ribs for the the judges and also to the people attending the rib competition/car show. It was an awesome experience but I was only to smoke 6 racks of ribs while other teams where smoking 20 racks. We took 2nd in the competition but where the first team out of ribs to serve. I was looking at the Yoder smokers they look awesome but a little more then I was looking to spend. So I kept looking and saw that people where building pellet smokers out of old freezer so my search started for an old freezer. It was no easy task, after some time I came across an old freezer for free! So I convinced the wife to jump in the truck and go get it. It wasn’t in the best shape but the guy had already gutted most of the heavy parts because he used it to cold smoke cheese!
That’s all I got for now time for work! I’ll try and get pictures up if I can figure it out!
 

Attachments

  • FE97C71C-D069-44B9-ABF9-D0307AF66C25.jpeg
    FE97C71C-D069-44B9-ABF9-D0307AF66C25.jpeg
    135 KB · Views: 155
  • C63CA14B-31BE-41D6-8E34-282D6DCC0DD6.jpeg
    C63CA14B-31BE-41D6-8E34-282D6DCC0DD6.jpeg
    122.9 KB · Views: 155
So you convinced the wife to jump in the truck an go get it? LOL. One heck of a wife.
 
  • Like
Reactions: fivetricks
Can of spray paint and she'll look great. In the end, it's all about the quality of the food coming out. What are you using for a heat and fuel source?
 
I'd stop right there and consider a few things....
You could put a heating element in the bottom for temperature control, with an outside controller. Lot's here use an Auber. I use an Ink Bird, but it is limited to 200° or 210°.

Then, use an AMNPS full of pellets for your smoke. And I'd use an external smoke box, like a Mailbox Mod, on the outside of your freezer. That way you could tend to the smoker part without opening up the big door and setting everything back.

Pellet smokers have several drawbacks. And those are why I didn't get one.
I went pellets myself, with the above method. I have my MES 30, with standard heat control, or with my Ink Bird for ambient to warm smoking. And the AMNPS smokes for 11 hours if I fill it.
Absolute control.
 
  • Like
Reactions: klower181
Thanks for the advice on the different ways to heat it. I considered going that way but liked the pellet smoker on my traeger and looking at others builds that used pellet hopper so I pulled the trigger on the smoke daddy! I also should’ve mentioned that the smoker is all done just sharing my story of the build because I feel like I got so much from everybody on here! Might take me awhile to get it all up and on the form!!
 
E39F5096-A4BE-4DCC-BE34-A3BCF0F99DF3.jpeg
CF642131-1322-414E-BDD4-F5F28B8D4445.jpeg
9CD9C18F-DCD3-479F-9B47-A4A2402F02BD.jpeg
E39F5096-A4BE-4DCC-BE34-A3BCF0F99DF3.jpeg
CF642131-1322-414E-BDD4-F5F28B8D4445.jpeg
9CD9C18F-DCD3-479F-9B47-A4A2402F02BD.jpeg E39F5096-A4BE-4DCC-BE34-A3BCF0F99DF3.jpeg
I disassembled every and took out the old insulation as it was smelly and had been wet by the looks of. Then I got the grinder out and started the long long process of sanding it down! Was able to get it down to the bare metal which was what I was hoping for.
 
  • Like
Reactions: texomakid
Watching this thread. Looks like a lot of work but the pure satisfaction of building your own pellet smoker would be off the chart. Very cool. Keep the pics and info coming. Good luck with your build.
 
I like what you're doing. I checked out Smoke Daddy's pellet unit. Looks perfect for your unit. Don't know if your unit can handle 400 degrees though.

By the way, I'm way jealous of your shop.
 
I like what you're doing. I checked out Smoke Daddy's pellet unit. Looks perfect for your unit. Don't know if your unit can handle 400 degrees though.

By the way, I'm way jealous of your shop.

Hey thanks shop was awesome during the smoker build. Spent a lot of my evenings in there!

Well after what seemed like forever the rust was pretty much gone. The next project I decided I need to tackle was the back wall. The back wall was really bad from all the rust. It full of holes, not sure what I was going to do with it at first. I decided to head to a local welding shop to get a price quote for a piece of 18ga. Steel. I want to have them cut it because I have never messed with cutting steel. I got the price quote back and decided I would just buy the sheet of steel from the welding shop. I headed off the the garage with some cutting wheels for the grinder. Took some measurements of the back and got it all marked on the new piece of steel. Took my time and double checked everything because that sheet of steel wasn't too cheap. I started cut and it turned out pretty good considering I had never cut with grinder. I painted the back with rust stopping paint. I used pop rivets to attach the new piece steel.

The back of the freezer after grinding the rust. Lots of holes

IMG_0038.JPG


Painted back with rust stop.
IMG_0049.JPG

The bottom is a another post

IMG_0063.JPG

The new piece of 18 ga. Steel.
 
  • Like
Reactions: ELKHNTR
Well the next thing I did on the freezer was cut the bottom out. It had a hole in it and was raised up for the compressor. After I cut it out I cleaned all the rust up and painted the bottom with rust stop. I cut a new piece of 18 ga. To fix the hole. This was all on the out side shell. The inner shell only had a small hole so I cut another piece for that too. I riveted both piece in.
EF41ECE0-38B1-4722-8635-944FD63F4656.jpeg


Next I took off the door and cleaned that all up and paint the inside with rust stop.
9047274D-22ED-41EC-9E44-43FBCEA0ECC9.jpeg
FCF1CB73-B858-4BD4-9237-A06AE4F5AB9B.jpeg
 

Attachments

  • 1A7EFCEE-1554-43E5-A9E0-2F54F2E4EE02.jpeg
    1A7EFCEE-1554-43E5-A9E0-2F54F2E4EE02.jpeg
    148.8 KB · Views: 112
A582B1AC-99E3-4E6C-AF91-E10F15CC43B3.jpeg
E1EB1AAB-A8BF-412E-96B3-0A3CA6CB5691.jpeg

7D1F7A7F-F911-4908-8D38-1CB16F6AE9C8.jpeg

The top of the shell had some pretty big dents in it. I took out the hammer and started popping some of them out. It worked pretty good. Kinda hard to tell in the pictures.

I got the dents out the best I could. I decided I would try to use some body filler to smooth it out. That was kinda a fun learning experience, definitely takes a lot of patience and sanding that stuff makes a dust mess. It turned out pretty well for never doing it before.
468C5037-F6F8-4D28-A76B-1027D99FD6FB.jpeg

22BDA485-FA50-448C-97C6-AA716F4E3257.jpeg


I also cut the hole in the side for the smoke daddy pellet hopper. I cut a vent in the back for air vent. I used a old floor register vent that way I could adjust the flow. I drilled holes through the shell with a 1” hole saw bit.
 
With all my body work done to the best of my patience! I paint the inside of the shell with rust stop paint too. I was so excited to get to the fun stuff and started to mock it up a little. I put the hopper through the hole I cut and bolted it up and it actually fit!!
9E284142-F050-4793-AD8C-2E10C4FE83E3.jpeg


I also bought heat defuser from smoke daddy inc. it’s 13 ga. Was perfect for my build. I followed how smoke daddy directions. Which is using 4 “L” brackets and bolting it to the fire pot. Don’t have any good pictures of the “L” brackets.


A3ADAB6E-4F6B-4D4D-BDC0-9B4E0FBA5078.jpeg

Started measuring where I wanted to put my racks. I cut pieces of 3/4 angle steel. I drilled holes where I wanted all of them and riveted them in. The racks I found for 12$ at menards and had to cut them a little so they would fit.
5EF4B13D-9EBE-48C2-9115-CAF9681AC25E.jpeg

724D1CF4-9733-46D7-9A83-E61615103327.jpeg

Kinda coming together hard to have patience!
 
Well now it was time to take it back apart to get the insulation in! It wasn’t much fun taking it all apart felt like I was going backwards.
I used some rock wool insulation, rated for like 2000 degrees. Very easy to cut but itchy working with it

Door insulation
A9C438A4-88CE-4B63-BC5A-551F368534AF.jpeg

I measured and cut a piece of 18 ga. Steel for the door and riveted it. I was starting to get pretty good at cutting by now!
D2FBE028-EA5A-4605-9952-D4AE21BC5E44.jpeg


Out side shell insulation
3010C981-0125-4FF6-9B0C-90EB762646CE.jpeg
 
Finally I was ready to put my inner shell back in for the last time! Got it bolt in and was ready to cut steel pieces for around the shell!
DB447A61-1BF6-4E82-B2E3-B4A36357D81C.jpeg

The three holes in the bottom is my 1” vent holes. New metal bottom.

Door back on. Had to fabricate up some metal for the door latch to make it latch again. Works awesome
73977560-5F9A-4B5E-8AC3-95E5797F22BA.jpeg
 
SmokingMeatForums.com is reader supported and as an Amazon Associate, we may earn commissions from qualifying purchases.

Latest posts

Hot Threads

Clicky