Another 120 gallon reverse flow

  • Some of the links on this forum allow SMF, at no cost to you, to earn a small commission when you click through and make a purchase. Let me know if you have any questions about this.
SMF is reader-supported. When you buy through links on our site, we may earn an affiliate commission.

socalcooker

Meat Mopper
Original poster
May 12, 2014
229
41
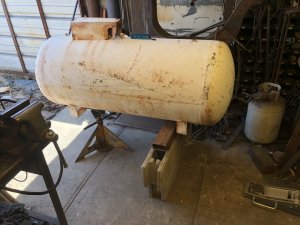
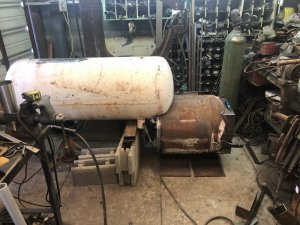
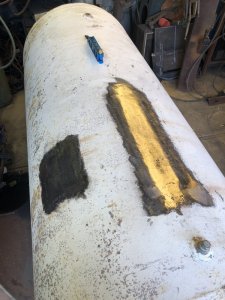
Since the smoker I've been working on is on hold waiting on the trailer I started another one to replace my 60 gallon RF. This section of tank is what I cut off the tank of the other build. This is probably the last time I'll put a door in the domed end. Was a pain to mark the opening and I screwed up that top cut. I used some 1/2" bar to cover the gap and have something to weld to. The bottom of the door will be round to match the tank so I can scrape the ashes out without scooping them. I need some material to finish the bottom of the opening, then I'll start the door.

Thanks for the look, Kyle
IMG_1335.JPG
IMG_1333.JPG
IMG_1319.JPG
 
  • Like
Reactions: hagewood91
Yep , Cut the ends off with a cutting disc on a grinder and weld a plate on there. Much easier to work with than curves which equates to more beer drinking time.
 
I'm all about looks and I wanted the door coming out of the dome so it is what it is now.

Kyle
 
IMG_1346.JPG
IMG_1345.JPG
Made some more progress. It's all welded up. Just needs a lot of grinding. I never intended to cut the bottom so far down the tank. But it was the only way I could get rid of that double wall inside the dome weld. Ended up using 3 pieces of flat bar to fill that up. I can't bend something wide and thick enough is the reason I had to use all the pieces. After I clean it all up I'll move onto the door and hinges.
 
  • Like
Reactions: hagewood91
Before welding the hinges/door to the FB, place nails around the door opening to space the door about 3/32" off of the opening... 2 things... that will allow the door to remain in plane with the FB and allow room for a gasket to insure an airtight seal... best to get you gasket material first to insure a good seal...
 
I'm doing the door like an air tight wood stove with the rope inside a channel on the inside of the door.
 
Got the door fabbed and welded up. I'm trying to do this build with as much on hand or scrap material as I possibly can. Hence the 3 piece door. It warped a little which I'm not really surprised from all that welding. I'm going to put it in my press and see how close I can get it back to flat. I cut the intake opening also. Going to do a vertical slide with a cable kind of like a Santa Maria grill. I used a saw tooth slide on the last smoker. But I'd rather have it infinitely adjustable, rather than set points of opening.

Kyle
IMG_1372.JPG
IMG_1373.JPG
 
  • Like
Reactions: hagewood91
IMG_1378.JPG
IMG_1385.JPG
IMG_1387.JPG
Door is getting close to done. Vent is finished. Liking how the cable setup is functioning so far. Got the gasket in place. Going to start on the hinges and latch next.

Kyle
 
IMG_1396.JPG
IMG_1394.JPG
IMG_1389.JPG
Hinges are done. I like the angled look I'm going to cut off the corners near the pivot so the don't stick out. Also picked up some heavy chain to use for the CC hinges. Going to figure out how I want my latch tomorrow.

Kyle
 
IMG_1410.JPG
IMG_1407.JPG
I was able to get the handle and latch done except for the spring handle part. I might add a brace onto the latch portion. It seems to flex a little to much when I push the handle into the slot rather than compressing the gasket. It's 1/2"X1.5" but I guess it's sticking out there far enough to move. This will be the last update on this build for a while since I got a trailer to finish my other build.

Kyle
 
79594A28-C4F0-4E6B-AD11-9DE5DAB72E8B.jpeg
82550E3D-FCB6-42C5-AEE1-29E835D2F653.jpeg
38CAC16E-6DB5-42E6-BD60-F2688C47ECC0.jpeg
825C9FE2-0ACF-4F9B-B59D-F4BAACB5C0C4.jpeg
Been a long time since I’ve been able to work on this. Just got going on it again in the last couple weeks. Cut out and patched where the valves were and the name tag was so rusted I decided to just cut it out and patch it as well. I cut the opening from FB to CC and got them welded together. It’s a real pain lining everything up with a round FB compared to square FB. This was supposed to be my smoker originally but a friend wants to buy it and I found a really cool tank that I’d rather keep for myself. I think it was an old boiler tank all hot rivets no welds.
 

Attachments

  • 9452E640-ECEE-4E3B-8175-E5C2D155B66E.jpeg
    9452E640-ECEE-4E3B-8175-E5C2D155B66E.jpeg
    141.7 KB · Views: 11
  • E144BC59-B131-4807-80EF-D5AE48B8F95E.jpeg
    E144BC59-B131-4807-80EF-D5AE48B8F95E.jpeg
    162.5 KB · Views: 10
  • 6263E2A8-7A79-4705-9190-8C580DEA35DB.jpeg
    6263E2A8-7A79-4705-9190-8C580DEA35DB.jpeg
    162.7 KB · Views: 11
  • BF1F155C-9897-4090-A934-C60E65844818.jpeg
    BF1F155C-9897-4090-A934-C60E65844818.jpeg
    308.9 KB · Views: 10
60ADF94B-1083-47DC-9B05-CB9079EF977C.jpeg
385AA6EA-5294-43E3-A923-3AD31A4B4071.jpeg
Got the cook chamber door cut out today and the opening from FB to CC. Door warped a little but didn’t look like it was gonna be to bad.
 
Adding air inlets to the top of the FB allows for better temp control and less fuel consumption... Many on this forum has employed this addition with great success.... Doing this will move the excess heat from the FB to the CC, without adding extra air that fuels the fire.... It works well..

Smoker exh and int 3 Ahumadora.jpg Smoker Exh and Intakes 2.jpg
 
Not a fan of the upper inlet. I put one on my first build and it’s always closed.
 
Not trying to be an a-hole.... but, I'm guessing you didn't take the time to learn it's qualities.. Just sayin'.. because the the many thumbs up responses from the members that have added it to their smokers and how much it has improved their smoker qualities, is some sort of proof about it's worthiness...
But then, I'm not trying to convince you, just trying to add another tool to your arsenal of fine smoked meats...
After 30+ years of smokers not having an upper air inlets, it's a difficult NEW idea to wrap one's head around...
The first upper air inlet I installed on a wood burning device was a camp stove for my tent... That was in the 70's... The wood burned cleaner, I used less wood and it helped sweep the moisture from the stove without adding air to the fuel... No more dripping creosote on the floor, (carpet in my tent), no more creosote build up in the stack.. The upper air inlet added combustion oxygen to the volatiles produced in the combustion process consuming those nasty volatiles..
It can also reduce the creosote on meats... Here is an example of a ham... the upper air inlet to the pellet burning box, I think reduces those nasties...
Note the clean layer of smoke on the ham.....
If you think I'm being a jerk, click on my avatar and in the upper right corner is an ignore button... Dave
ham-006-jpg.368236
 
  • Like
Reactions: firecracker cs
I put it on my first smoker based off of info from this site. But I’m able to control my temps better with it closed. Temps fluctuated much more when trying to use it. I also get a very clean burning fire with no visible smoke most of the time. Not sure why it didn’t work out on my cooker but the second build I didn’t put it and that smoker works perfect with a clean burn. I’ve used my first smoker for 2 years now and there’s little if any creosote buildup on the inside. After the two builds I didn’t see a reason to add it on this one.
 
  • Like
Reactions: ahumadora
Got a lot done in the last couple weeks. RF plate and drain are in. The RF plate has a half inch drop from the ends to the center. The center section I tacked to the tank then pushed down to make a trough. Poured some water in there and it drains pretty well. I put a flat spot on the FB for a pot or to pre heat wood. Finished up the grate and the rails for it. The door fortunately did not warp that I could really notice. Got it back in and the seal all tacked to the door and the tank. Once I get it all welded up I’ll cut it away from the tank and tack the hinges on.
6E0FE3AF-6A1C-402E-8087-2D4C7959BA81.jpeg
B912F1B0-B78C-406E-80EA-AFA5E8BAC606.jpeg
0BBE6CBC-27BF-4394-8726-84BC539292B3.jpeg
0BE72C19-485B-4396-B718-7A9EADF6A157.jpeg
 
  • Like
Reactions: Walchit
44733C9A-672D-4498-98D5-4F67E16E36D0.jpeg
4FADF632-9088-45CD-AC3F-EBD7CBD583ED.jpeg
30B18D1C-8B3F-44D7-A749-498AA4C69272.jpeg
442D76B4-F4CA-4713-AF81-D3E2551ED30D.jpeg
69D56367-D50C-47D6-BAEE-E90D592F6DF6.jpeg
46DFDB3F-CB9A-416B-8FBF-9101D8CE5DF7.jpeg
Got a lot done over the last few weeks. Door and counter weight are done. Exhaust is on there along with the cap. Grate is done. Base is all done except wheels. Put in temp probe ports. Got the firebox door put back on. I spent most of today cleaning up weld spatter and filling and grinding cosmetic stuff. I did finish the firebox door handle today though. Put bronze washers on the firebox hinges, air adjustment, and firebox air inlet adjuster.
 
86492E84-1067-4943-BDD2-E16A913F51AE.jpeg
7631AD9D-EFB4-4D38-AAFE-4772D42B3F77.jpeg
BAA12A13-A1EF-4ED9-9074-96817E2D9340.jpeg
32034D19-8287-45F7-BB75-AA02D7465612.jpeg
24A3B89C-24E9-4255-9E02-A6D86286166D.jpeg
F0EB1A5E-C5A0-41BF-B2E2-EA64C5809D51.jpeg
B0161EBC-664E-4499-8B51-ABD9B0348623.jpeg
Finally finished this smoker. Put some casters on it, fabbed the charcoal basket, a fire poker, and an ash clean out tool that doubles as a way to pull out and push in the charcoal basket. The charcoal basket is pretty heavy. I put platform grate in the bottom and expanded metal over that. My buddie came and picked it up on Saturday. He is going to do all the paint and finish work himself. Gave it a test fire, one chimney of lit coals and one split took about 40 min to heat up to 225. I added another chimney full and one more split took it to 300 then backed it down to 250 and held for quite a while with the vent only open about a 1/4”. This is the first time I’ve ever had a smoker running with bare metal in the fire box you can see how hot they get.

Thanks for the look
 
SmokingMeatForums.com is reader supported and as an Amazon Associate, we may earn commissions from qualifying purchases.

Latest posts

Hot Threads

Clicky