Analog Masterbuilt MES35B Mods for AMNPS

  • Some of the links on this forum allow SMF, at no cost to you, to earn a small commission when you click through and make a purchase. Let me know if you have any questions about this.
SMF is reader-supported. When you buy through links on our site, we may earn an affiliate commission.

mrsmoklestein

Smoke Blower
Original poster
May 10, 2014
77
21
Fond du Lac, WI
I decided to start a thread about modifications for the Masterbuilt MES35B which is an analog (not digital) unit as there was very little information about modifying the unit to gain enough airflow to run the AMNPS unit. The stock unit only has a 7/16” exhaust hole in the back which will not be sufficient for running the AMNPS unit.

My upgrades include:

4” river country damper added to the top of the unit for exhaust.

A 3/8” bolt and nut plugging the existing exhaust hole.

A 2” river country dial thermometer replacing the standard stock door thermometer. If you want to get really fancy you can order a Telltru.

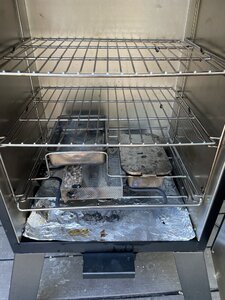
Opening up (drilling) the existing drain hole in the bottom of the unit to 3/4” and adding an additional four 1/4” holes around that drain hole for additional intake oxygen. This will ensure drippings only leak into the drip pan while bringing in enough fresh air to keep your AMNPS lit.

AMNPS runs like a champ on my unit with these mods!
24847823-1FB1-462B-84A6-1CE973DF20B6.jpeg
2B8D827B-3F20-4F45-9D80-24D5FFF89B6D.jpeg
8BB1A329-0232-493F-B104-05C27E08FD9F.jpeg
2BDF9FF9-4C40-4A53-9899-764D81D774CD.jpeg
45F3FF71-4E58-42FE-854A-AC9CA39BE799.jpeg
 
Looks good.
I think you will find the isn't much info, because most go the digital route. I did, even knowing I would probably have to make my MES 30 my own with several modifications.
I considered the model you have, but decided to get the next step up to digital at the time. And I shucked getting a probed unit thinking I would get my own temperature monitoring, which I did.

I like what you've done.
The ventilation to allow more air in is good. If it hadn't have worked out, you could step the 1/4" holes out until you got enough air to keep your AMNPS happy. But it sounds like it is working good for you.

One of my modifications was to remove the damper plate entirely, and ultimately attach it to my "Mailbox Mod". But in reality, both stay wide open anyway. And I fashioned me up a stack to elevate the smoke coming out of my smoker.

If you ever do get a hankerin to have a digital control, you are ahead of the game because you could set your analog temperature control at your maximum temperature, and let the external control run the element by sensing the IT of the smoker box and cycling the element on and off. A simple Plug and Play to go digital with a PID.
From the looks of it, it looks like your MES35B has insulated walls, or at least double wall construction. (But I'm betting it is insulated) So it will help maintain the temperature good.

I think you are all set to enjoy your new smoker to the max. Good work on the Modification!
 
  • Like
Reactions: mrsmoklestein
Man that' gotta be the cleanest smoker I've seen. :rolleyes: Nice job modding it. Looking forward to seeing it in action.

Chris
 
  • Like
Reactions: mrsmoklestein
I think Ill eventually get around to the mailbox mod as it just makes sense in every way but I wanted to knock out the basics because I have a batch of buckboard that will be done curing on Christmas day and plan on giving out a few packs....but only to the people I REALLY like haha. (Thanks Bear and OldFatGuy for steering me in the right direction).

I wanted a stack as well but I think it won't be too difficult in the future as Ill just cut out the area where the small damper holes are right now and extend a stack....then mount the existing damper plate on it with perhaps a rain cap.

I figured with what I have here it would be some help to someone who has the unit and wants to do some quick mods to get it working well.

It won't be clean for long though!

BBB pictures to come
 
I wanted a stack as well but I think it won't be too difficult in the future as Ill just cut out the area where the small damper holes are right now and extend a stack....then mount the existing damper plate on it with perhaps a rain cap.
If and when you decide to do this , keep this in mind . Local muffler shop . They can fab you a stack . Flare or swedge on one end weld a stud on the inside of the other . use a 4 " blank electrical cover for the damper . Also , depends on the wall thickness of your smoker , but Stainless steel sink drain / garbage disposal connections can help close a void if insulated .
 
I have the same smoker and I can only get decent smoke when the temperature is around 300 degrees. When the smoker is 225, the chips just turn a little black and smoke is minimal and it is not thin and blue. I bought the A-Maze-N Pellet smoker and I had to keep relighting it with my torch. I guess not enough airflow is the problem.

Your mods look like a good solution, but I have a few questions:
  • It looks like your intake holes are above where the drip pan sits. Do you still use the drip pan? If so the drip pan blocks the intake holes? Is that not an issue?
  • Where do you put the AMNPS unit int he smoker? Do you put it in on one of the racks? I believe that is what the manual says to do or did you put it where the stock chip pan sits?
 
I just bought this same smoker and used it twice unmodded.

It's a very clean looking smoker. I actually think it looks better than the nicer ones with a window, or with a digital control. I wanted something very simple and clean looking.

Like the OP, I noticed that this smoker lacks airflow--even for it to perform properly without any pellet trays. I've used it twice, and have noticed that it takes too long to start smoking, and when it does start smoking the oven temp is too high for my liking.

These things have 1500W heating elements, so it's not a lack of power...

I noticed that if I left the door unlatched (additional air low and insulation loss) then it will smoke no problem at 200-225F and smoke relatively quickly w/ wood chips.

The only problem is that the smoke will escape around the door area (and yes, lots will still hit your food).

I'm basically going to do exactly what the OP is doing! I'm not going to use the Pellet maze yet, but I'm still going to focus on wood chips. After the mod, I expect the smoker to smoke the food for longer, and at lower temps, AND much less fussing about. I expect it to be pretty much "set it and forget it" soon!
 
Last edited:
Here's me doing basically the same thing as the OP. This is a bit of work in progress since I am currently dry-running. Unlike the OP, I didn't care about plugging up the rear hole (I argue that it will make zero difference) and keeping that hole clear can allow for a probe to be installed.

I drilled 4 1/4" holes just like the OP did for a little bit of intake.

I installed the same damper and the same thermometer.

I found the crux of why out-of-the-box, my unit wasn't "perfect" (serviceable, yes as it made good smoked meats). The primary reason is because the thermometer read 20F higher. This was part of the reason. The second reason is by design, Masterbuilt bets on door leakage to basically be where you will get some exhaust flow. This is likely less than idea since you want the smoke to move up through your food (which is still mostly does) instead of allowing some of the smoke to escape laterally. I don't think this is a big deal, but just a point.

After the mod, I let it pre-heat and loaded some dry chips in the chip tray. I, for the first time, latched the door tightly instead of allowing it to be sloppy/lose.

It started smoking pretty much away in short time without too much waiting at all. I had the damper all the way open. A few moments later:


0.jpg

0.jpg

0.jpg


Holy crap! In about 15 minutes, my chip tray was completely burned out! This is an example of too much smoke. Essentially, the damper is too large for using the factory chip tray over a long smoke period. BUT, if you are cooking a very small piece that just needs additional smoke fast, it seems like this new "setting" (still too much) may be a really cool thing for the factory chip tray? Maybe this setting will come in handy for loading a couple pieces of charcoal in the chip tray for additional flavor?

I powered it off and put in new chips. This time, I closed the exhaust damper by 90%. I loaded the chip tray by about 60%, and just finished timing it at about 30 minutes. That's about correct.

This is about the correct damper setting for me, for 225F, long-last medium smokage (probably where you want it for ribs, slow-cook items):

0.jpg

Here is the smoke (it's 100F outside) that this generates...thin blue smoke:

0.jpg
 
So what this upgrade did for me was :

1) 20F closer to "actual" temp (confirmed with my separate Thermaltake probe) all just by getting a better door thermometer.
2) Made unit smoke much faster/easier
3) Separated "smoke" and "heat" setting to allow for a greater degree of control.
4) Allows me to "oversmoke" if not careful...however, this feature may come in handy for pellets or for charcoaling. Conversely, also allows me to "undersmoke" by shutting the damper completely off since I now have the door tight.
5) A good 70% of smoke is now exiting through the top, which means more smoke moving over meats. Before, 100% of smoke would exit from the door.

0.jpg


If you guys are interested in a pellet dry run, I may do that soon....
 
Let the smoker cook down. Filled up a row of apple pellets. Didn’t do the microwave thing. I also let them burn for about 3-5 minutes. Blew on them to make sure they were red hot and good to go.

The modded MES35 seems to have a great place to support the A-maze-N. Right under the water bowl to help shield it from drippings.

CCBB9129-4EF2-4F56-B784-CEA955819042.jpeg


I noticed that pellets put out more heat than the little chip tray, so I had to find a new 225F setting on the analogue dial.

seems that the damper puts out plenty of smoke (wouldn’t want any more) at half way.

pellets are burning nice and slow and should last a very long time with what I’m seeing so far.

93D7868E-F9D8-4F75-8A34-A765D8DE210D.jpeg

D299B1A4-F4C7-4734-8510-156A06E012DA.jpeg

92D3682B-B7BC-4A12-BD09-5576AA140B37.jpeg
 

Attachments

  • 2AF7097F-1E9D-4016-A4E9-6380658177C6.jpeg
    2AF7097F-1E9D-4016-A4E9-6380658177C6.jpeg
    179.9 KB · Views: 40
We cooked both a large and small babyback pork racks without breaking them down. A rack of beef ribs should fit.
 
We are super happy with how this performs. Keep in mind we are totally noobs. Smoke flavor is plentiful and it's the best way that we know up to this point to BBQ.

We've cooked the best pork and beef ribs to date by a landslide with this MES.

203872321_10158317372939021_3849085490277430627_n.jpg

204527419_10158317373129021_3552807359840382344_n.jpg

201588235_10158317373104021_1804048453687389412_n.jpg


203078340_10158318308989021_7217896449069989660_n.jpg

202327989_10158318309154021_4670214351547853863_n.jpg


No smoke ring, but unmistakably smoky (the pork ribs were max for me). Both the beef and pork ribs were juicy ,tender, and cooked perfectly.

Not a direct comparison, but we have significantly more smoke flavor than my neighbor gets on his Traeger.
 
  • Like
Reactions: newnewguy
Let the smoker cook down. Filled up a row of apple pellets. Didn’t do the microwave thing. I also let them burn for about 3-5 minutes. Blew on them to make sure they were red hot and good to go.

The modded MES35 seems to have a great place to support the A-maze-N. Right under the water bowl to help shield it from drippings.

View attachment 500489

I noticed that pellets put out more heat than the little chip tray, so I had to find a new 225F setting on the analogue dial.

seems that the damper puts out plenty of smoke (wouldn’t want any more) at half way.

pellets are burning nice and slow and should last a very long time with what I’m seeing so far.

View attachment 500491
View attachment 500493
View attachment 500494
Reviving this thread because I am reviving an analog smoker for fun and came across this thread. One question I had with the damper and holes at the top..since the top is double walled with air space in between, did you seal the walls for each hole? I noticed some have sealed with RTV when adding a smoke stack (seems easier due to access) but wasn't sure if you had just drilled the holes and added the damper and left it at that..would love any insight on that particular piece!

Again, I am just trying to bring the ol analog back to life so not going crazy but figured I would ask.

Thank you!

The damper at the top "sqeezes" the metal together. I never noticed and reduced temp capacity for mine. Just drilled holes and moved on!
 
SmokingMeatForums.com is reader supported and as an Amazon Associate, we may earn commissions from qualifying purchases.

Latest posts

Hot Threads

Clicky