We made a smoker!

  • Some of the links on this forum allow SMF, at no cost to you, to earn a small commission when you click through and make a purchase. Let me know if you have any questions about this.
SMF is reader-supported. When you buy through links on our site, we may earn an affiliate commission.

Fischerman

Newbie
Original poster
Jan 16, 2023
10
18
BA5EB0CE-123A-4FE2-9644-C62718947991.jpeg


After 4 months of redesigns and waiting for various parts our custom smoker is finished!

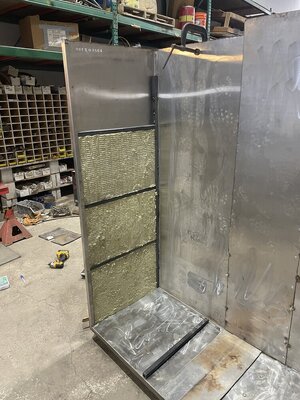
Started with an old commercial fridge and some stainless steel cabinets/tubs purchased from a neighbors junkyard pile.

00ECB2E1-383F-4FA4-9C10-F0E542EDAFE1.jpeg


Fridge had non heat rated insulation so we ended up having to strip it down to bare metal. Pretty much only salvaged the doors and hinges from it.

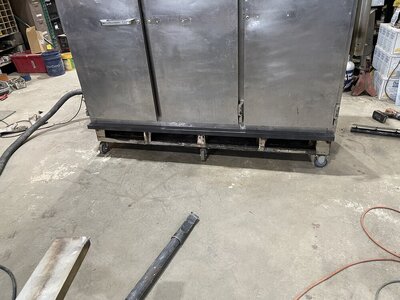
Fire box and base fabrication.

22DAE4A3-21AE-4C18-89B0-815D5E21F596.jpeg


03D01FC4-AFDC-4C67-BD8C-CB6195A74FEA.jpeg


37CD6225-FF32-484D-A04D-D0A795271F37.jpeg


Used 1” mineral wool for insulation, fit into 1” tube steel frames. Stainless steel sheets to cover.

8C00C280-266B-469D-99CC-4DA51CE0CD63.jpeg


CECADE9B-1001-4050-BE3F-F01033AEF24F.jpeg


1/4” steel plate directly above the burner for thermal mass. Went for a reverse flow design in hopes of more even temps within the cooking chamber. Heat flows from the fire box up through a 1” channel on the outsides into the top of the cooking chamber. Exhaust exits the cooking chamber on the bottom and flows out through the 1” chamber back middle.

A711E128-81B3-44F2-A425-22031A89E656.jpeg


AB56667E-8E4C-45F7-8601-3363BCD45F24.jpeg


Thanks to old posts found on this site we were able to install an automatically controlled propane heating system. Pilot with thermocouple safety valve into an electronic solenoid valve into a propane tube burner. Auber wifi controller used to operate the solenoid valve. Mechanical bypass valve used for preheating and/or use without wifi.

DC0E69A4-FF4B-4DBC-8784-293C9764C1D4.jpeg


C5C9393A-34EF-4151-97C3-197DFC5C8DA1.jpeg


82158982-7AD4-4EE3-8B62-AC9E28A0E30B.jpeg


DFB8159E-7C5C-4207-98D7-74A2C0076232.jpeg


Doors were next and they were the biggest pain. After stripping the non heat insulation the frames were weak, in hindsight we should have reinforced them. Or better yet we should have fabricated our own….was a nightmare getting the seams to seal. Waited 6 weeks for a custom 1” heat gasket, have 60ft of it left if anyone needs some lol

978320EF-9479-406C-BED1-08464EACBD2B.jpeg


C473D335-59FB-4952-B6E0-ED5FDD100A2A.jpeg


3E62B921-0B15-46E0-B4FD-257D8B889150.jpeg


While waiting for the custom gasket we tested it and found some issues. The burner would extinguish itself once it got hot. After some advice from the fine people here we rectified three issues. We removed 80% of the angle iron channel the burner was resting in, allowing air to flow around the burner. We increased the intake air vents around the firebox. Finally we added circulation fans to help promote the reverse air flow design.

6D75E5FC-9165-4304-81A1-A836C0AB77A9.jpeg


300B82C0-6A15-45EE-9BEC-67461926E0C0.jpeg


Next came the interior shelving, electrical wiring and smoke generator.

6D604136-C8A8-422C-B18E-841D47A95D1A.jpeg

5AB2F5FD-D23A-4BE2-AFE2-43445109CFA4.jpeg


1E37DDF3-2946-4564-BC27-7FE808DCF71E.jpeg


Applied some finishing touches and filled it with meat!

927702A4-8D8D-48C7-89EA-B0FD47F60EA4.jpeg


315DB45C-7324-4C8D-BDDC-D682156DC717.jpeg


46325FAE-2438-4B8D-9D03-2C0F136E85C2.jpeg


38D099DA-478C-482E-B820-641A341757DA.jpeg


DD03204D-381D-4DC7-B9A4-70ED068CCC05.jpeg


B7121F6C-264F-4FE7-BECD-AFAC2F4DA758.jpeg


Overall a fun project and so far a success. This site was super helpful in making this build happen. Please let us know if you see any issues with the design we might have missed!
 

Attachments

  • C3EC85AC-8E3F-4B7A-8470-C6DA260602EA.jpeg
    C3EC85AC-8E3F-4B7A-8470-C6DA260602EA.jpeg
    179.9 KB · Views: 23
  • 056BDBC7-4829-4492-B328-646C72808436.jpeg
    056BDBC7-4829-4492-B328-646C72808436.jpeg
    158.2 KB · Views: 23
Last edited:
Awesome job. Im planing a build similar but pretty much only the size of 1 of the 3 chambers you have, that thing is massive.

Corey
 
WOW!!!! So is it just geared towards jerky and sausage smoking? Or will you be doing butts, ribs and etc also? That thing is massive!!

Jim
 
WOW!!!! So is it just geared towards jerky and sausage smoking? Or will you be doing butts, ribs and etc also? That thing is massive!!

Jim

Yes designed mostly for sausage, we end up doing 300-600lbs a year depending on how many animals we harvest. The smoking was the pinch point that would take days doing multiple batches in the cookshack.

I did crank it up to 275* and it was able to hold temp, not many times we will need 25 pork butts smoked at once but you never know lol
 
  • Haha
Reactions: JLeonard
Nice fabrication and design work. I’m looking forward to seeing what that beast can smoke!
 
Both the smoker and the smoked goods look fantastic. Nice job on both.

Point for sure
Chris
 
Wow, amazing work.

"I love it when a plan comes together." - John Hannibal Smith

Would you share the part number of that gas solenoid valve you used please?

I am trying to set up a PID gas burner control system but have been having issues sourcing the proper solenoid valve for propane gas.

Thanks,

JC :emoji_cat:
1/2" Solenoid Valve

Also need to make sure the power output matches your PID controller. 110v, 220v, 12v, etc

Make sure you also install some sort of thermocouple safety shutoff valve.
 
  • Like
Reactions: JC in GB
That looks like an awesome build and some awesome food as well. It may have taken you awhile to build it but it looks good and probably functions very well now. What kind of fans did you end up using?
 
That looks like an awesome build and some awesome food as well. It may have taken you awhile to build it but it looks good and probably functions very well now. What kind of fans did you end up using?
Auber Circulation Fans

We do have a small issue with the fan setup. We are getting overcooked meat directly under the fans due to the constant flow of hot air. We plan to make some sort of baffle cover to divert the hot air down and into the center chamber without directly blowing onto the meat We may try adding 2 more fans in the bottom of the smoker to help even out airflow as well.
 
SmokingMeatForums.com is reader supported and as an Amazon Associate, we may earn commissions from qualifying purchases.

Latest posts

Hot Threads

Clicky