I started this project 5 weeks ago. Prior to this I had never welded or done any sort of metal fabrication. I bought a cheap welder and angle grinder on Amazon and gave it my best shot. I got so much help from reading and seeing pictures on this website that I feel like I need to post my own thread. Before I started, reading every build helped me learn something, regardless of the style or builder skill level.

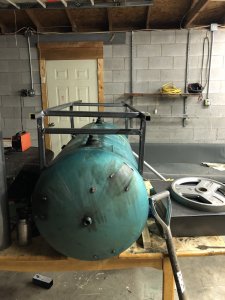
Future Cook Chamber. 80 gallon air tank picked up from a salvage yard. I wanted something a little bigger, but this is what they had and I was anxious to get started.

25 gallon air tank for the firebox.

Tanks are lined up, trying to visualize how they will connect. I lifted the big tank onto the table by myself and threw my back out for a week.

This is the frame for the cook chamber to sit on. It was the first thing I welded. Welding was harder than I thought it would be. I had a lot of stuck rods in this first part. I burned 1/8 inch 6013 rods at 135 Amps on a 220V plug.


The door is cut and hinges added. My hinge welds are not great but better than my frame. My friends all thought I was the first person to put a horseshoe on top as a door stop and gave me a lot of praise for it...it was hard to tell them everyone does that. Cutting the door was a big turning point in feeling like I would finish. I had a little door spring but not enough cause a problem. I cut near the seam but not on it. Based on my understanding of how tanks are manufactured, this is the spot that should have the least tension on it and therfore spring the least.


The plenum was a big challenge. I wanted it to be a different style but felt this was the best I could do with my limited skills. Welding still ugly but progressing--it was a big relief to get the welds more-or-less airtight on the first try, even if they are pretty ugly. Cutting with a 5 inch hole saw took forever; 30 minutes in and it was only half done. I ended up cutting the hole with my angle grinder and using the halfway cut from the holesaw has a groove to place the chimney. This ended up actually working pretty well.


Joining the tanks was obviously the hardest part. I ended up cutting the holes progressively larger until they fit together and even then had to patch a couple places with scrap metal where one hole was misshapen. It took a few days of work to cut little by little but it was worth it. A plasma cutter would’ve been great, but regardless of cutting tool, finding the right shape was just hard. I also spent a few days welding these together. I mostly did the welding inside the CC tank because it was hard to access all the way around on the outside.

The grates were easy and satisfying to make. I made two and built both in about an hour. The rails in the inside of the chamber were hard to get level—because of the placement I couldn't weld them on the bottom side, so the welds are all on the top and had to be very solid.
 I wanted to put one thermometer on either side of the door because I thought it looked good that way and also because i liked the idea of mounting on the fixed wall of the smoker versus the movable door. At the last second, I decided to mount in the middle of the door. My reasoning was that the temperature of the smoke that is about to exit the smokestack (and is therefore already past the meat) doesn't matter as much as the temperature of the air that is about to approach the meat. Because I made the decision late and didn't plan for it well, the thermometer in the door is about 1/4 inch higher than the other one.
 This is the nearly-finished smoker moved onto the trailer. I got the trailer for $150 on craigslist. It was homemade by someone with a car axle and welding skills not much better than mine. I took the top rail down on the sides for easier access and removed floorboards in the back so the firebox wont catch the floor on fire.

Initial burn-out. The inside of the tanks were rusty and had a layer of grease along with something that looked/felt like clay in the bottom. We got the fire raging up to ~700 F. The dials in the picture here have gone around once already. The paint burned off the outside and the inside cleaned up nicely too. While the fire was raging, there was some smoke leaking out of the doors, but once it reduced under 300, there were no issues with that, so I don't think I need to seal the doors any further. A lot of the smoke in this picture is just from the burning paint.
I haven't cooked anything yet, but once it was heated up, I was getting 5 degree difference on my thermometers, which I think is a good sign. It probably indicates there is 10-15 degree differential end-to-end. I can live with that.
Future Cook Chamber. 80 gallon air tank picked up from a salvage yard. I wanted something a little bigger, but this is what they had and I was anxious to get started.
25 gallon air tank for the firebox.
Tanks are lined up, trying to visualize how they will connect. I lifted the big tank onto the table by myself and threw my back out for a week.
This is the frame for the cook chamber to sit on. It was the first thing I welded. Welding was harder than I thought it would be. I had a lot of stuck rods in this first part. I burned 1/8 inch 6013 rods at 135 Amps on a 220V plug.
The door is cut and hinges added. My hinge welds are not great but better than my frame. My friends all thought I was the first person to put a horseshoe on top as a door stop and gave me a lot of praise for it...it was hard to tell them everyone does that. Cutting the door was a big turning point in feeling like I would finish. I had a little door spring but not enough cause a problem. I cut near the seam but not on it. Based on my understanding of how tanks are manufactured, this is the spot that should have the least tension on it and therfore spring the least.
The plenum was a big challenge. I wanted it to be a different style but felt this was the best I could do with my limited skills. Welding still ugly but progressing--it was a big relief to get the welds more-or-less airtight on the first try, even if they are pretty ugly. Cutting with a 5 inch hole saw took forever; 30 minutes in and it was only half done. I ended up cutting the hole with my angle grinder and using the halfway cut from the holesaw has a groove to place the chimney. This ended up actually working pretty well.
Joining the tanks was obviously the hardest part. I ended up cutting the holes progressively larger until they fit together and even then had to patch a couple places with scrap metal where one hole was misshapen. It took a few days of work to cut little by little but it was worth it. A plasma cutter would’ve been great, but regardless of cutting tool, finding the right shape was just hard. I also spent a few days welding these together. I mostly did the welding inside the CC tank because it was hard to access all the way around on the outside.
The grates were easy and satisfying to make. I made two and built both in about an hour. The rails in the inside of the chamber were hard to get level—because of the placement I couldn't weld them on the bottom side, so the welds are all on the top and had to be very solid.
Initial burn-out. The inside of the tanks were rusty and had a layer of grease along with something that looked/felt like clay in the bottom. We got the fire raging up to ~700 F. The dials in the picture here have gone around once already. The paint burned off the outside and the inside cleaned up nicely too. While the fire was raging, there was some smoke leaking out of the doors, but once it reduced under 300, there were no issues with that, so I don't think I need to seal the doors any further. A lot of the smoke in this picture is just from the burning paint.
I haven't cooked anything yet, but once it was heated up, I was getting 5 degree difference on my thermometers, which I think is a good sign. It probably indicates there is 10-15 degree differential end-to-end. I can live with that.